What's New in CCC® Estimating for March 2025
Click here to view the What’s New release notes for CCC® Estimating.
Note: The availability of the features listed below may vary based on the products licensed to your company.
CCCONE.COM - Web Estimating
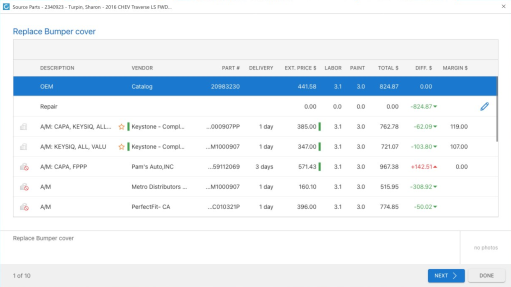
Source Parts: Sorting
Users now have the ability to sort part results returned by column in the Source Parts screen. Simply click the Sort by button and select the desired option.
To access this feature:
- Open a workfile to Edit on cccone.com.
- Add one or more replacement parts to the estimate.
- Click the Source Parts tab.
- Select any green tag displayed on the right-hand side of the estimate.
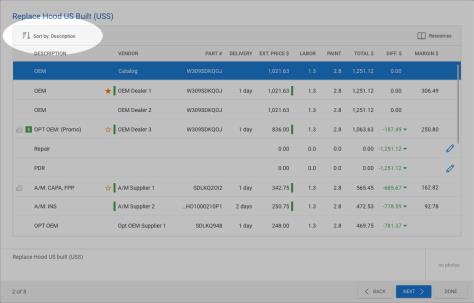
Note:
- User must have the following security permission to edit the estimate: Create and edit workfiles
- When the Source Parts wizard is displayed, focus defaults to the part where the tag was clicked
- Once in the Source Parts wizard, user can review alternatives for all replacement parts on the estimate
- The current part on the estimate is always displayed as the first row in the Source Parts wizard, regardless of applied sort
Source Parts: Usability Enhancements
The following updates were made to Source Parts functionality to improve usability:
Estimate Prompts
Previously, the Source Parts screen would close and redirect the user to the Estimate screen when a prompt was triggered. Now prompts are displayed within the Source Parts screen. This allows users to continue evaluating part alternatives without having to navigate back to Source Parts.
To access this feature:
- Open a workfile to Edit on cccone.com.
- Add one or more replacement parts to the estimate.
- Click the Source Parts button.
- Select any green tag displayed on the right-hand side of the estimate.
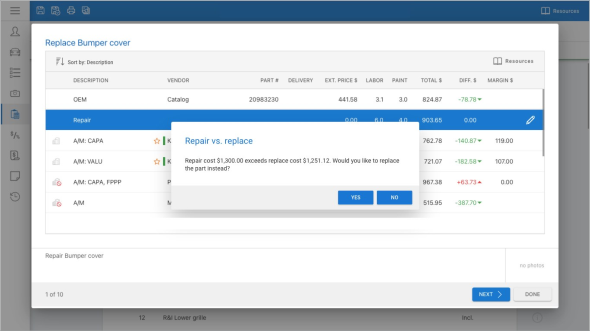
Note:
- User must have the following security permission to edit the estimate: Create and edit workfiles.
- When the Source Parts wizard is displayed, focus defaults to the part where the tag was clicked.
- Once in the Source Parts wizard, user can review alternatives for all replacement parts on the estimate.
- The current part on the estimate is always displayed as the first row in the Source Parts wizard, regardless of applied sort.
Payroll: Preview Employee Pay Detail
Shops enabled with CCC Payroll will now find additional detailed information available within the View Payroll screen in cccone.com. Employee payroll detail now includes the following:
- Gross pay amount
- Tax amount
- Benefit deduction amount
- Post tax deduction amount
Tax, benefit deduction, and post tax deductions also include a detailed breakdown of the amounts for each employee.
To access this feature:
- Go to the Payroll Dashboard on cccone.com.
- Select Edit pay period on the current pay period.
- In the pay period screen, select Finalize pay period.
- After the pay period is finalized, select View payroll from the pay period screen or Payroll Dashboard.
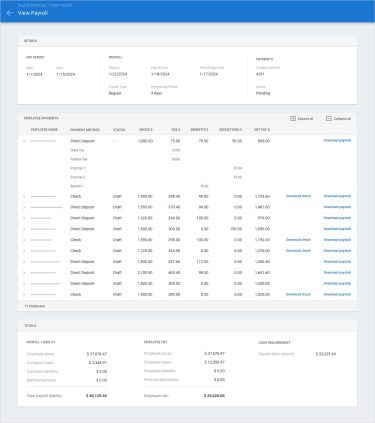
When the View Payroll screen opens, scroll to view employee details. Review the pay totals for each employee. Click on the arrow to the left of the employee name to view pay breakdown.
Note:
- Shop must have the following licensed product to access Payroll features: CCC Payroll.
- User must have the following security permission to access the Payroll Dashboard: Payroll - View the payroll dashboard.
- User must have the following security permission to view payroll details on cccone.com: Payroll - Manage payroll activities as an authorized signatory for the organization.
- Additional pay details in the View Payroll screen is available in both normal and off-cycle payrolls
Payroll: Pay Requests
Shops enabled with CCC Pay Workflow now have the ability to receive and act upon employee pay requests on cccone.com. Employees can submit a pay change request via the mobile app. Once submitted by the employee, the payroll manager can now view and apply or discard pay requests within the employee paysheet. Employees may submit the following requests:
- Pay Adjustment - This is a request to update pay hours on a flat rate/commission labor assignment
- Labor Request - This is a request to have a missing flat rate/commission labor assignment added to the paysheet
- Bonus Adjustment - This is a request for bonus dollars
- Advance - This is a request for advance dollars
Employees in shops enabled with CCC Payroll also have the ability to request the following:
- Commission Adjustment - This is a request for commission dollars
- Paid Time Off (PTO) - This is a request for PTO pay hours
- Sick Pay - This is a request for sick pay hours
When a new request is submitted, both the pending pay period and employee paysheet displays a pay request indicator to highlight the request.
To access this feature:
- Log into cccone.com then select the menu icon in the upper left-hand corner of the screen.
- Select Payroll, then select Pay Periods.
- Open a pending pay period to Edit.
- Select the employee paysheet to Edit.
- Click on a pay request indicator icon to view request details.
- Select Apply or Discard to resolve the request.
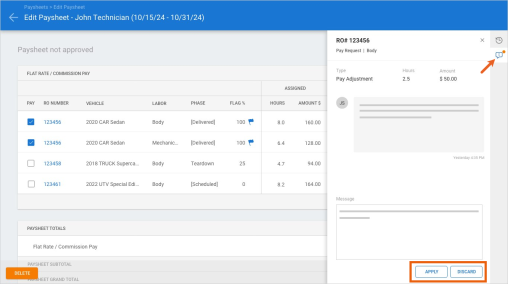
When the pay request is applied, the paysheet is automatically updated with the requested hours and/or amount. When resolving a pay request, the payroll manager has the opportunity to add comments to the pay request. The resulting decision and any comments entered are recorded to pay item history. Pay item history is visible to the employee in the Mobile app.
Note:
- Shop must have the following licensed product to use pay request functionality: CCC Pay Workflow.
- User must have the following security permission to access paysheets on cccone.com: Create, search, view and edit pay periods.
- Employees will submit pay requests via the Mobile app and those requests will be reviewed by managers on cccone.com.
- When the payroll manager finalizes the pay period, the user may be prompted to review open pay requests if any exists.
- All open pay requests must be resolved before the pay period can be finalized.
- Pay request functionality for payroll managers is only available on cccone.com - open requests are not visible in the desktop application.
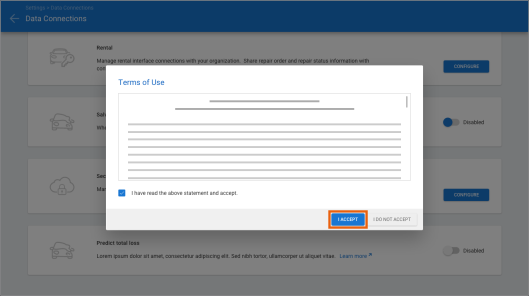
Advance Fees: Activation Settings
Configuration for CCC Advance Fees Services is available on cccone.com. To begin using CCC Advance Fees Services you must first activate data sharing with salvage companies.
To locate salvage data sharing settings:
|
|
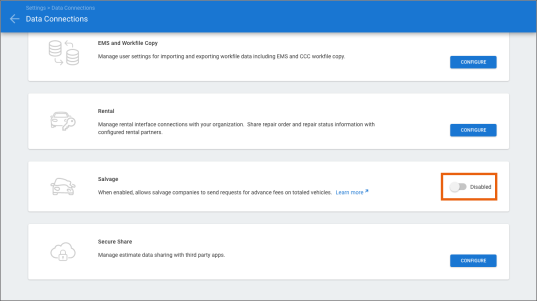
When setting the switch to Enabled, a Terms of Use screen is displayed. Review the terms, then check the box and click I ACCEPT to accept the agreement.
To enable data sharing with salvors, you must accept the Terms of Use. Once accepted, data sharing with salvors is enabled for all shop locations within your organization.
Note:
- User must have the following security permission to enable data sharing with salvage companies: Edit repairer profile.
- You may choose to disable this feature at any time. To re-enable the feature, you will be required to accept the Terms of Use again.
Advance Fees: Receipt Type Settings
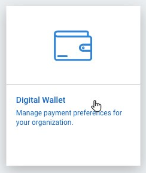
For shops with Repair Workflow, payment receipts are automatically created on the workfile when Payment completed status is received on a salvage payment. By default, payment receipts are created with the EFT receipt type. The receipt type used for salvage payments may be changed in Digital Wallet settings. The user can specify any active, non-Adjustment receipt type for use in creating salvage payment receipts.
To edit receipt type configuration for salvage payments:
|
|
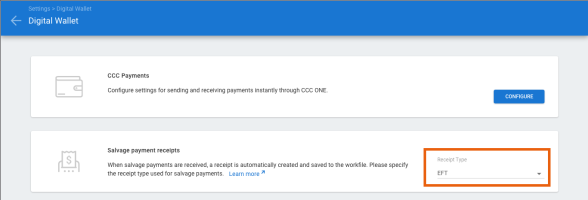
Note:
- User must have the following security permission to access Digital Wallet settings: Manage Digital Wallet.
- If the receipt type specified for salvage payment receipts is deactivated in Receipt Type settings, the system will continue to use the specified type until the salvage payment receipts setting is updated.
- The salvage payment receipts setting is only available to shops enabled with Repair Workflow functionality.
Carwise: Repair Cost Range Settings
Shops with an active Carwise profile now have the ability to enable online photo estimate and instant repair cost range functionality independently. Previously, the shop had to enable online photo estimate in order to use instant repair cost range. Now, shops can enable one or both of these features as desired.
To access these settings:
- Go to Settings on cccone.com.
- Select Carwise Profile.
- Set Online photo estimate with Carwise to enabled or disabled as desired.
- Set Provide instant repair cost range to enabled or disabled as desired.
Note:
- User must have the following security permission to edit Carwise Profile settings: Edit repair facility profile.
- To access photo estimate and repair cost range features, Share you profile on Carwise.com must be set to Enabled.
Production Boards: Scheduled Filter
Shops enabled with Repair Workflow Production Management features will now find a Vehicle Status available in Production Boards on cccone.com. The new filter allows shops to filter board results by the following:
- All - Shows open repair orders regardless of on-site or scheduled status
- On-site - Shows only open repair orders where Vehicle In is marked "complete"
- Scheduled - Shows open repair orders where the Vehicle In date is specified but not yet marked "complete"
To access this feature:
- Go to cccone.com and click the menu button in the upper left-hand corner of the screen.
- Select Production Board.
- Click the Filter button in the toolbar on the upper right-hand side of the screen.
- Update filters as desired and click Apply.
Dashboard results refresh when Apply is selected. The new settings are automatically saved to the board.
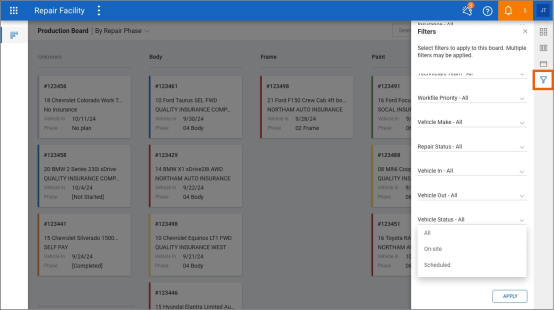
Note:
- Default selection for the Vehicle Status filter is "All"
- Vehicle Status filter may include repair orders marked total loss. To exclude total loss workfiles use the separate Total Loss filter.
- Production Boards is available to shops licensed with the following product: Repair Workflow Production Management.
- User must have the following permission to view Production Boards: Production: View the production schedule dashboard.
- User must have the following permission to edit repair plans via Production Boards: Create, edit, delete, and recalculate repair plan.
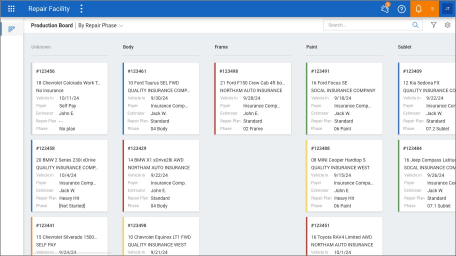
Production Boards: Additional RO Card Data Fields
Additional data fields are available when customizing data cards on the Production Board. The following fields were added:
- Estimator
- Payer
- Repair Plan
To access this feature:
- Go to cccone.com and click the menu button in the upper left-hand corner of the screen.
- Select Production Board.
- Click the Settings button in the toolbar on the upper right-hand side of the screen.
- Select the Card Settings button in the bar on the right.
Add or remove data fields as desired. Then drag the fields to put them in the desired display order.
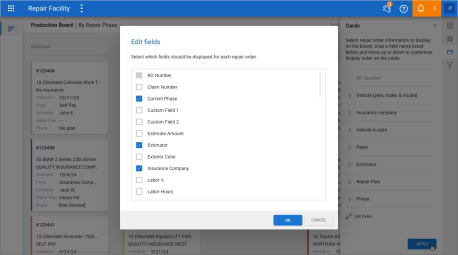
Note:
- Production Boards is available to shops licensed with the following product: Repair Workflow Production Management
- User must have the following permission to view Production Boards: Production: View the production schedule dashboard
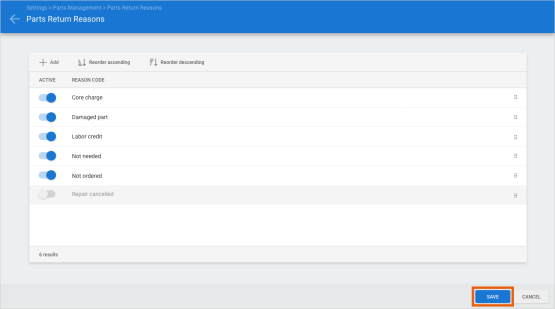
Settings: Parts Return Reasons
Shops enabled with Repair Workflow Parts Management functionality can now manage Parts Return Reasons on cccone.com.
A part return reason is required when creating a new credit memo in CCC ONE. When selecting a reason, the list of available options is defined in settings.
To access part return reasons settings:
|
|
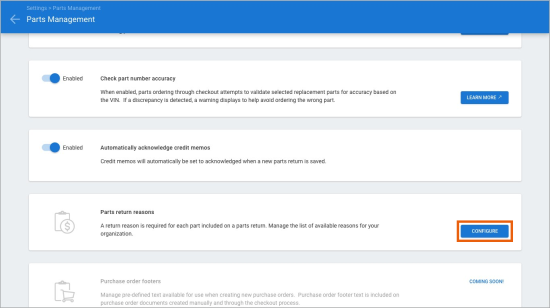
Add new return reasons and activate/deactivate existing ones. When finished making changes, click Save.
Note:
- Shop must be licensed with the following product to access part return reasons: CCWPT - Parts Management.
- User must have the following security permission to edit part return reasons: Edit repairer profile.
- Users with the following security permission will have read-only access to part return reasons: Edit repair facility profile or Search and view profiles (read-only).
- When adding new reasons to the list, reason code name must be unique.
- Once a reason is saved to the list, reason code name cannot be changed.
- Once a reason is saved to the list, the item cannot be deleted - it can only be activated or deactivated.
CCC ONE Desktop Release 51
Sales Reports: Gross Profit/Job Cost Summary (by Repairs Complete Date)
The Gross Profit / Job Cost Summary (by Repairs Completed date) is now available in System Reports under the Sales category. The report provides gross profit details for repair orders where the Repairs Completed milestone is marked complete and within the date range specified. Data is grouped by Sales Account name by default. Details include the total number of repair orders for each Sales Account.
To access this report:
- Log into CCC ONE Desktop.
- Select the Reports menu, then Find Report.
- Select Sales in the report category menu.
- Under System Reports, select Gross Profit / Job Cost Summary (by Repairs Completed date).
Note:
- Shops licensed with the following product will have access to this report: Repair Workflow Repair Order Management.
- User must have the following security permission to access this report: Sales - View sales reports.
- This new report is based on the existing Gross Profit / Job Cost Summary (by Repair Order).
- Sales recognition settings do not impact report results - results are driven by the Repairs Completed milestone status.
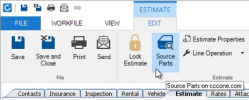
Source Parts: Usability Enhancements
Shops will no longer get redirected to cccone.com when clicking Source Parts on the workfile. Similar to Checkout, Source Parts functionality will launch in a separate fly-out without leaving the workfile in the desktop application. The shop can make all its part sourcing decisions at once and expect estimate lines to update accordingly.
To access this feature:
|
|
The Source Parts fly-out closes and the workfile screen is refreshed. Estimate line detail is updated to reflect alternate part selections.
Note:
- User must have the following permission to access Source Parts and update the estimate: Create and edit workfiles
- Source Parts includes all part lines with replace, repair, or section operations.
- Replace and Section lines may be changed to Repair lines (and vice versa) via the Source Parts fly-out
- User must click Done in the Source Parts fly-out for alternative selections to be saved to the workfile
- If user cancels out of the Source Parts fly-out before clicking Done, system displays a warning that changes may be lost
Diagnostics: Recommendations Supports Multiple Scan Providers
Diagnostic Recommendations now supports multiple scan providers when retrieving diagnostic recommendations on the workfile. If more than one scan provider with ADAS services is configured, the user is prompted to select a provider when getting diagnostic recommendations.
To access this feature:
- Open a workfile with a standard vehicle.
- At the top of the workfile screen, select Diagnostics.
- If prompted with a list of providers, click on a provider.
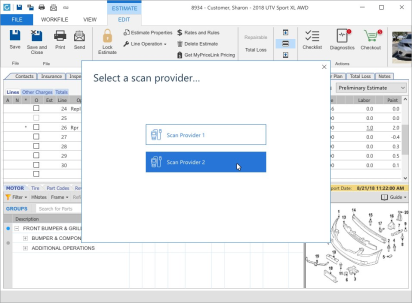
Once a provider is selected, diagnostic recommendations are retrieved from the specified provider. The Review Diagnostic Procedures screen is displayed so the user can select procedures to add to the estimate.
Note:
- Shop must be licensed with the following product to access the Diagnostics Dashboard: CCC Diagnostics Workflow
- User must have the following security permission to access diagnostics recommendations within the workfile: Create and edit workfile
- Each time the Diagnostics action is triggered, calibration recommendations may appear
- Calibration recommendations are contingent on scan provider participation - some scan providers may not support calibration recommendations
Diagnostics: Recommendations Enhancements
More information is available in the Review Diagnostic Procedures screen access from the workfile. The following updates were made:
- Updated sort order of procedures
- Added columns for System, Sub-system, and Level
- Added Level, Labor Type, and Labor Hours to the recommendation detail fly-out
The list of procedures now sorts information as follows:
- Recommendations from a scan provider are listed first, followed by the shop's configured procedures
- Procedures are then listed by scan type in the following order - Pre-repair, In-process, Post-repair, then Calibrations
- Following scan type, procedures are listed by Description, then Level value
Additional Columns System, Sub-system, and Level columns were added to provide more information on screen for calibration recommendations. Previously the information displayed in these columns was only visible in the detail fly-out launched when clicking the purple pulse icon.
User clicks the purple pulse icon to view recommendation details. This fly-out was updated to include Level, Labor Type, and Labor Hours.
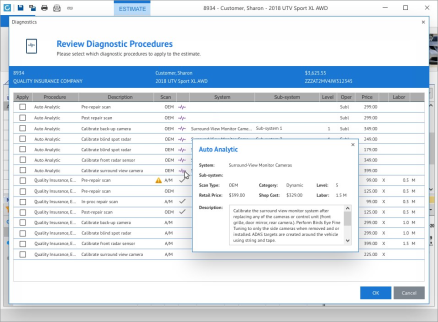
To access the Review Diagnostic Procedures screen:
- Open a workfile with a standard vehicle.
- At the top of the workfile screen, click the Diagnostics button.
Note:
- Shop must have the following licensed product to access diagnostic recommendations: CCC Diagnostics Workflow
- User must have the following permission to edit the workfile: Create and edit workfile
- Each time the Diagnostics action is triggered, calibration recommendations may appear
- Calibration recommendations are contingent on scan provider participation - some scan providers may not support calibration recommendations
Build Sheets: Download Verified Build Data
Shops licensed with Build Sheets may now download build data via the desktop application from manufacturers using OEM Verified Build Data. Functionally, there is no change to the end user experience in receiving build data. When build sheet or build data is present on the workfile, enhanced parts filtering is available. Also, the Vehicle Equipment Report may be saved to the workfile.
To download build data from within CCC ONE Repair Facility Desktop:
- Create a new workfile.
- Enter customer information, then select the Vehicle tab.
- Enter VIN and "tab" or click Decode.
- If more than one model is returned, select a model and click Next, otherwise click OK.
- Build data is downloaded automatically.
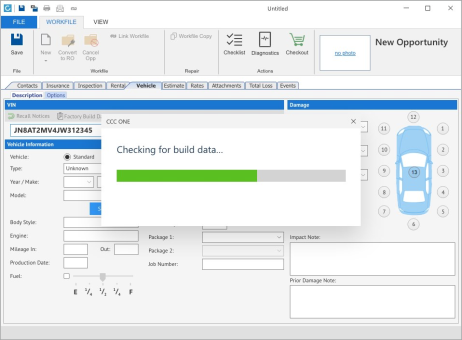
Once data is saved to the workfile, enhanced parts filtering is available in the desktop application and on cccone.com.
Note:
- Only shops licensed with the following feature may access build data from within CCC ONE Desktop: BLDSH - Build sheets
- User must have the following security permissions to download build sheets: Create and edit workfiles
- Not all manufacturers provide factory build data. The Vehicle Equipment Report will still be automatically retrieved where build sheet data is not supported.
CCC Mobile Repair Facility
Payroll: Employee Pay Requests (iOS/ Andriod)
Employees at shops enabled with CCC Pay Workflow now have the ability submit employee pay requests via the mobile application. Once a request is submitted, the payroll manager can view the pay request on the employee's paysheet on cccone.com. The manager then applies or discards the employee pay request to the paysheet.
Employees may submit the following requests:
- Pay Adjustment - This is a request to update pay hours on a flat rate/commission labor assignment.
- Labor Request - This is a request to have a missing flat rate/commission labor assignment added to the paysheet.
- Bonus Adjustment - This is a request for bonus dollars.
- Advance - This is a request for advance dollars.
Employees in shops enabled with CCC Payroll also have the ability to request the following:
- Commission Adjustment - This is a request for commission dollars.
- Paid Time Off (PTO) - This is a request for PTO pay hours.
- Sick Pay - This is a request for sick pay hours.
When a new request is submitted, the employee can track status of the request within the mobile app. The employee will be able to view all pay request activity on their current paysheet.
To access this feature:
|
|
|
_162x347.png)
_164x351.png)
When a request is submitted, the employee sees a request icon on the line item. When the payroll manager acts on the request, the employee will see an orange indicator on the icon. Tap the item, then select Pay History to view item activity.
Note:
- Shop must have the following licensed product to use pay request functionality: CCC Pay Workflow.
- To submit a request for missing labor on, employee selects Pay Request, then Labor Request. This will allow the employee to search for the RO for which labor is missing.
- Employees will submit pay requests via the Mobile app and those requests will be reviewed by managers on cccone.com.
- Pay request functionality for employees is only available in the mobile app - employee's cannot initiate pay requests from either the desktop application or cccone.com.
- This feature is available to shops with or without CCC Payroll.
Quickly find your CCC Team members. Go to http://www.cccis.com/collision-repairers/team/ and follow the screen instructions.
