What's New in CCC® Estimating for September 2024
Click here to view the What’s New release notes for CCC® Estimating.
Note: The availability of the features listed below may vary based on the products licensed to your company.
CCCONE.COM - Web Estimating
UpdatePlus: Text Consent Confirmation
Shops enabled with UpdatePlus CSI and/or UpdatePlus Appointments may send customers appointment reminders and repair status messages to their customers. When the customer communication preference is set on the workfile, the user must confirm customer consent to receive messages. The text on this confirmation prompt has been updated for clarity.
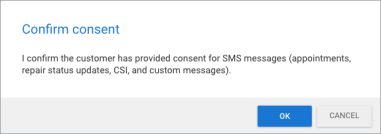
Note:
- User must have the following security permission to edit details on the workfile: Create and edit workfile.
- The consent confirmation prompt is only displayed when the customer's communication preference is set to Text.
Checkout: Support for shops with "Disable Repair Order" Enabled
Multi-shop organizations that have upgraded from an estimating only solution to Repair Workflow may opt to disable repair order functionality on a per-location basis to facilitate roll-out. Now, shops with "Disable Repair Order" enabled can use Checkout for ordering parts. Previously this functionality was blocked.
When using Checkout, shops with this configuration will continue to use the estimating only flow for ordering parts. In other words, the user will be prompted to convert the workfile to a job prior to ordering parts. Once converted to job, the Checkout screen will display.
Note:
- This functionality only applies to shop locations where the license includes Repair Order Management features and Disable Repair Order is set to true.
- The Disable Repair Order flag is managed via Web Support Tool - this setting cannot be modified within any of the CCC ONE apps.
- User must have the following security permission to convert workfiles to jobs: Create and edit workfile.
- User must have the following security permission to order parts: Create, search, view and void purchase orders.
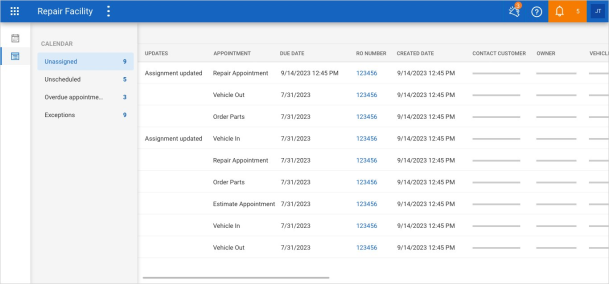
Calendar Dashboard: Shop Calendar
Viewing the Shop Calendar is now available on cccone.com. Shops licensed with Calendar features will now find a "Calendar Dashboard" item in the main menu on cccone.com. When viewing the shop calendar you will see:
- Tasks
- Appointments
- Vehicle In and Vehicle Out dates
- Other blocked time
As on desktop, you can view items on the calendar by day or by week. You can filter items to a specific estimator. You can also view item details simply by clicking on the item in the calendar.
Overlapping appointments/tasks split the same time block on the calendar. They do not stack into a single item as seen in the desktop app. Items displayed on the calendar are color coded for quick identification:
- Light grey = General blocked time
- Medium grey = Completed
- Red = Overdue
- Light blue = Task items
- Medium light blue = Repair appointments
- Blue = Estimate appointments
- Medium blue = Vehicle In milestones
- Dark blue = Vehicle Out milestones
_1_321x179.png)
_2_321x179.png)
On the right-hand side of the screen, you'll find the "Upcoming" panel. This panel lists upcoming items for the day or week, depending on the calendar view selected. For items tied to a workfile, the vehicle owner, vehicle, and estimator initials are provided. There is also a link to open the workfile for viewing/editing.
To access this feature:
- Select Calendar in the main menu.
- Click the View button to change between Day and Week views.
- Use the small calendar in the upper left corner to select days/weeks to view.
- Set Show and Estimators options as desired to filter calendar items displayed.
- Click on an item block in the calendar to view item details.
_3_214x204.png)
_4_205x201.png)
Note:
- Shop must be licensed with the following product to access Shop Calendar: Calendar Dashboard.
- User must have the following security permission enabled to access Shop Calendar: Manage the shop calendar and schedule of appointments.
- Shop Calendar detail is limited to viewing items up to 1 year in the past and 2 years in the future.
- Shop Calendar is read-only at this time - the ability to create and edit calendar items will be included in an upcoming release.
Calendar Dashboard: Exceptions
Calendar Dashboard exceptions queues are now available to view on cccone.com. Each queue highlights different items that require action.
Unassigned
Items in this queue include workfiles that are not assigned to an estimator. To resolve items that appear in this queue, make sure an estimator is assigned to the workfile.
Unscheduled
Items in this queue include workfiles that do not have an estimate appointment. To resolve items that appear in this queue, create an estimate appointment or task.
Overdue Appointments
Items in this queue include estimate appointments, repair appointments, Vehicle In milestones, and Vehicle Out milestones that have past their due date and time. To resolve items that appear in this queue, either reschedule or complete/cancel the item.
Exceptions
Items in this queue include Vehicle In and Vehicle Out milestones where complete dates don't match the due dates of a corresponding appointment. To resolve items that appear in this queue, make sure related appointments are before the actual milestone complete date.
To access this feature:
- Select Calendar in the main menu.
- In the white bar on the left side of the screen, click the Calendar Exceptions button.
- Click on the individual queues to view items listed in the queue.
Note:
- Shop must be licensed with the following product to access Shop Calendar: Calendar Dashboard.
- User must have the following security permission enabled to access Shop Calendar: Manage the shop calendar and schedule of appointments.
- Items displayed in the Calendar Exceptions queues are read-only at this time - the ability to resolve items from the queues will be implemented in an upcoming release.

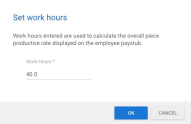
Payroll: Edit Work Hours on Flat Rate Paysheet
Shops enabled with CCC Payroll now have the ability to specify pay period work hours for flat rate/commission employees within the employee paysheet. These work hours are sent with paysheet data to our payroll integration partner, Check. The work hours entered are displayed on the employee paystub and used to calculate the overall piece rate earning for the period.
To access this feature:
- Open a pending pay period to Edit.
- Select a flat rate/commission employee paysheet, then click Edit.
- In the Flat Rate/Commission Pay toolbar, select Work hours.
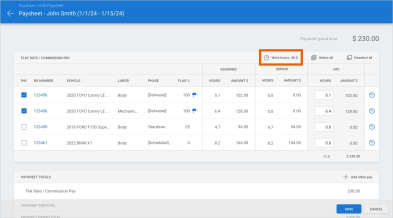
- Edit the work hours value and click Save.
Note:
- This feature is only available to shops licensed with the following product: CCC Payroll.
- User must have the following security permission to edit employee paysheets: Create, search, view and edit pay periods.
- When the pay period is first opened, flat rate employee work hours default to 8 hours per normal work day in the pay period. For example, a 7 day pay period from Monday to Sunday equates to 40 work hours - 8 hours for each regular week day.
- Updating the employee's work hours for the pay period applies only to that pay period. The next pay period will return to default work hours.
Payroll: Download Checks & Paystubs Before Payday
Shops enabled with CCC Payroll now have the ability to download and print employee paychecks and paystubs from the payroll detail screen once payroll has been submitted. Previously these link were only available when payroll status was "Paid."
To access this feature:
- Go to the Payroll summary screen on cccone.com.
- Select Submit Payroll and confirm the action to submit.
- Once payroll is submitted, select View payroll.
- Select Download paper check and Download paystub links as desired.
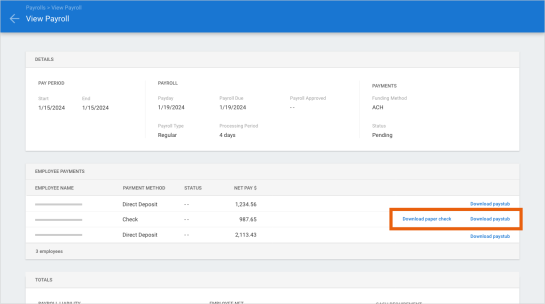
Note:
- This feature is only available to shops enabled with the following product: CCC Payroll.
- User must have the following security permission to submit payroll: Payroll - Manage payroll activities as an authorized signatory for the organization.
- Download links for paper checks and paystubs are available for all payroll statuses except Draft.
Payroll: Print Pay Period Worksheets
Shops with Repair Workflow Labor Management features now have the ability to print worksheets from the pay period on cccone.com. The Worksheets print option prints all worksheets for all employees and teams included in the pay period.
To access this feature:
- Go to Pay Periods on cccone.com.
- Select a pay period to View or Edit.
- In the toolbar at the top of the screen, select Print.
- Select Worksheets.
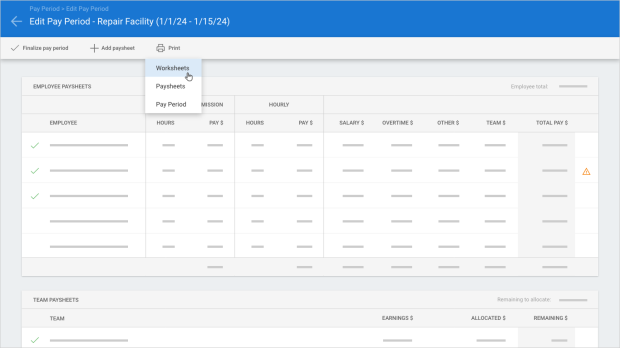
Note:
- This feature is only available to shops licensed with the following feature: Repair Workflow Labor Management.
- User must have the following security permission to view or edit pay periods: Create, search, view and edit pay periods.
- The Worksheets report is only available from the pay period detail screen at this time
Payroll: Timecard Search (by Day)
Last release shops enabled with Repair Workflow Labor Management features were given the ability to search timecards by punch on cccone.com. This release provides the ability to search timecards by day as well. When searching timecards by day, search results return a single row per clocked employee per day. A given day may include multiple timecard punches for the employee.
Follow these steps to search timecards by day:
- In the main menu select, Payroll > Timecards.
- Click the View button in the toolbar on the upper, right-hand side of the screen.
- Select By Day.
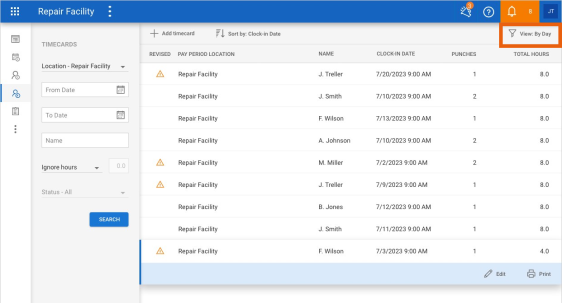
Note:
- Shop must be licensed with the following product to access timecard search: Repair Workflow Labor Management.
- User must have the following security permission to access timecard search: Timecards - Create, search, view, edit, and forcibly clock-out timecards.
Payroll: Create/Edit Timecards
Shops enabled with Repair Workflow Labor Management features now have the ability to create and edit timecards on cccone.com. A timecard is automatically created any time an employee clocks into the CCC ONE Timecard application. The timecard tracks the employee clock-in time, clock-out time, and time clocked to specific repair orders or teams.
Users with appropriate permission may edit timecards. When editing timecards, you can update the employee's clock-in time, clock-out time, and hours allocated to repair orders or teams. With edit permission, you can also create timecards manually.
To edit an existing timecard:
- Go to Payroll > Timecards on cccone.com.
- Select View: By Punch in the upper right-hand corner of the screen.
- Search for and select the timecard you want to edit, then click Edit.
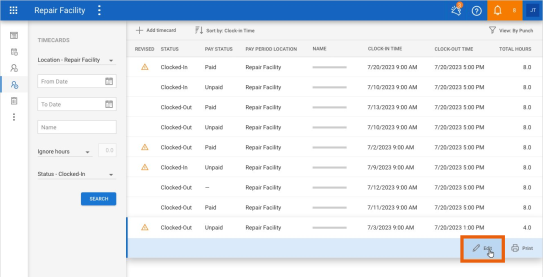
- Update timecard as desired, then click Save.
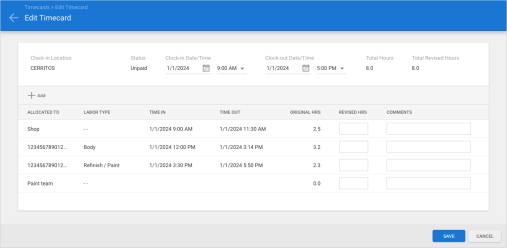
To create a new timecard from scratch:
- Go to Payroll > Timecards on cccone.com.
- Select Add timecard in the toolbar at the top of the screen.

- Select the clock-in location for the employee.
- Select the employee and specify clock-in and clock-out times, then click OK.
- Edit timecard details as desired, then click Save.

Note:
- This feature is only available to shops licensed with the following product: Repair Workflow Labor Management.
- User must have the following security permission to create and edit timecards: Create, search, view, edit and forcibly clock-out timecards.
- Timecards may be created for any type of employee (Salary, Hourly, Flat Rate/Commission).
- In a given pay period, timecard data is used when calculating employee pay only for hourly employees.
- Only timecards by punch may be edited at this time. Editing timecards by day will be available in a future release.
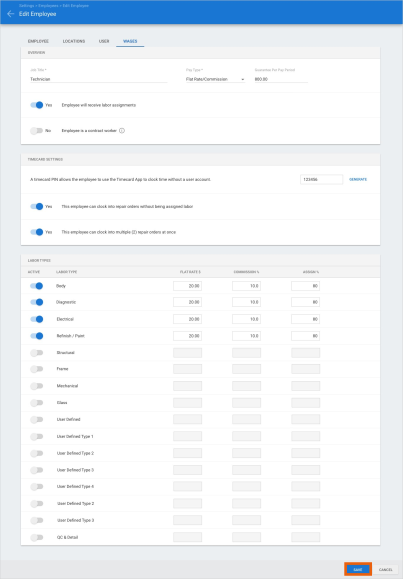
Employees: Wage Settings
Shops with Repair Workflow Labor Management features now have the ability to edit employee wages in the Employee profile on cccone.com. Within the employee wages tab, you can specify:
- Employee wage type - Salary, Hourly, Flat Rate/Commission
- Employee wage rate appropriate for the wage type
- If the employee is a contract worker
- If employee will receive labor assignments in CCC ONE
If an employee is set to receive labor assignments in CCC ONE, you must also specify the labor types the employee can be assigned. You may also specify rules for use of the Timecard application for clocking into jobs.
To edit employee wage settings:
- Go to Settings on cccone.com, then select Employees.
- Select the employee, then click Edit.
- Click on the Wages tab at the top of the screen.

- Update employee wage settings, then click Save.
Note:
- This feature is only available to shops licensed with Repair Workflow Labor Management features.
- User must have the following security permission to edit the employee profile: Create, search, view, edit, and deactivate employees.
Insurance Change Request: Accept & Edit
Shops now have the ability to accept insurance change requests without locking the estimate. This allows the shop to apply requested changes from the insurance company and continue to edit the estimate.
To access this feature:
- Open a workfile where an insurance change request has been received.
- Select View on the change request item in the Workfile alerts pop-up.
- Click Accept and Edit in the change request fly-out.
_497x278.png)
Note:
- When accepted, a preliminary supplement is generated and all insurance proposed changes are automatically applied. Then you can continue to update the estimate as needed. When ready, lock the estimate as usual by selecting the lock estimate action.
- User must have the following security permission to accept changes on an insurance change request: Create and edit workfiles.
- Separate events are logged to the workfile for Accept and Lock, Accept and Edit, and Reject and Edit.
- There is no change to existing behavior for Accept and Lock and Reject and Edit actions.
- The Accept and Edit action is considered an accepted change request when the supplement is ultimately locked. Until locked, the change request remains in "Pending" status.
- The Accept and Edit action will be tracked on the Insurance Review system report as a separate status.
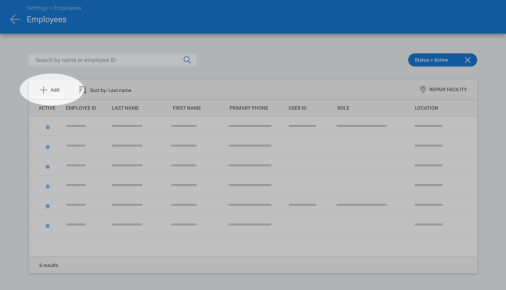
Employees: Add Employee for Repair Workflow
Shops with Repair Workflow Labor Management features now have the ability to create new employees on cccone.com. Previously only editing existing employees was permitted.
To add new employees to your shop:
- Go to Settings on cccone.com, then select Employees.
- Click Add in the toolbar above the list of employees.
- Enter required information under Employee, Location, and Wages tabs.
- Click Save.
Note:
- User must have the following security permission to add new employees: Create, search, view, edit, and deactivate employees.
- User must have the following security permission to add a CCC ONE user account to the employee: Create, edit, and deactivate user login accounts.
Scan Devices: Support for Displaying Services
When adding a new diagnostic scanner to Diagnostic Connection settings, the shop can now see the types of services offered by the scan provider. Services that may be displayed include:
- Scan
- Calibration
- ADAS
- Inspect
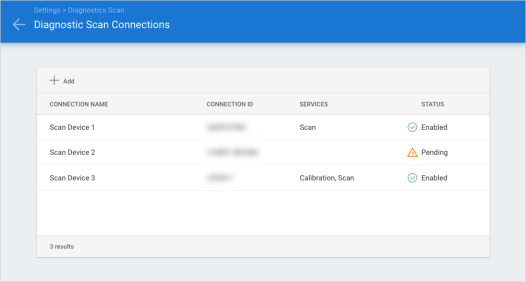
To configure diagnostic scan devices:
- Go to Settings on cccone.com.
- Select Diagnostic Connections.
- Select Add.
- Select Connection type and enter any additional required information, then click OK.
- Accept the Terms of Use.
If additional action is required, you'll be presented with the Connection pending... screen. Once all requirements have been met, device status will be updated to Enabled.
Note:
- The following security permission is required to edit Diagnostic Connections: Edit repairer profile or Edit repair facility profile.
CCC ONE Desktop Release 47
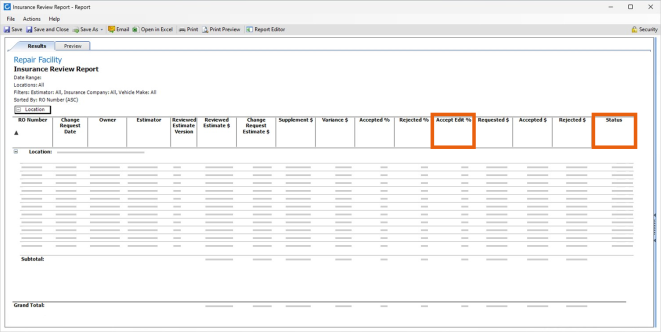
System Reports: Updated Insurance Review Report
The Insurance Review Report has been updated to support new "Accept and Edit" functionality that will be available on insurance change requests. Shops will now have the ability to accept an insurance change request without automatically locking the supplement. Updates to the Insurance Review Report allow shops to track change request activity accurately.
- New column added: Accept Edit %
- Existing column updated: Status column now includes "Accept and Edit" status
To access this report:
- Log into the CCC ONE desktop application.
- Select the Reports menu, then select Find Report.
- Select Estimating in the report category menu.
- Under System Reports, select Insurance Review Report.
Note:
- User must have the following permission to access the Insurance Review Report: Estimating Reports - View estimating reports
System Reports: Updated CSI Survey Detail (UpdatePlus) Report
The CSI Survey Detail (UpdatePlus) report has been updated to include enhanced reporting around mid-repair survey responses.
The following columns were added to the report:
- Survey Phase: Identifies if the survey was mid-repair or post-repair.
- Mid-Repair Rating: Lists customer response Very Positive, Positive, Neutral, Negative, or Very Negative.
- Mid-Repair Comments: Displays comments provided by the customer.
Additionally, a new filter is available that allows users to filter report detail by survey phase. By setting the phase filter to "Mid-repair," you can easily see customer ratings and comments associated with the repair prior to delivery. This allows you to ensure customer satisfaction is managed throughout the repair process, not only after repairs are complete.
To access this feature:
- Access Reports via CCC ONE some screen.
- Open CSI Survey Detail (UpdatePlus) report.
- Select the Survey Phase filter.
- Choose All, Mid-repair or Post-repair, then click Apply.
Note:
- User must have the following security permission to access the CSI Survey Detail.
- (UpdatePlus) report: Customer - View Customer Reports.
- With “Mid-repair” selected, only records with a Mid-repair survey will be shown.
- When “Post-repair” is selected, only records with a Post-repair survey will be returned.
Estimate: Source Parts on cccone.com
CCC ONE users can now access Source Parts on cccone.com directly from a CCC ONE desktop workfile. Source Parts allows users to efficiently review and select a replacement part, per the estimate line, by exposing all pertinent part information in one place. This includes a comparison of all available part types (aftermarket, recycled, OEM, etc) as well as the cost of repairing the part. Information such as cost difference and margin dollars are also shown.
To access this feature:
- Access a Workfile.
- Add Estimate Lines with repair and/or replacement parts.
- Click Source Parts button.
Note:
- User must have the following security permission to edit the workfile: Create and edit workfile.
- The Source Parts button is not available on estimates created from EMS files (i.e., non- native CCC ONE estimates).
- Source Parts button is available on RPD and UPD estimates.
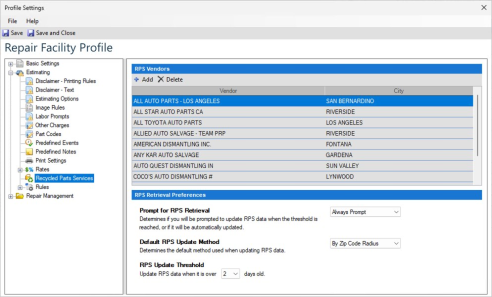
Eliminate RPS Data Cube
Vendor data for recycled parts is no longer provided via Recycled Parts Services (RPS). As a result, RPS related functionality has been removed from the CCC ONE desktop application. Going forward, shops simply need to add their recycled vendors to their normal vendor list.
The following updates were made to the desktop application:
- Repair Facility profile - Removed Recycled Parts Services settings.
- Express Setup wizard - Removed Recycled Parts Services settings.
- Assignment workfile - Removed the prompt to update RPS data.
- Workfile ribbon bar - Removed the "Retrieve RPS" button from the Estimate tab.
Note:
- To configure vendors for part sourcing go to Settings > Vendors on cccone.com.
- Part sourcing is available on UPD and RPD estimates via the Part Comparison screen (on the Estimate tab, select the part you want to add, then click Compare).
- Sourced parts on UPD and RPD estimates are not available to order via Checkout.
Insurance Change Request: Accept & Edit
Shops processing an Insurance Change Request can now accept the changes without being required to lock the estimate. Utilizing this feature will download all of the changes to the workfile while keeping the workfile in a preliminary state.
To access this feature:
- From workfile search, open a workfile with "Changes requested" status.
- Select the Estimate TabSelect Click Here to view change request from... (you'll find this in orange ribbon on the bottom right corner of the screen).
- View change request details, then click Accept and Edit.
_454x318.png)
After clicking Accept and Edit, the Change Request screen closes. A prompt is displayed to confirm the action to create a new supplement. If confirmed, the new supplement is created and all of the changes proposed in the change request are applied. The supplement remains in a preliminary state to make further changes. When ready, lock the supplement as usual.
Note:
- User must have the following security permission to accept changes on an insurance change request: Create and edit workfiles.
- Separate events are logged to the workfile for Accept and Lock, Accept and Edit, and Reject and Edit.
- There is no change to existing behavior for Accept and Lock and Reject and Edit actions.
- The Accept and Edit action is considered an accepted change request when the supplement is ultimately locked. Until locked, the change reuqest remains in "Pending" status.
- The Accept and Edit action will be tracked on the Insurance Review system report as a separate status.
UpdatePlus: Support for Pre-repair Customer Messaging
Shops licensed with UpdatePlus now have the ability to send customers email or text messages via the Customer Communications screen before the vehicle arrives at the shop. Previously, the Vehicle In milestone date needed to be complete before email/text messages could be sent to the customer.
To access this feature:
- Create or open an existing opportunity or assignment.
- Set customer Comm. Preference on the Contacts tab, then save the workfile.
- Go to the Notes tab and click Contact Customer.
- Select or enter a message for the customer, then click Send.
Note:
- Shop must be licensed with with following product to access this feature: UpdatePlus.
- User must have the following security permission to send custom messages to customers: Customer Communication - Send custom text and email replies.
- Customer comm. preference determines the method in which messages are sent to the customer - either text or email.
- When setting "text" as the customer comm. preference, user must confirm customer consent to receive messages via text.
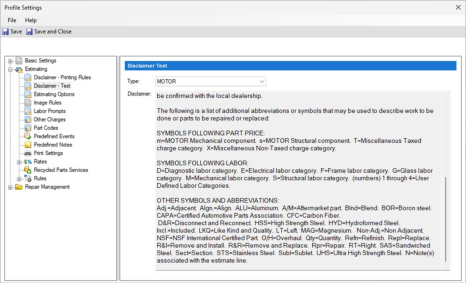
Estimate Reports: Substrates References
Users will now see Stainless Steel and Carbon Fiber represented as substrates within the MOTOR Disclaimer Text. Throughout a given estimate, these substrates may be referenced, symbolized or abbreviated as STS or CFC. The disclaimer text is available on various print reports. To access this feature:
- Go to Configure > Profiles.
- Select the Repair Facility profile, then click Edit.
- Under Estimating settings, select Disclaimer - Text.
- Select MOTOR Type from drop down.
Note:
- User must have one of the following security permissions to view disclaimer text: Search and view (read-only) profiles or Edit repair facility profile.
- The MOTOR disclaimer is displayed on the following estimate reports: Preliminary Estimate, Supplement Summary, and Supplement with Summary, Estimate of Record, Supplement of Record Summary, Supplement of Record with Summary.
- Updated MOTOR disclaimer text will appear on new estimates and supplements only. Existing locked estimates/supplements retain disclaimer text at the time the estimate/ supplement was locked.
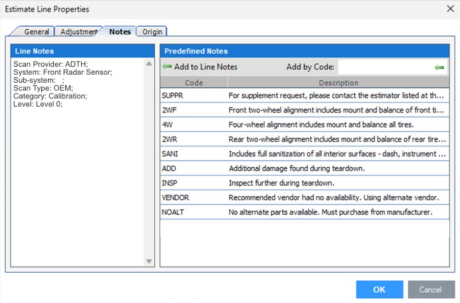
Diagnostics: Add Calibration Info to Line Notes
Estimate line notes will automatically populate with calibration information when adding a Calibration Recommendation to the estimate. The following information will be included in the line note if exists:
- Scan provider
- System name
- Sub-system name
- Scan type (OEM or A/M)
- Scan category (Calibration, Pre-scan, etc.)
- Scan level received from the provider
To access this feature:
- Open a Workfile.
- Select the Diagnostics button.
- Select a recommended calibration item, then click OK.
- Right-click the calibration line added to the estimate, then select Line Notes...
Note:
- User must have the following security permission to edit the workfile: Create and edit workfiles.
- Recommended calibration items are indicated by a purple pulse icon displayed to the right of Scan Type in the Review Diagnostic Procedures pop-up.
- The scan provider must be configured as an integrated partner on cccone.com under Settings > Scan Devices.
- The scan provider must support calibration recommendations in their integration services (see Services under Settings > Scan Devices).
- All values in the automated line note text are supplied by the scan provider.
CCC Mobile RF
Mobile Technician User: Search Workfiles (Android/iOS)
This version of CCC ONE mobile for Repair Facilities now supports new security permissions for searching workfiles. Previously, users with the CCC ONE Mobile Technician security role always had access to search for any workfile. Now, shops can customize this security role to limit technician access only to workfiles they are assigned.
To update the technician user security role:
- Log onto cccone.com.
- Go to Settings, then select Security Roles.
- Click on the CCC ONE Mobile Technician role, then click Edit.
- Update technician permission as desired, then click Save.
_449x252.png)
A technician user will always have permission to view workfiles assigned to them. The ability to search all workfiles must now be granted separately. A technician is considered assigned to a workfile when any of the following conditions are met:
- Technician has a labor assignment on the workfile.
- Technician has an assigned, open task on the workfile.
- Technician has clocked time to the workfile.
Note:
- User must have the following permission to edit security roles on cccone.com: Security Roles - Create, search, view, edit, and delete security roles.
- The CCC ONE Mobile Technician security role will always have the following permission enabled: Search workfiles assigned to me.
- The following security role must be manually enabled or disabled for the technician user: Search all workfiles.
- The CCC ONE Mobile Technician security role applies to all mobile technician users.
_2_151x326.png)
|
_3_162x348.png)
|
_4_161x346.png)
|
_5_162x348.png)
|
_6_160x345.png)
|
Quickly find your CCC Team members. Go to http://www.cccis.com/collision-repairers/team/ and follow the screen instructions.
