What's New in CCC® Estimating for August 2024
Click here to view the What’s New release notes for CCC® Estimating.
Note: The availability of the features listed below may vary based on the products licensed to your company.
CCCONE.COM - Web Estimating
Estimating: View Photos While Editing Estimate
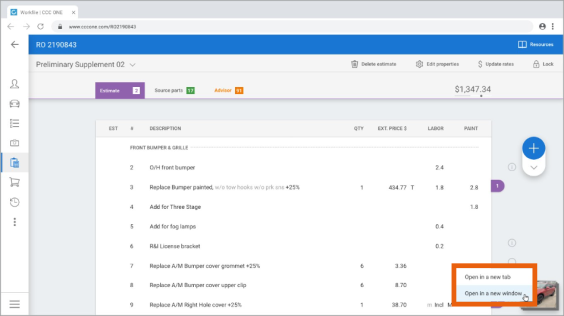
Users can now view workfile photos while editing the estimate in cccone.com. From the estimate screen, the user can launch a large image viewer in a separate screen. This allows the user to view and interact with both the estimate screen and large image viewer simultaneously.
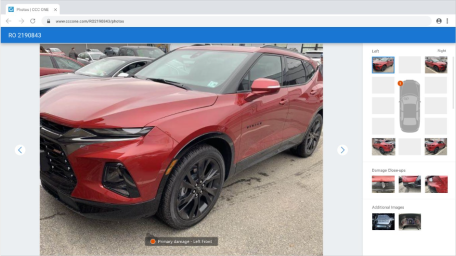
Within the large image viewer the user can now:
- View vehicle photos at larger scale.
- Zoom into a specific area on the photo.
- Quickly select a specific photo to view.
To access this feature:
- Open a workfile with photo attachments.
- Go to the Estimate screen.
- Click on the photo thumbnail displayed in the lower right-hand corner of the screen.
- Select one of the following options:
- Open in a new tab
- Open in a new window
The large image viewer is displayed. Use the left and right arrow keys to move through images in order. Or, click on one of the thumbnail images in the right-hand panel to jump to a specific photo. Click anywhere on the large image displayed to zoom and drag the photo as desired.
Note:
- This feature is available to users with and without the edit workfiles permission.
- The photo viewer supports opening multiple instances in browser tabs or windows without limit.
Action Center: Vendor Messages
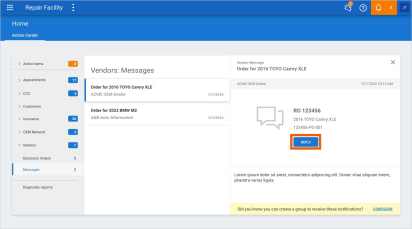
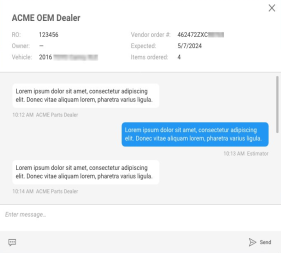
The Action Center on cccone.com now includes a new sub-category under Vendors called "Messages." This sub-category includes notifications for vendor conversations initiated through the Vendor Chat feature. Notifications displayed for the vendor includes the most recent messages from the vendor. The user also has the option to reply to the vendor from the notification.
To access this feature:
- Go the Action Center on cccone.com.
- Click Vendors on the left-hand side of the screen, then click Messages.
- Select a notification from the list to view message detail.
- Click Reply in the message detail to write a response to the vendor.
Note:
- Messages section will only display notifications when new messages are received from the vendor.
- Users can also set up a notification group for Vendor Message notifications.
Payroll: Timecard Search (by punch)
Shops enabled with Repair Workflow Labor Management features now have the ability to search Timecards on cccone.com. Timecards are created when a given employee clicks "Clock-in" on the CCC ONE Timecard application or within the My Work dashboard in the desktop application.
Follow these steps to access timecards:
- In the main menu select, Payroll > Timecards.

- Specify search criteria as desired, then click Search.
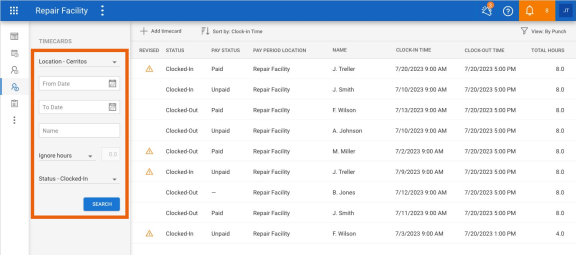
- Change the search results view by clicking the View button in the upper right corner.
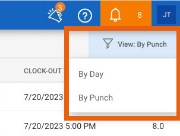
Ultimately, shops may search for timecards by "punch" or by day:
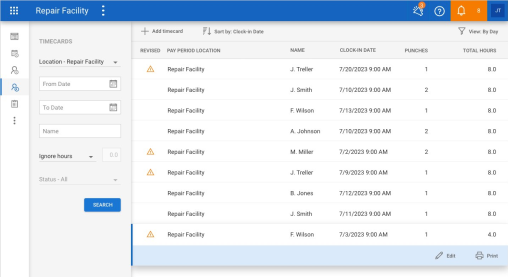
- By Punch - Returns a single row per timecard session. A timecard session represents the time clocked by a single employee from clock-in to clock-out.
- By Day - Returns a single row per day. A given day may include multiple timecard punches.
Note:
- Shop must be licensed with the following product to access timecard search: Repair Workflow Labor Management.
- User must have the following security permission to access timecard search: Timecards - Create, search, view, edit, and forcibly clock-out timecards.
- Only timecard search capability is available at this time. Edit capability will soon be available in an upcoming release.
- For this release, results displayed represent timecards By Punch only. Timecards By Day will be available in an upcoming release.
Paysheet: "Select" Options for Flat Rate Pay
When editing paysheets on cccone.com, the existing “Select all" button for flat rate/ commission pay selection has been updated. Just like the desktop application, in addition to "select all" functionality, users now have the ability to select flat rate/ commission pay by:
- Flagged hours - Selects items to pay that have unpaid flagged labor.
- Vehicle completed - Selects items to pay where Vehicle Out is marked as complete.
- Vehicles delivered - Selects items to pay where Vehicle Delivered is marked as complete.

To access this feature:
- Open a pending pay period or search for a pending paysheet on cccone.com.
- Select a Flat Rate/ Commission employee or team paysheet and click Edit.
- In the upper right-hand corner of the list of Flat Rate/ Commission items, click Select...
- Select one of the available options.
Note:
- User must have the following security permission to edit paysheets: Create, search, view, and edit pay periods.
- Paysheets may only be edited while the corresponding pay period has a status of Pending.
- Flagged labor rules are defined in repair plan phase details configured within the Repair Facility profile Repair Plan settings.
Invoices: Available Actions
Shops with Repair Workflow Parts Management features now have access to additional invoice functionality on cccone.com. New launch points for invoice related actions are available in the Parts Dashboard, Invoice search, and workfiles Parts view.
New launch points for invoice actions as follows:
- Parts Dashboard, Draft Invoices queue - Void and Edit are now available.
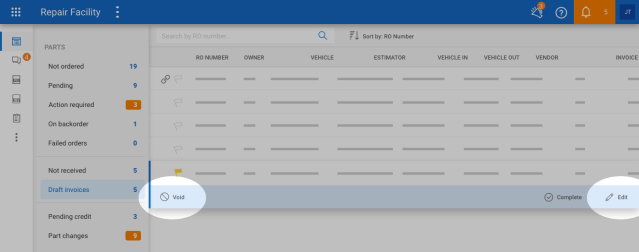
- Parts Dashboard, Not Received queue - New invoice is now available.
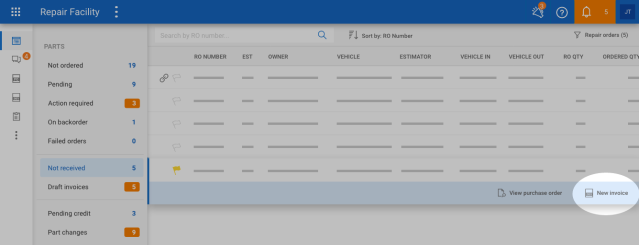
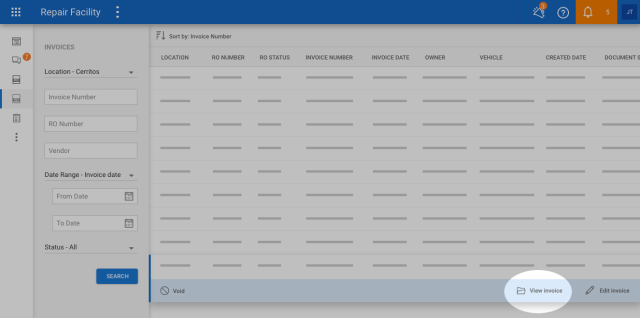
- Invoice search - View invoice is now available.
To access the Parts Dashboard:
- Log into cccone.com and select the menu button in the upper left-hand corner.
- Select Parts, then Parts Dashboard.
Once on the Parts Dashboard, select the individual queues to see items within that queue. Within the queues, select a row from the list of results to see available actions.
Invoice search is also accessible from the Parts Dashboard. Simply click the Invoices button in the white bar displayed on the left-hand side of the screen.
Note:
- Shop must be licensed with the following product to access invoices: Repair Workflow Parts Management.
- User must have one of the following security permissions to edit invoices:
- Create, search, view, and edit invoices
- Parts - Manage all aspects of parts procurement from a single dashboard
- User must have the following security permission to void invoices: Void invoices.
Invoices: Map Orphaned Part to Estimate Line
When receiving parts on an invoice, there is the potential for "orphaned" parts to appear on the invoice. This occurs when:
- A part was removed from the estimate after a purchase order was created.
- A part was manually added to a purchase order.
- An electronic draft invoice includes a part that couldn't be identified on the estimate.
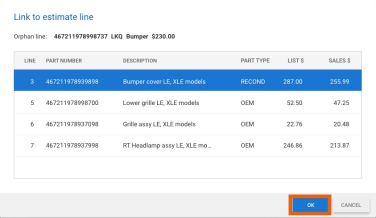
Now, shops with Repair Workflow Parts Management features can map these orphaned lines on the invoice to an estimate line.
To access this feature:
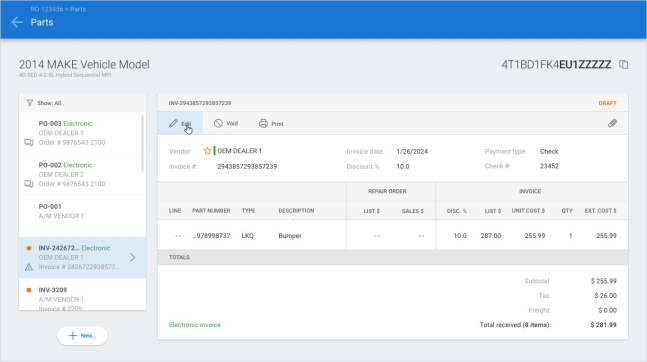
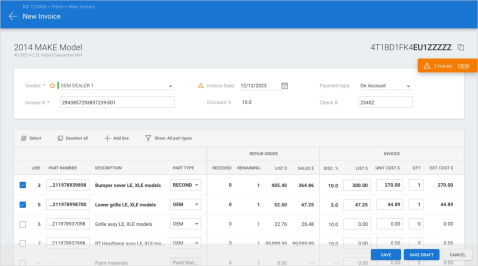
- Create a new invoice or open a draft invoice with "orphaned" parts on cccone.com.
|
|
|
|
|
|
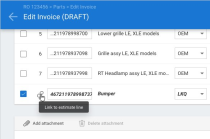
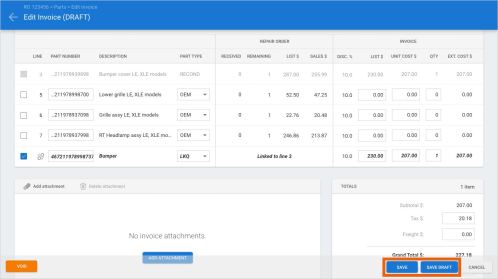
Once changes are saved, the orphaned line no longer exists. The invoiced part is now mapped to the selected estimate line.
Note:
- User must have one of the following security permissions to edit invoices:
- Create, search, view, and edit invoices
- Parts - Manage all aspects of parts procurement from a single dashboard
- Part line linking cannot be undone once Save or Save Draft has been clicked on the invoice.
- User may remove link before saving the invoice by clicking the broken link button on the orphaned line.
Invoices: Print Invoice
Shops with Repair Workflow Parts Management features now have the ability to print invoices on cccone.com.
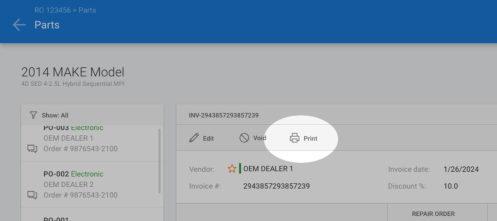
Follow these steps to print an invoice from the workfile:
- Select the menu button in the bottom left-hand corner of the workfile
- Select Open on the left-hand side of the screen
- Select the invoice document you want to open
- When the Parts screen is displayed, select Print in the toolbar above invoice details
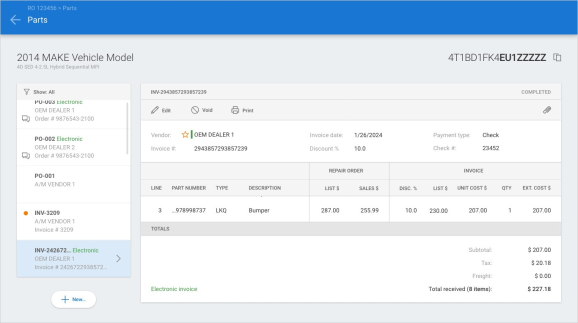
Follow these steps to print an invoice from Invoice search:
- Search for and select an invoice.
- Select View invoice.
- When the Parts screen is displayed, select Print in the toolbar above invoice details.
Note:
- Shop must be licensed with the following product to access invoices: Repair Workflow Parts Management.
- User must have one of the following security permissions to access invoice search:
- Create, search, view, and edit invoices
- Parts - Manage all aspects of parts procurement from a single dashboard
- User must have one of the following security permission to view parts documents on the workfile:
- Search and view (read-only) workfiles
- Create and edit workfiles
Invoices: Issues & Errors
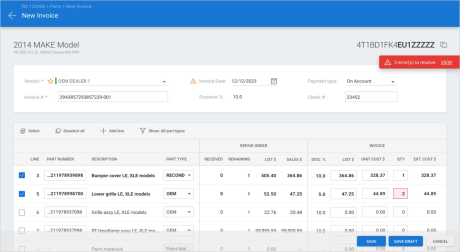
As you create new invoices and edit draft invoices on cccone.com, issues and errors may be displayed. Errors have been updated to more clearly display the specific reason the invoice cannot be saved. When errors are encountered a red tag may be displayed in the upper right-hand corner of the screen. Clicking on the tag will display a list of the errors encountered.
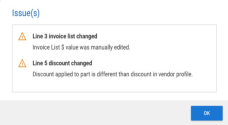
Issues highlight manual changes to invoice list and discount values. Issues are informational and will not prevent saving the invoice. When issues exist, an orange tag is displayed in the upper right-hand corner of the screen. Clicking on the tag will display a list of the issues encountered.
To access the issues feature:
- Create a new invoice or edit an existing draft invoice.
- Select one or more parts to receive.
- Manually change Invoice List $ or Invoice Unit Cost $.
- Click on the orange Issues tag.
Issues are displayed for the following reasons:
|
|
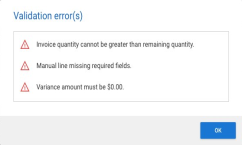
To access the errors feature:
- Create a new invoice or edit an existing draft invoice.
- Select one or more parts to receive.
- Select Save without entering the invoice amount.
- Click on the red Errors tag.
Errors are displayed for the following reasons:
|
|
Note:
- Shop must be licensed with the following product to access invoices: Repair Workflow Parts Management
- User must have one of the following security permissions to edit invoices:
- Create, search, view, and edit invoices
- Parts - Manage all aspects of parts procurement from a single dashboard
- When both issues and errors exist on the invoice, the errors tag takes precedence - issues are hidden until errors are resolved.
CCC ONE Desktop Release 46
System Reports: VIN column added to Instant Repair Cost Prediction report
The existing Instant Repair Cost Prediction system report has been updated to include a new optional column for VIN. You can find this existing report in the Customer reports category.
To access the report:
- Log into the CCC ONE desktop application.
- Select the Reports menu, then select Find Report.
- Select Customer in the report category menu.
- Under System Reports, select Instant Repair Cost Prediction.
Note:
- Shop must have the following licensed product to access the report: Repair Workflow Repair Order Management.
- User must have the following security permission to access the report: Reporting: Customer - View customer reports.
- User must have entered and saved a VIN value to the workfile for the VIN column to populate on the report.
- VIN is an optional column - User must manually add the column to the report in Columns settings.
CCC Mobile RF
Edit Override Prompt (iOS/Android)
When editing workfiles via the CCC ONE Repair Facilities mobile application, users may be presented with an edit override prompt. If another user has the same workfile open in CCC ONE, the logged in user will be presented with a prompt to take over the workfile so they can edit and save changes.
_v2_244x165.png)
Note:
- The prompt will only be displayed when attempting to save changes to workfile data (e.g., vehicle information, vehicle options, estimate lines through Jumpstart).
- Only users with the following security permission will be allowed to select the override action: Override workfile lock for editing.
Support for Predictive Total Loss (iOS/Android)
Additional AI functionality is being introduced into the CCC ONE mobile application for repair facilities. For select carriers, shops will be able to request a total loss prediction before writing an estimate with Jumpstart.
To access this feature:
- Open an assignment without an estimate on the mobile app.
- Go to the Photos tab and capture required damage photos - 4 corners of the vehicle plus 3 damage close ups.
- Select the Estimate tab.
- Tap Predict Total Loss.
Damage photos are sent and processed by AI. The app displays a progress screen until a prediction result is returned. Possible prediction outcomes are:
|
_387x271.png)
|
When a prediction result is returned, an event is saved to the workfile. This allows the user to view the predicted result in workfile event history, as well as view the result again within the mobile app.
Note:
- This feature is only available on assignments from carriers where Predict Total Loss is enabled.
- The Predict Total Loss action must be run before estimate lines are written.
- The Predict Total Loss action is optional - shop can write an estimate with Mobile Jumpstart without selecting the Predict Total Loss action.
- The following damage photos are required to get a total loss prediction: Left Front, Right Front, Right Rear, Left Rear, Damage Left, Damage Center, Damage Right.
- Only standard mobile users with permission to edit workfiles may access this feature - feature is not available to technician users.
My Account Settings (Android)
Users now have access to view My Account settings in the RF Mobile app. Users with appropriate permission may also edit My Account settings via the app. This includes:
- Employee photo
- Personal information such as name, display name, and date of birth
- Contact information such as address, phone, and email
- Emergency contact information
To access this feature:
- Log into the RF Mobile app.
- Tap the menu button in the upper left-hand corner of the screen.
- Select My Account.
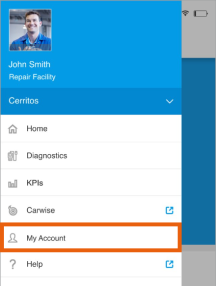
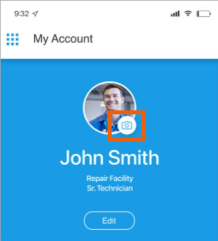
The My Account screen is displayed. If user has permission to edit their settings, then a photo button and "Edit" button are displayed. Tap Edit to update My Account settings.
To upload an employee photo:
- Tap the photo button on the My Account screen.
- Select Photo from Camera or Photo from Library.
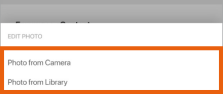
- Either take a photo or select an image from the device library.
- Accept terms of use when prompted.
Note:
- All users with access to the RF Mobile app have access to view My Account settings.
- User must have the following permission to edit My Account settings: Edit My Account information
- Users are granted access to edit My Account settings via Security Roles
- Security Roles for standard CCC ONE users may be edited via RF Desktop or cccone.com
- The security role for CCC ONE technician users may only be edited via cccone.com
Mobile Technician User: Search Workfiles (iOS/Android)
This version of CCC ONE mobile for Repair Facilities now supports new security permissions for searching workfiles. Previously, users with the CCC ONE Mobile Technician security role always had access to search for any workfile. Now, shops can customize this security role to limit technician access only to workfiles they are assigned.
To update the technician user security role:
- Log onto cccone.com.
- Go to Settings, then select Security Roles.
- Click on the CCC ONE Mobile Technician role, then click Edit.
- Update technician permission as desired, then click Save.
A technician user will always have permission to view workfiles assigned to them. The ability to search all workfiles must now be granted separately. A technician is considered assigned to a workfile when any of the following conditions are met:
- Technician has a labor assignment on the workfile
- Technician has an assigned, open task on the workfile
- Technician has clocked time to the workfile
Note:
- User must have the following permission to edit security roles on cccone.com: Security Roles - Create, search, view, edit, and delete security roles
- The CCC ONE Mobile Technician security role will always have the following permission enabled: Search workfiles assigned to me
- The following security role must be manually enabled or disabled for the technician user: Search all workfiles
- The CCC ONE Mobile Technician security role applies to all mobile technician users
_510x286.png)
Quickly find your CCC Team members. Go to http://www.cccis.com/collision-repairers/team/ and follow the screen instructions.
