What's New in CCC® Estimating for June 2024
Click here to view the What’s New release notes for CCC® Estimating.
Note: The availability of the features listed below may vary based on the products licensed to your company.
CCCONE.COM - Web Estimating
Build Sheets: Support for Supplements
Shops enabled with Build Sheets now have the ability to download build sheet data on supplement workfiles via cccone.com. When creating a new supplement, users can download build sheet data if it has not already been download on the workfile. This will download the Vehicle Equipment Report and enhance parts filtering capability on the workfile.
To access this feature:
- Open a workfile with a preliminary supplement on cccone.com.
- Go to the Vehicle screen.
- Select Factory Build Sheet in the toolbar.
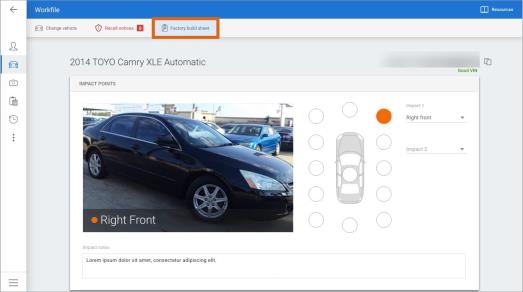
Build sheet data is downloaded and applied to the vehicle. Go to the Options screen or Photos screen to access the Vehicle Equipment Report. Additionally, build sheet level filtering is automatically applied to the parts database in the Estimate screen.
Note:
- Only shops licensed with the following feature may access build sheets on cccone.com: BLDSH - Build sheets
- User must have the following security permission to download build sheets: Create and edit workfiles
- Build sheet data may be retrieved on cccone.com no matter which CCC ONE application was used to create the workfile.
- Not all manufacturers provide factory build sheet data. The Vehicle Equipment Report will still be retrieved and saved to the workfile where build sheet data is not supported.
Workfile: Backstage Updates
We've updated the workfile backstage menu on cccone.com. These updates provide access to actions and saved documents on the workfile. Summary of changes as follows:
Home Menu
Depending on user security permission and workfile state, the first menu listed in backstage was called "Save," "Exit," or "Restore". This is now always called "Home."
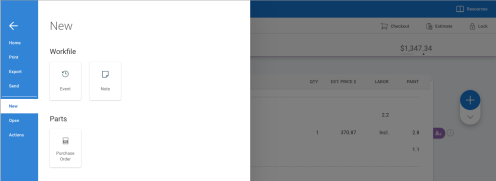
Within the Home menu, users will still find actions for Save, Exit, and Restore, as well as workfile summary detail. In addition, users will now find buttons for launching workfile actions New Event and New Note. In the near future, this menu will also provide access to recent documents (form letters, purchase orders, etc.) created on the workfile.

New Menu
This menu provides actions for creating new items or documents on the workfile. Right now this menu includes New Event and New Note actions. Shops with Repair Workflow Parts Management features will also see New Purchase Order. You can expect available actions in this menu to grow as more features are added to cccone.com
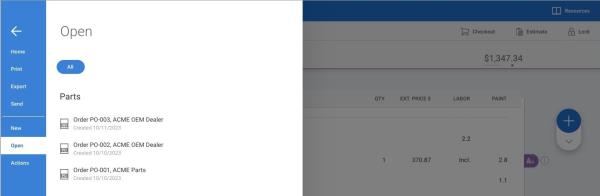
Open Menu
This menu provides access to documents saved to the workfile. Right now this includes purchase orders. In the near future, form letters and other parts documents will be available to open from this menu.
To access the workfile backstage:
- Open a workfile to view or edit on cccone.com.
- In the lower left corner of the workfile, click the menu button.
Note:
- User must have one of the following security permissions to open workfiles on cccone.com:
- Create and edit workfiles.
- Search and view (read-only) workfiles.
- The Home menu is always available on all workfiles, regardless of workfile status.
- Availability of "New" actions in the Home menu is dependent on workfile status and user security permissions
- There is no change to existing functionality in Print, Export, Send, and Actions menus.
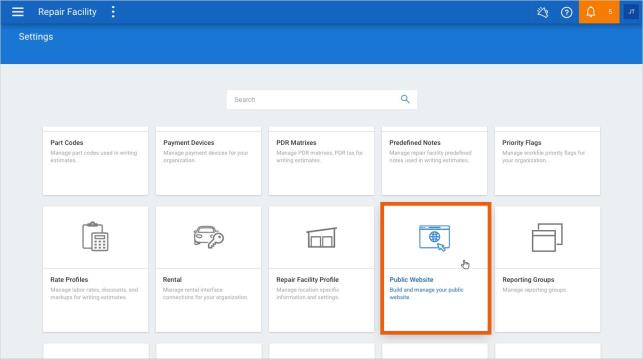
Public Website: Allow Access with Client Feature
Shops enabled with the appropriate back-end company attribute now have the ability to use CCC Amplify. This will allow shops access to Public Website settings on cccone.com. From there, the shop can create their own professional website. Shops can use one of the pre-defined templates or customize their site using the site editor.
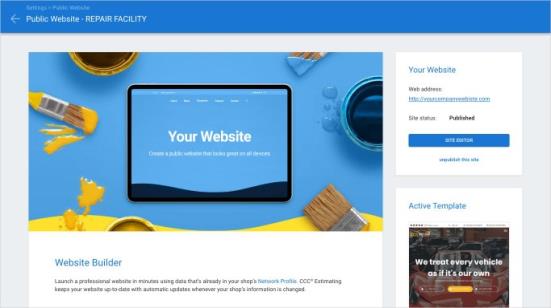
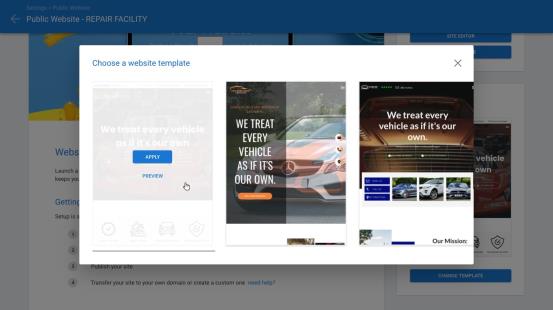
To access this feature:
- Go to Settings on cccone.com.
- Select Public Website.
Note: CCC Amplify will be enabled for shops when either the following is true:
1. The shop's license includes the following product: CCC Amplify.
2. The following company attribute is enabled: Web - Enable Duda Public Website setting.
- User must have the following security permission to access Publish Website settings: Edit repair facility profiles.
- Shops without CCC Amplify or the above mentioned company attribute will not have access to Publish Website settings on cccone.com.
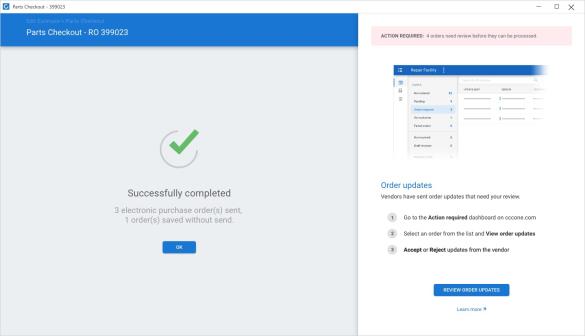
Web Checkout: Update Success State
When completing an order through Checkout, users with valid permission may now see a notification that there are "Action Required" items in the Parts Dashboard. If there are items that require action, a notification is displayed in the Checkout success screen.
To access this feature:
- Open a workfile with replacement parts to order in either cccone.com or the desktop app.
- Select Checkout.
- Select parts to order, then click Order Parts.
If the notification is displayed, you'll have the option to view action required items in the Parts Dashboard on cccone.com. Simply click the Review Order Updates button.
Note:
- The Action Required notification will only appear for users with the following security permission: Parts - Manage all aspects of parts procurement from a single dashboard.
- The notification will be displayed in the Checkout screen for shops with and without Repair Workflow (i.e. available to all shops that order parts through Checkout).
- The notification will be displayed in the Checkout screen when launched from either cccone.com or the desktop app.
- When launching Checkout from the desktop application, this notification will only be displayed for R43 and higher.
Parts Dashboard: Vendor Chat Buttons
We recently introduced the Vendor Messages view in the Parts Dashboard. In this view you can manage vendor messages associated with your electronic orders. This release we've added access to vendor messages in the following areas:
- Parts Dashboard, Pending queue
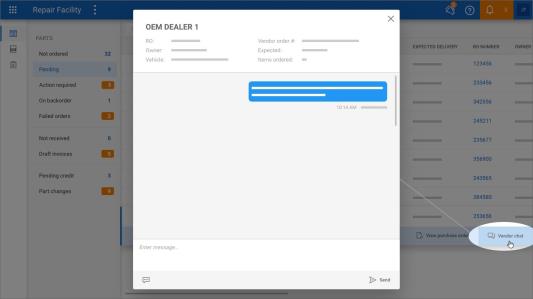
- Purchase Order search
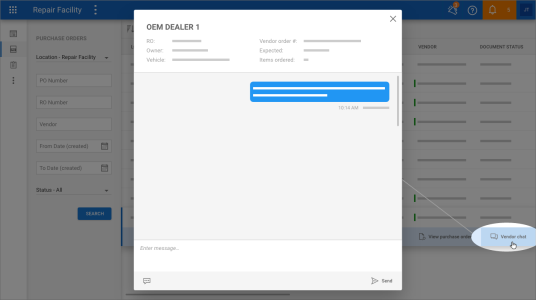
- Workfile Orders view
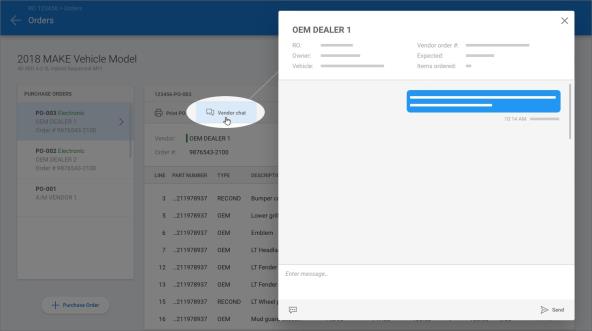
When accessing purchase orders from the screens above, you'll now find a Vendor Chat action. Clicking Vendor Chat launches a fly-out for you to send messages to the vendor. You can start a new message thread with the vendor or respond to an existing one.
Note:
- Users must have the following permission to access the Parts Dashboard: Parts Dashboard - Manage all aspects of parts procurement from a single dashboard.
- Users must have one of the following permissions to access Purchase Order search and the workfile Orders view:
- Purchase Orders - Create, search, view, and void purchase orders.
- Parts Dashboard - Manage all aspects of parts procurement from a single dashboard.
- The Parts Dashboard and workfile Orders view is available to shops with or without Repair Workflow.
- Purchase Order search is only available to shops with Repair Workflow Parts Management features
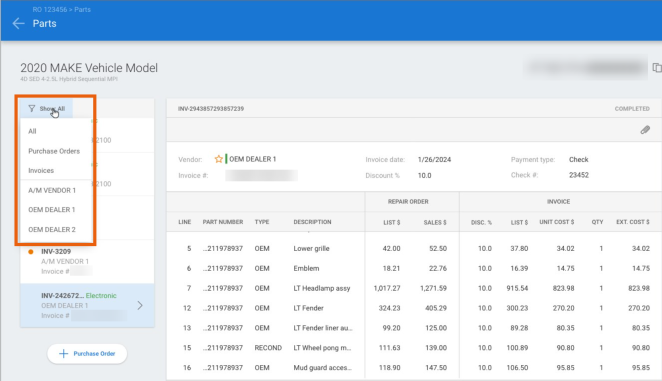
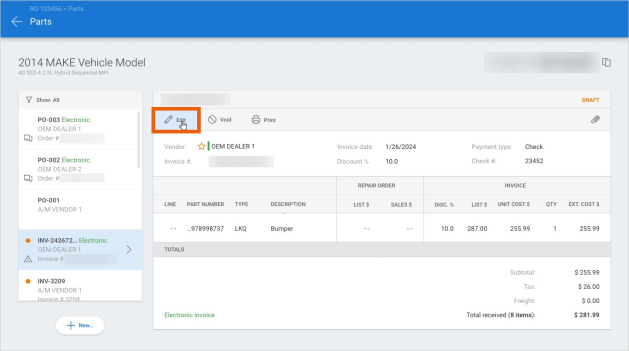
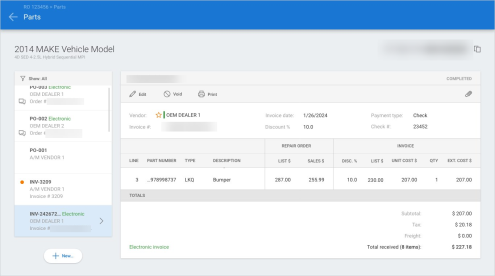
Parts: Workfile Invoice View
Shops with Repair Workflow Labor Management features now have access to invoice documents on the workfile in cccone.com. Now, you can find both purchase orders and invoices on the workfile Parts screen (previously the Orders screen).
To access invoices on the workfile:
- Go to cccone.com and open a workfile with invoices saved.
- Click the menu button in the lower left-hand corner of the workfile screen.
- Select the Open menu, then select the invoice you want to view.
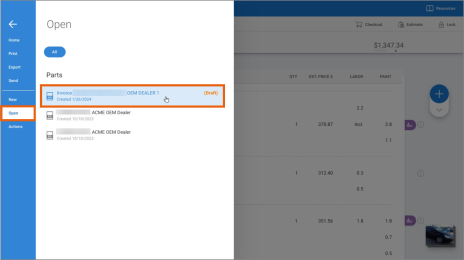
The workfile Parts screen is displayed with the selected invoice in view. All invoices saved to the workfile are available to view. This includes draft, complete/posted, and voided invoices.
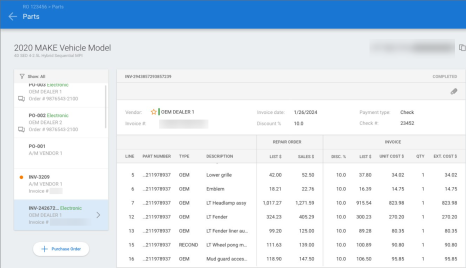
From this screen you can still view all purchase orders saved to the workfile. You can also filter the documents you want to see by document type or vendor name.
Note:
- Shop must be licensed with the following product to access invoices on the workfile: Repair Workflow Parts Management.
- User must have the following security permission to access invoices on the workfile: Parts Management - Create, search, view, and edit invoices.
- Draft invoices are indicated with an orange bullet in the document list on the left-hand side of the screen.
- New, edit, and void functionality is not available at this time - stay tuned for these features in an upcoming release.
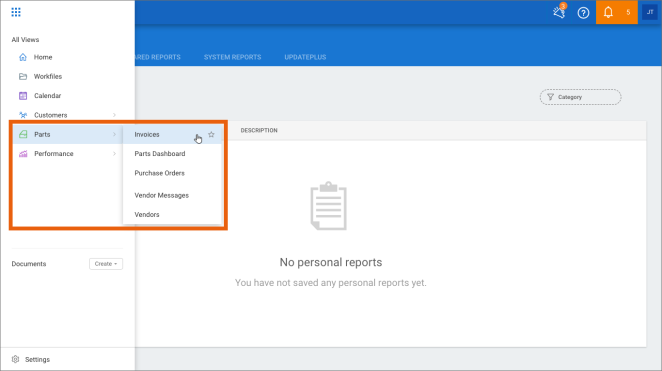
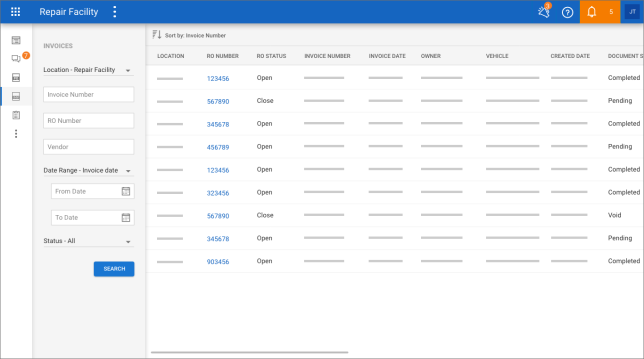
Parts: Invoice Search
Shops with Repair Workflow Parts Management features now have the ability to search for invoice documents on cccone.com. Just as in the desktop application, you can search for invoices by the following criteria:
- Invoice number
- Repair order
- Vendor
- Invoice date
- Created date
- Modified date
- Document status (Draft, Complete/Posted, and Voided)
To access invoice search:
- Log into cccone.com and click the menu button in the upper left-hand corner of the screen.
- Select Parts, then select Invoices.
In this release you'll be able to open the workfile from invoice search results by clicking on the RO number hyperlink. Stay tuned for additional functionality in an upcoming release including the ability to void and edit invoices from this screen.
Note:
- Shop must be licensed with the following product to access invoice search: Repair Workflow Parts Management.
- User must have the following security permission to access invoice search: Parts Management - Create, search, view, and edit invoices.
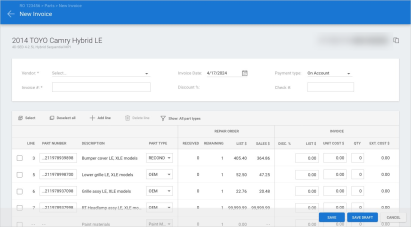
Parts: Add & Edit Invoice
Shops with Repair Workflow Parts Management features now have the ability to create and edit invoices on cccone.com. To access this feature, open a workfile on cccone.com and follow the steps below.
To create a new invoice:
- Click workfile Menu button in the lower left corner of the workfile screen.
- Select New.
- Select Invoice.

This opens the New Invoice screen where you can select the parts you want to receive. Just as in the desktop application, you'll need to select a vendor, enter the vendor invoice number, select parts to receive, and enter the invoice total amount to save the invoice. You can also save the invoice as a draft to continue editing later.
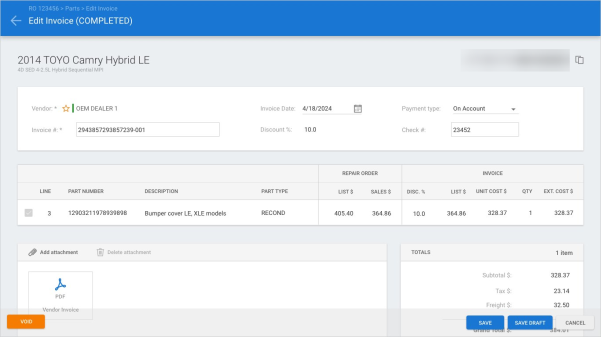
To edit draft or completed invoices:
- Click workfile Menu button in the lower left corner of the workfile screen.
- Select Open.
- Select the invoice document you wish to edit.
This opens the Edit Invoice screen. Invoices in draft state remain fully editable - you can update parts selected to receive, add lines, etc. Completed invoices don't allow line level edit but fields for invoice number, invoice date, payment type, and check number remain editable.
Note:
- Shop must be licensed with the following product to access invoice search: Repair Workflow Parts Management.
- User must have the following security permission to access edit invoices: Parts Management - Create, search, view, and edit invoices
Invoices: Map Orphaned Part to Estimate Line
When receiving parts on an invoice, there is the potential for "orphaned" parts to appear on the invoice. This occurs when:
- A part was removed from the estimate after a purchase order was created.
- A part was manually added to a purchase order.
- An electronic draft invoice includes a part that couldn't be identified on the estimate.
Now, shops with Repair Workflow Parts Management features can map these orphaned lines on the invoice to an estimate line.
To access this feature:
- Create a new invoice or open a draft invoice with "orphaned" parts on cccone.com.
- Select the link button on the orphaned part line.
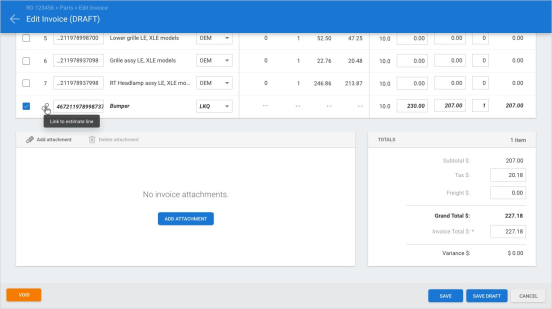
- Click on a row in the Link to estimate line screen to select, then click OK.
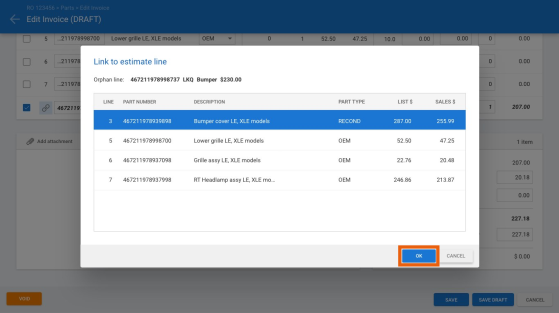
- Select Save or Save as Draft to save your changes.
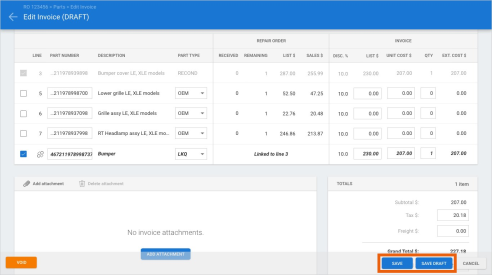
Once changes are saved, the orphaned line no longer exists. The invoiced part is now mapped to the selected estimate line.
Note:
User must have the following security permission to edit invoices:
- Part line linking cannot be undone once Save or Save as Draft has been clicked on the invoice.
- User may remove link before saving the invoice by clicking the broken link button on the orphaned line
Payroll: Pay Periods
Shops with Repair Workflow Labor Management features now have access to Pay Periods on cccone.com. You can now search, view, create, open, and finalize pay periods on cccone.com.
To access this feature:
- Select the app menu in the upper left-hand corner of the screen.
- Select Payroll, then select Pay Periods.
From Pay Period search you can add new pay periods for the shop location. Simply click the Add pay periods button and follow the steps. Steps are the same as performing the same action in the desktop application.
You can search for existing pay periods using the search criteria on the left side of the screen. Select a row in the search results to see available actions.
- Open pay period - Changes pay period status from "Unused" to "Open" once paysheets have been selected to add.

- Edit - Displays the pay period detail screen listing all employee and team paysheets in the pay period.
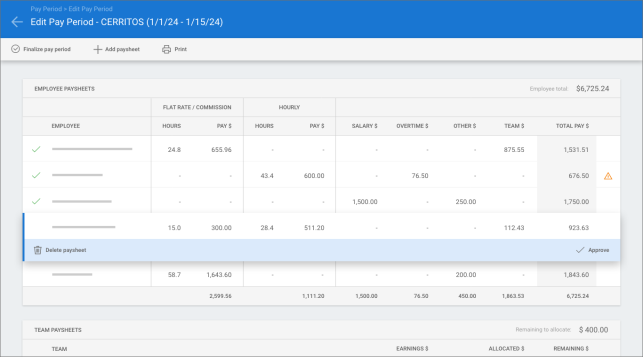
- Delete paysheets - Deletes all employee and team paysheets in the pay period resetting pay period status to "Unused".
- Finalize - Changes pay period status from "Pending" to "Finalized".
- Reopen - Changes pay period status from "Finalized" to "Reopen".
Within the pay period detail screen you can view summary detail of the paysheets included in the pay period. Select a paysheet to see available actions:
- Delete paysheet - Removes the selected paysheet from the pay period.
- Approve / Unapprove - Changes the approval status of the selected paysheet.
Note:
- Shop must have the following licensed product to access Pay Periods features: CCWLB - Repair Workflow Labor Management.
- User must have the following security permission to access Pay Periods on cccone.com: Create, search, view and edit pay periods.
- User must have the following additional security permissions to perform specific actions:
- Delete unused pay periods - Provides the action for deleting all unused pay periods in the shop location.
- Finalize pay periods - Provides the action to finalize a pay period.
- Reopen a finalized pay period - Provides the action to reopen a finalized pay period.
- Editing paysheet details is not yet available - this will be included in a near term release.
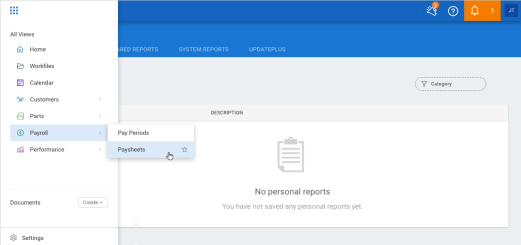
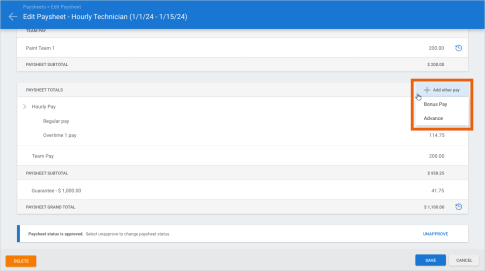
Payroll: Paysheets
Shops with Repair Workflow Labor Management features now have access to Paysheets on cccone.com. You can now search, view, and edit paysheets on cccone.com.
To access this feature:
- Select the app menu in the upper left-hand corner of the screen.
- Select Payroll, then select Paysheets.
You can search for existing paysheets using the search criteria on the left side of the screen. Select a row in the search results to see available actions.
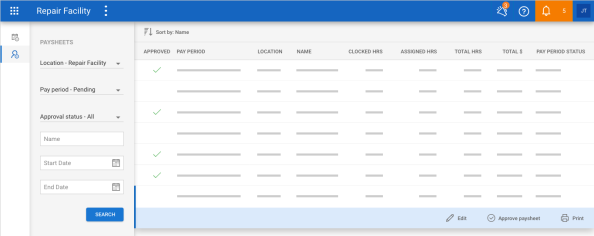
- Edit - Opens the employee or team paysheet in edit mode.
- Approve paysheet - Changes status of the employee or team paysheet to "approved".
- Unapprove paysheet - Changes status of the employee or team paysheet to "not approved".
- View - Opens the employee or team paysheet in read-only mode.
Both employee and team paysheets are available for edit. Paysheet information has been streamlined to show only the information relevant to the employee or team. For example, paysheet totals for an hourly employee no longer includes "salary" or "flat rate/ commission" pay in the totals breakdown. Team pay, guarantee, bonus, and advance are included only when they apply to the employee.
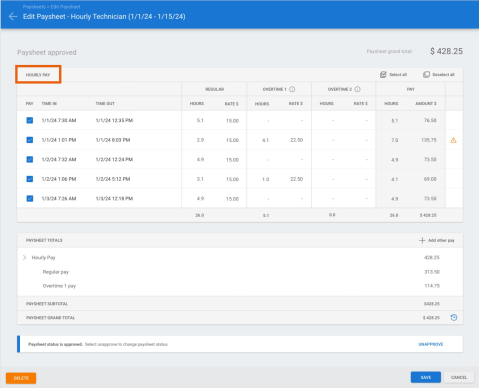
Within the edit paysheet screen you can view and edit paysheet details. Select labor assignments and/or timecards to pay for the pay period. Adjust pay hours and add bonus or advance dollars as needed. When ready, set paysheet status to approved.
Note:
- Shop must have the following licensed product to access Paysheets features: CCWLB - Repair Workflow Labor Management.
- User must have the following security permission to access paysheets on cccone.com: Create, search, view and edit pay periods.
- User must have the following additional security permissions to perform specific actions:
- Paysheets - Edit advance field - Provides the ability to add/edit advance on the employee paysheet.
- Paysheets - Edit bonus field - Provides the ability to add/edit bonus on the employee paysheet.
- Paysheets - Edit flat rate/commission pay hours - Provides the ability to select and edit flat rate/commission items for pay.
- The ability to edit timecards from the paysheet is not yet available in cccone.com - look for this functionality in an upcoming release.
Action Center: Open Workfile from Notification
Shops can now open the following items from notifications received in Action Center:
- New DRP assignments.
- New Open Shop assignments.
- New Insurance photo assignments.
- New Online photo estimate requests.
- Insurance change requests.
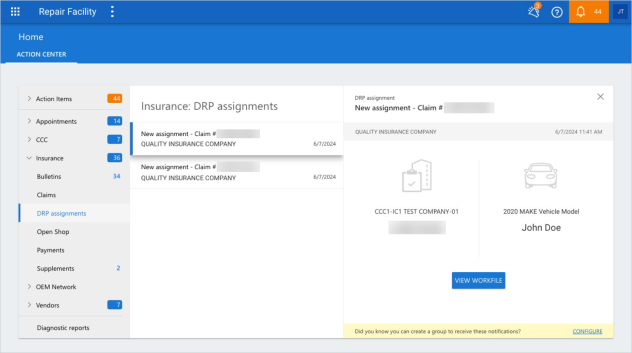
To open a workfile:
- Log into cccone.com and select Home in the app menu.
- From the Action Center screen, open a workfile notification.
For example, a New Assignment notification under >Insurance > DRP Assignments.
Click the View Workfile on the notification.
The corresponding workfile opens in either edit or view mode based on the user's security permissions.
Note:
- User must have the following security permission to edit workfiles: Create and edit workfiles
- User must have the following security permission to view workfiles: Search and view (read-only) workfiles
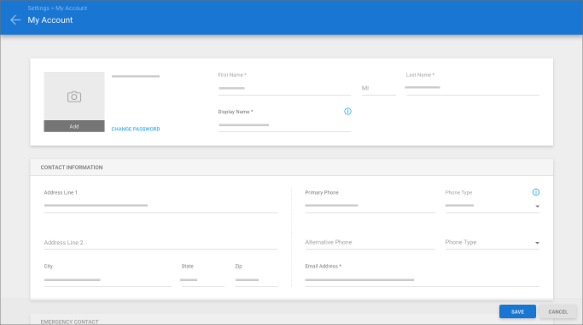
My Account: Emergency Contact
Users now have the ability to enter and edit emergency contact information from My Account settings on cccone.com. When updating emergency contact via My Account, the same information is also updated on the employee profile.
To access this feature from the desktop app:
- Select Configure.
- Select My Account.
You are automatically logged into cccone.com and directed to your My Account settings page.
To access this feature from cccone.com:
- Select you avatar button in the upper right-hand corner of the screen.
- Select My Account.
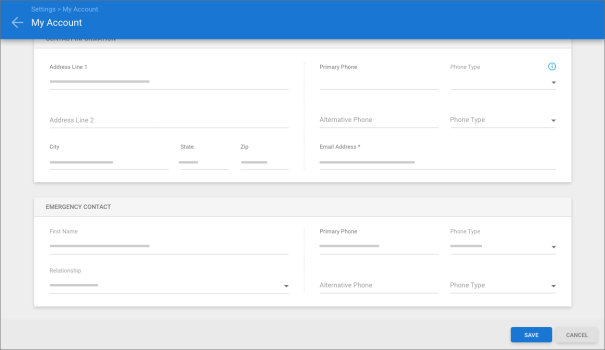
If you have permission to edit My Account settings, then you'll be able to edit all information displayed, including emergency contact information. If you do not have permission, then the information is displayed as read-only.
Note:
- All users have access to view their My Account settings.
- User must have the following security permission to edit MY Account settings: Edit My Account Information
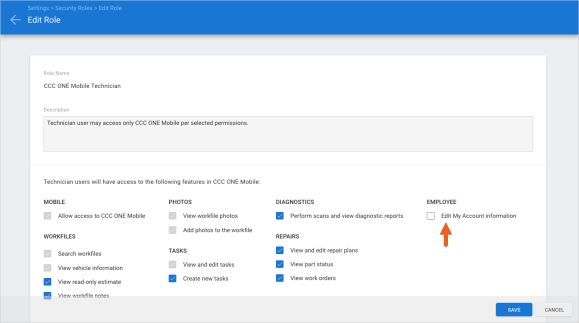
Security Roles: Mobile Technician
In preparation for new features coming soon on the mobile app for repair facilities, new security permissions have been added to the CCC ONE Mobile Technician security role. The following permission was added:
- Edit My Account settings
By default, this permission is unchecked for the mobile technician user. When checked, the mobile technician user will be allowed to edit their My Account settings via the mobile app.
To view/update the mobile technician security role:
- Log into cccone.com.
- Go to Settings.
- Select Security Roles.
- Select CCC ONE Mobile Technician in the list, then click Edit.
- Check and uncheck available permissions as desired, then click Save.
Note:
- User must have the following security permission to edit security roles: Create, search, view, edit, and delete security roles
- The Mobile technician security role may only be edited via cccone.com.
Settings: My Account Updates
A new security permission called Edit My Account information has been added to Security Role settings. This allows shops to limit a user's ability to edit their information in My Account settings.
To update security permissions:
- Go to Settings on cccone.com.
- Select Security Roles.
- Select a security role, then click Edit.
- Click the Permissions tab, then check/uncheck desired permissions.
- When finished, click Save.
When the Edit My Account information permission is checked, the user will be able to edit their name, address, and phone information in My Account settings same as they can today. When this permission is unchecked, the user will only be able to view their information in My Account settings but cannot change it.
Note:
- Because all CCC ONE users can edit their My Account information today, all existing security roles have this permission checked by default.
- Users with or without the Edit My Account information permission will still be able to change their password from the My Account screen.
- A user's ability to change password may be limited by the shop organization's CCC ONE authentication policy.
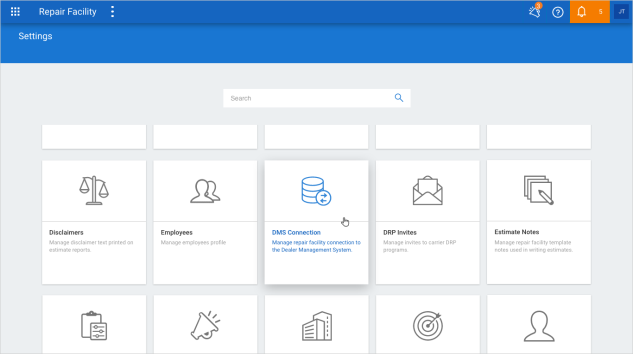
DMS Settings: Updated Permission to Access
CCC One has updated the associated security permissions required for editing DMS Connection settings. Previously users needed the “Edit repair facility profile" access these settings. Now, users must have the following permission instead: Manage accounting connection settings, data imports, and data exports
To access DMS Connection settings:
- Verify the user's security role has the following permission enabled:Manage accounting connection settings, data imports, and data exports.
- Go to Settings on cccone.com.
- Select DMS Connection.
Note:
- The "Edit repair facility profile" permission no longer provides access to DMS Connection settings.
- If the user does not have the required permission, the DMS Connection settings tile will appear locked.
Payment Devices: Unknown Payment Types (PayLink)
When an unknown payment type is received from Clearent PayLink transactions, the receipt created in CCC ONE will now be created with a default receipt type of "Clearent Paylink." This will help shops reconcile payments made through Clearent PayLink.
Shops can change the default receipt type applied in this scenario by updating Payment Devices configuration in Settings on cccone.com. There is a new setting called Processing unknown payment types. This setting allows the shop to select one of the payment types configured for Clearent, instead of using the default. Then, the receipt created in CCC ONE will use the selected payment type when an unknown payment type is received from Clearent PayLink.
To configure this setting:
- Go to Settings on cccone.com.
- Select Payment Devices.
- Scroll to the bottom of the screen to find the Processing unknown payment types setting.
- Select an available Payment Type from the list.
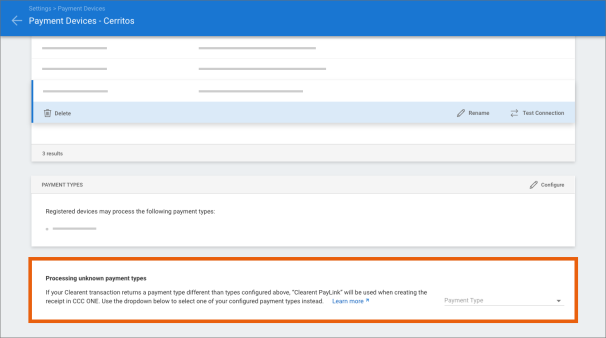
Changes are saved automatically.
Note:
- This setting is only available to shops enabled with Clearent PayLink.
- PayLink features must be enabled on the shop's Clearent account via Clearent - this is not done through CCC ONE.
- Shop location must have at least one Clearent device configured to process payments via CCC ONE.
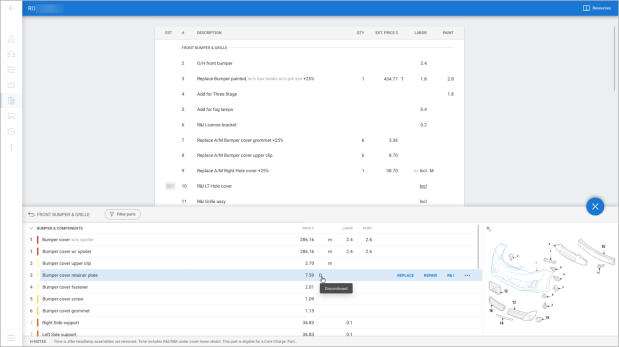
Estimating: Parts Database Updates
We've made a couple of enhancements to improve usability of the parts database when writing estimates on cccone.com. First, the width of the part description column now grows when the screen is expanded. Additionally, you'll now find the following indicators displayed to the right of the part price when applicable:
- D - Discontinued
- C - Core charge
- A - Approximate price
To access the parts database on cccone.com:
- Open a workfile on cccone.com, or create a new one.
- On the Vehicle screen, add a Standard Vehicle.
- On the Estimate screen, click the blue + button on the upper right-hand side of the screen.
Note:
- The parts database is only available when a vehicle has been added to the workfile.
- Indicators listed above are shown conditionally based on the data provided by MOTOR.
Estimating: Edit group Header Line
When editing estimate line details in cccone.com, users can now select the part group header line and perform select actions. This includes:
- Editing the header line description
- Adding a note to the header line
- Inserting a manual line above the header line
To access this feature:
- Open a workfile on cccone.com.
- Go to the Estimate screen.
- Click on a group header line to select.
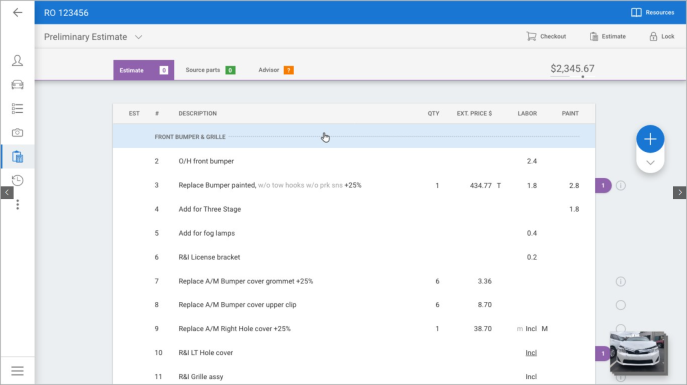
Once the line is selected:
- Edit the line description, then click OK to save changes.
- Click the Add line note link to enter a line note.
- Click the Insert line button to add a manual line above the header line.

Note: User must have the following security permission to edit estimates: Create and edit workfiles
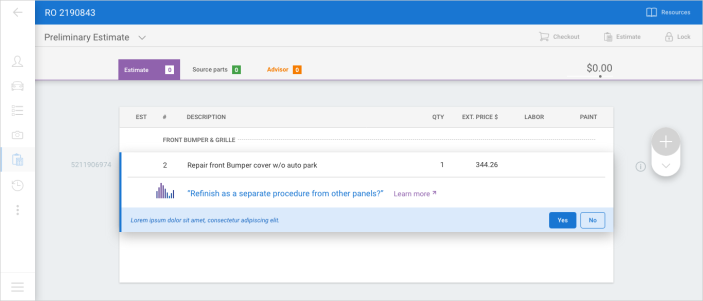
Estimating: Add Line Note from Prompt
When editing estimate line details in cccone.com, users can now add line notes to estimate when answering prompts.
To access this feature:
- Open a workfile on cccone.com.
- Go to the Estimate screen.
- Add a part to the estimate that triggers a prompt (Example: Add a bumper).
- Click Add line note... in the prompt action bar.
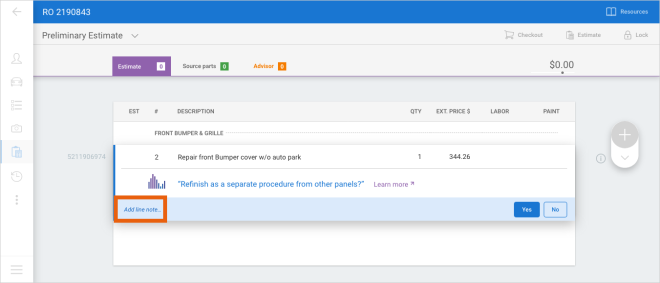
- Add desired line notes, then click Save.

You can select predefined notes and manually type note text. You can edit the note before closing the prompt by clicking the line note link again. When you finish answering the prompt, the appropriate lines are added to the estimate and the line note you entered will appear immediately below the part line on the estimate.
Note: User must have the following security permission to Edit estimates: Workfiles - Create and edit workfiles
Estimating: Multi-select Part Code
When writing estimates on cccone.com, users can now add multiple part codes to the estimate at once.
To access this feature:
- Open a workfile to edit on cccone.com.
- Go to the Estimate screen.
- Click the drop down arrow below the blue + button.
- Select Part Codes.
- Click on each part code you wish to add, then click OK.
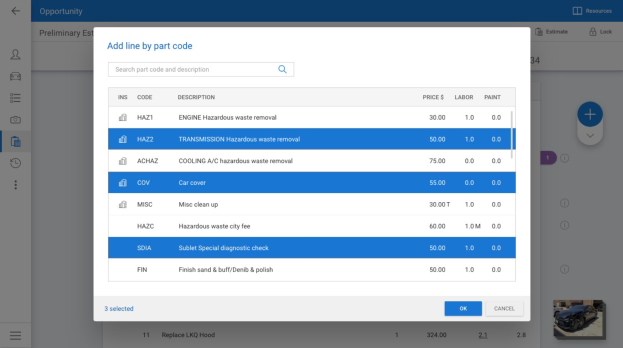
As you select part codes to add, a counter is displayed in the lower left corner of the Add line by part code screen. You may search for part codes by code or description. Any part codes you have already selected will remain selected while you execute your search.
Part codes configured with a specific part group will be added to the estimate within the configured group. Part codes without a group are added to the end of the estimate.
Note: User must have the following security permission to edit the estimate: Create and edit workfiles
CCC ONE Desktop Release 45
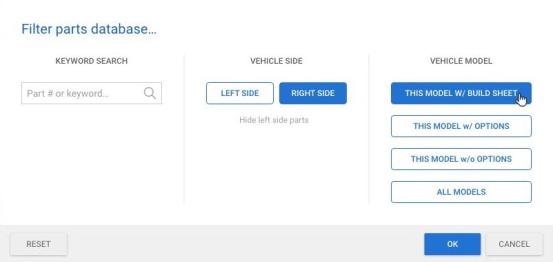
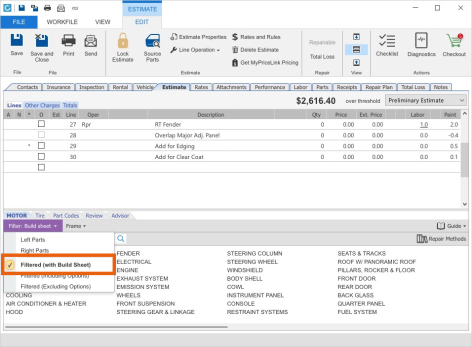
Build Sheets: Enhanced Parts Filtering
Shops licensed with build sheets now have enhanced parts filtering when build sheet data is applied to the workfile. When build sheet data exists, the parts database automatically filters parts based on build sheet data. The filter can then be changed to one of the standard filter options if desired.
To access this feature:
- Open a workfile where build sheet data has been downloaded.
- Go to the Estimate screen.
- Click on the MOTOR tab to view the parts database.
When parts are filtered with build sheet data, the Filter button is purple and displays as Filter: Build Sheet.
Note:
- Only shops licensed with the following feature will have parts filtering with build sheet data: BLDSH - Build sheets
- User must have the following security permission to access the parts database: Create and edit workfile
- Build sheet data may only be downloaded on workfiles created/edited on cccone.com or the RF Mobile app.
- Build sheet data is automatically downloaded when VIN is decoded via cccone.com or the RF Mobile app.
- When build sheet data is downloaded, the Vehicle Equipment Report is also saved to the workfile and available to view in the Attachments tab.
- If build sheet data was not available when VIN was decoded, the Vehicle Equipment Report is still saved to the workfile and available to view in the Attachments tab.
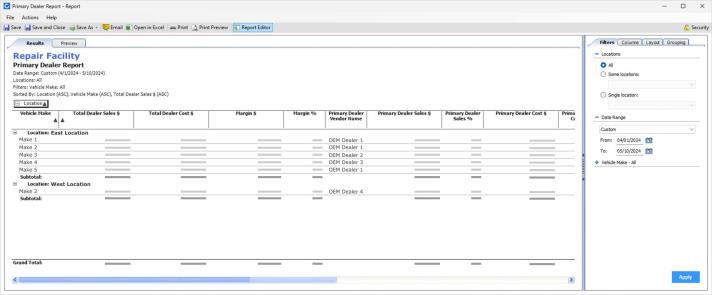
System Reports: Primary Dealer Report
A new system report has been added to the Sales reports category Primary Dealer Report. The report provides sales, cost, and margin details of OEM parts by vehicle make. Report data includes sales and cost dollars associated with primary dealer and non-primary dealer purchases.
To access this report:
- Log into the CCC ONE desktop application.
- Select the Reports menu, then select Find Report.
- Select Sales in the report category menu.
- Under System Reports, select Primary Dealer Report.
Note:
- This report is only available to shops with the following licensed feature: CCWRO - Repair Workflow.
- Only users with the following security permission may access this report: Sales - View sales reports.
- Report is available to run in all desktop client versions as of Back-end Release 2024.05.10.
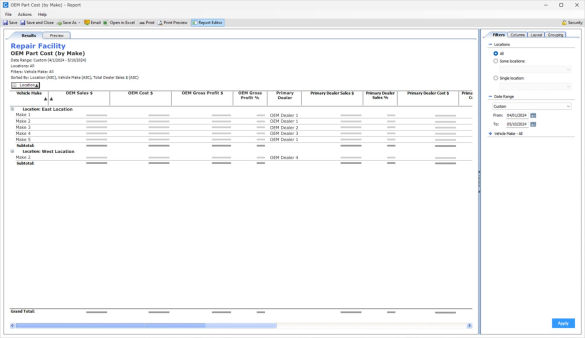
System Reports: OEM Part Cost (by Make)
The Primary Dealer system report in our last release is now called OEM Part Cost (by Make). You can find this report in the Sales reports category. The report provides sales, cost, and gross profit details of OEM parts by vehicle make.
To access the report:
- Log into the CCC ONE desktop application.
- Select the Reports menu, then select Find Report.
- Select Sales in the report category menu.
- Under System Reports, select OEM Part Cost (by Make).
Note:
- Shop must have the following licensed product to access the report: Repair Workflow Repair Order Management.
- User must have the following security permission to access the report: Reports - View sales reports.
- Like most gross profit reports, data included in the report is driven by sales recognized within the date range criteria specified.
Parts Dashboard: Pending and Action Required Queues
Shops with Repair Workflow Parts Management functionality will find two new queues on the Parts Dashboard:
- Pending
- Action Required
These queues provide additional visibility to parts orders. Each queue displays a count of items within the queue. Clicking on the queue redirects the user to the Parts Dashboard on cccone.com where action can be taken to resolve items within the queue.
To access this feature:
- In the desktop application, click the dashboard menu in the upper left corner of the screen.
- Select Parts.
- Click the Pending or Action Required queue.

Note:
- This change is only available to shops licensed with Repair Workflow Parts Management features.
- Item detail and actions available to resolve items in the queues are only available in cccone.com.
- User must have the following security permission to access the parts dashboard: Manage all aspects of parts procurement from a single dashboard
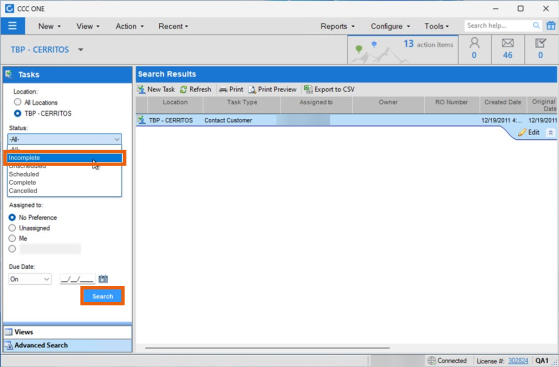
Tasks: Advanced Search "Status" Criteria
When managing tasks via the Task search screen, users have a new Status criteria option called "Incomplete." This new option produces search results where tasks are not marked as "Complete" or "Canceled" - the tasks may be "Scheduled" or "Unscheduled." This provides more visibility to all open tasks.
To access this feature:
- In the desktop application select View, then Tasks.
- Select Advanced Search.
- Click the Status criteria, then select Incomplete.
- Enter additional criteria as desired, then click Search.
Note:
- Results include tasks with a status of "Scheduled" or "Unscheduled"
- Results may include tasks with or without a Due Date specified.
Work Hours settings: Copy Calendar Enhancement
When managing Work Hours settings, Copy Calendar functionality has been updated to show the Available Locations (and subsequent Selected Locations) in alphabetical order. For MSOs with a large list of Available Locations, this update will improve efficiency and accuracy.
To access this feature:
- In the desktop application select the Configure menu, then select Work Hours.
- Select either Work Hours calendar - Production or Customer Service.
- Select Copy Calendar.
In the Copy Calendar fly-out, you'll notice the list of available locations is now in alphabetical order.
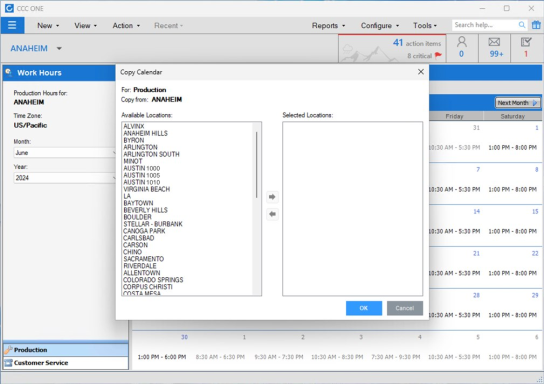
Note:
- The location name listed in Available Locations is sourced from the repair facility profile Address and Contact Information "Short Name" field.
- As locations are selected, the Selected Location list is also sorted in alphabetical order.
Workfile: Tracking Information Enhancement
When editing Tracking Information in the workfile Contacts tab, users will find the Location field more usable. In select circumstances, the Location value on the workfile may be changed. The list of available locations is now wider to show longer location names. This list is also sorted alphabetically making it easier to find a location in the list.
To access this feature:
In the desktop application, open a workfile to edit.
Go to the Contacts tab.
Under Tracking Information on the right-hand side of the screen, select Location.
Note:
The Location field is not generally enabled for edit. Location can be changed when the following conditions are true:
- Workfile is created from an imported EMS estimate.
- User has access to more than one location in the MSO.
CCC Mobile RF
Home Screen Updates (Android)
In preparation for new, upcoming features in CCC ONE Mobile, we've made some updates to the application home screen. The application now has a header where we've moved launch points for the app menu and Help. In the future, you can expect to find access to announcements and notifications here.
Additionally, quick action buttons have been consolidated into a single row. In the future, you can expect to see new actions available. Including the ability to customize the quick actions displayed.
_154x332.png)
Note:
- To access the app menu, tap the waffle icon to the left of the CCC logo.
- To access CCC ONE help, tap the ? icon on the right-hand side of the header.
- No changes were made to access for quick actions.
- No changes were made to workfile search capability.
- No changes were made to access for workfiles, appointments, and tasks on the home screen.
Home Screen Updates (iOS)
In preparation for new, upcoming features in CCC ONE Mobile, we've made some updates to the application home screen. The application now has a header where we've moved launch points for the app menu and Help. In the future, you can expect to find access to announcements and notifications here.
Additionally, quick action buttons have been consolidated into a single row. In the future, you can expect to see new actions available. Including the ability to customize the quick actions displayed.
_185x399.png)
Note:
- To access the app menu, tap the waffle icon to the left of the CCC logo.
- To access CCC ONE help, tap the ? icon on the right-hand side of the header.
- No changes were made to access for quick actions.
- No changes were made to workfile search capability.
- No changes were made to access for workfiles, appointments, and tasks on the home screen.
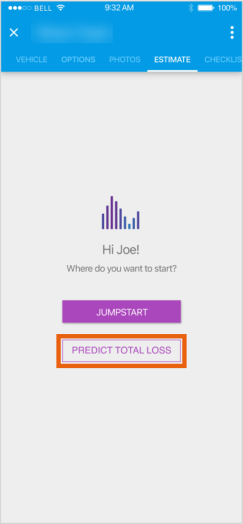
Support for Predictive Total Loss (iOS)
Additional AI functionality is being introduced into the CCC ONE mobile application for repair facilities. For select carriers, shops will be able to request a total loss prediction before writing an estimate with Jumpstart.
To access this feature:
- Open an assignment without an estimate on the mobile app.
- Go to the Photos tab and capture required damage photos - 4 corners of the vehicle plus 3 damage close ups.
- Select the Estimate tab.
- Tap Predict Total Loss.
Damage photos are sent and processed by AI. The app displays a progress screen until a prediction result is returned. Possible prediction outcomes are:
- Predicted Repairable
- Probably Total Loss
- Predicted Total Loss
- Unknown
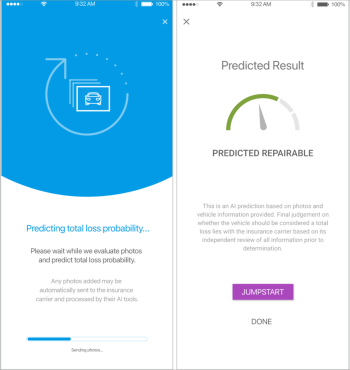
When a prediction result is returned, an event is saved to the workfile. This allows the user to view the predicted result in workfile event history, as well as view the result again within the mobile app.
Note:
- This feature is only available on assignments from carriers where Predict Total Loss is enabled.
- The Predict Total Loss action must be run before estimate lines are written.
- The Predict Total Loss action is optional - shop can write an estimate with Mobile Jumpstart without selecting the Predict Total Loss action.
- The following damage photos are required to get a total loss prediction: Left Front, Right Front, Right Rear, Left Rear, Damage Left, Damage Center, Damage Right.
- Only standard mobile users with permission to edit workfiles may access this feature - feature is not available to technician users.
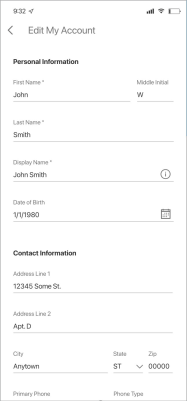
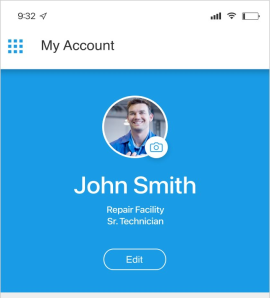
My Account Settings (iOS & Android)
Users now have access to view My Account settings in the RF Mobile app. Users with appropriate permission may also edit My Account settings via the app. This includes:
- Employee photo.
- Personal information such as name, display name, and date of birth.
- Contact information such as address, phone, and email.
- Emergency contact information.
To access this feature:
- Log into the RF Mobile app.
- Tap the menu button in the upper left-hand corner of the screen.
- Select My Account.
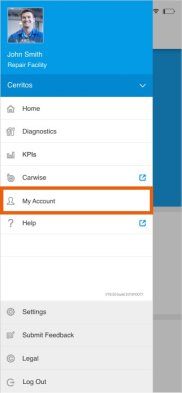
The My Account screen is displayed. If user has permission to edit their settings, then a photo button and "Edit" button are displayed. Tap Edit to update My Account settings.
To upload an employee photo:
- Tap the photo button on the My Account screen.
- Select Photo from Camera or Photo from Library.
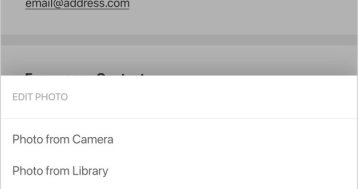
- Either take a photo or select an image from the device library.
- Accept terms of use when prompted.
Note:
- All users with access to the RF Mobile app have access to view My Account settings.
- User must have the following permission to edit My Account settings: Edit My Account information
- Users are granted access to edit My Account settings via Security Roles.
- Security Roles for standard CCC ONE users may be edited via RF Desktop or cccone.com.
- The security role for CCC ONE technician users may only be edited via cccone.com.
Quickly find your CCC Team members. Go to http://www.cccis.com/collision-repairers/team/ and follow the screen instructions.
