What's New in CCC® Estimating for May 2024
Click here to view the What’s New release notes for CCC® Estimating.
Note: The availability of the features listed below may vary based on the products licensed to your company.
CCCONE.COM - Web Estimating
UpdatePlus: Mid-Repair Survey Settings
Web now supports a mid-repair survey for UpdatePlus users which allows shops to track customer satisfaction while the repair is in progress. This feature helps with customer interaction by tracking mid-cycle feedback for a more positive customer experience.
To enable the mid-repair survey feature:
- Navigate to Settings on cccone.com.
- Select UpdatePlus.
- On the Messaging tab, set Repair Status Messaging to enabled.
- Toggle the Mid-Repair Survey switch to enabled, then click Save.
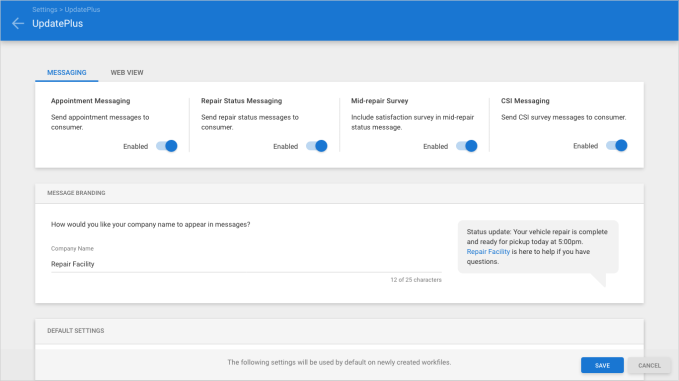
When enabled, the mid-repair status message sent to the consumer will include a link to a mid-repair survey. Negative responses from the consumer may generate a notification to the estimator so the estimator can take action.
Note:
- User must have the following security permission to manage UpdatePlus settings: Edit repair facility profile.
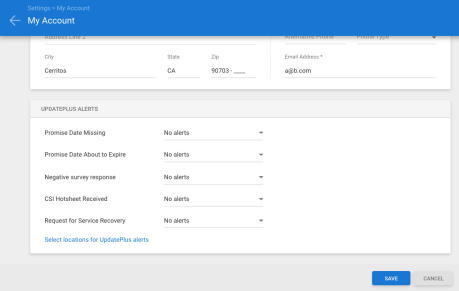
- Estimators may configure UpdatePlus Alerts, including notifications for negative survey responses in My Account settings.
- Consumer response to surveys is recorded in workfile notes under the Customer Communication category.
- Negative responses received will include additional notes from the consumer.
Parts Dashboard: Complete Draft Invoices
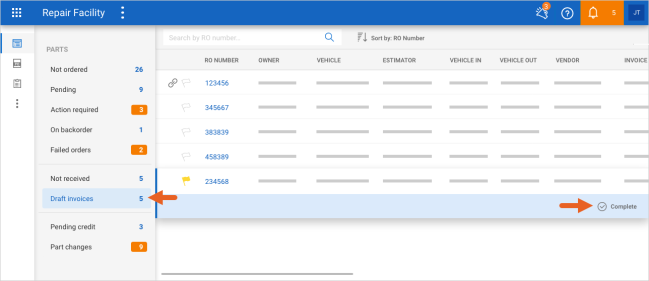
Shops with Repair Workflow Parts Management features can now complete electronic draft invoices on cccone.com. This action is available from the Parts Dashboard, Draft Invoice queue.
To complete an electronic draft invoice:
- Go to the Parts Dashboard on cccone.com.
- Select Draft invoices on the left panel.
- Select an invoice listed in the results displayed on the right.
- Click Complete.
- Click Yes on confirmation prompt.
Note:
- This feature is only available on electronic draft invoices.
- This feature is only available to shops licensed with Repair Workflow Parts Management features.
- User must have the following security permission to access the parts dashboard: Manage all aspects of parts procurement from a single dashboard
Parts Dashboard: Order Update
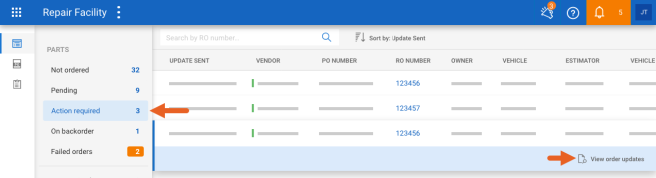
Previously, new queues were introduced in the Parts Dashboard to provide greater visibility to status on electronic orders. The Action Required queue includes a list of electronic orders where the vendor has sent order updates that require the shop's review. Now, shops have the ability to view and respond to order updates from the vendor.
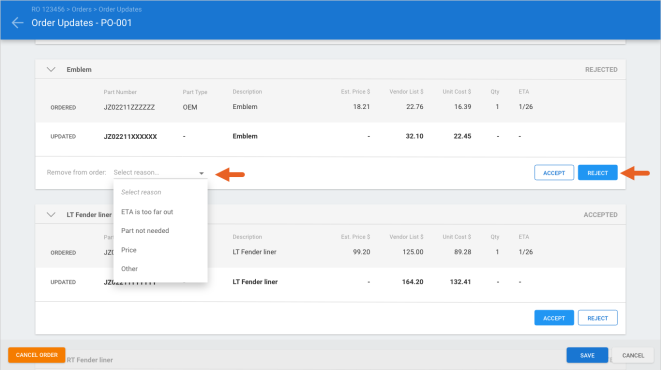
The order updates screen allows shops to view purchase order details that have been updated by the vendor. The shop may accept or reject these updates from the vendor. Updates may include changes to:
- Part price
- Part number
- Order quantity
- Expected delivery date
- Backorder status
- Removing inaccurate parts and adding the correct one
To view order updates on cccone.com:
- Log into cccone.com and select the main menu in the upper left-hand corner of the screen.
- Select Parts, then Parts Dashboard.
- Click Action Required on the left side of the screen.
- Select a row in the results displayed, then click View order updates.
When reviewing order updates, part details from the original order are displayed. You'll find updated part details displayed immediately below the original part. Where information is different, the new value is displayed in bold. Where information is unchanged, a dash is displayed.
To resolve order updates the shop must accept or reject each change. When rejecting a change, the shop must specify a reason. Simply click the Reject button, then select a reason from the list provided. Rejected changes will remove the part from the order.
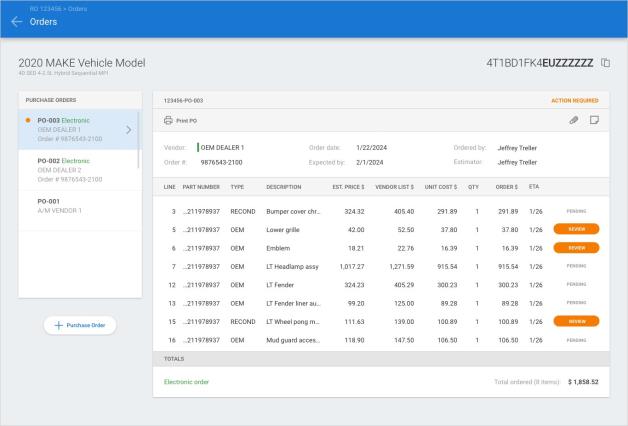
Tip: The order updates screen may also be accessed from the purchase order. When selecting the action to View purchase order, the workfile Orders screen is displayed. Purchase orders with action required display an orange indicator next to the PO number. When viewing purchase order details, click the orange tag on any part showing Review status.
Note:
- User must have the following security permission to access the Parts Dashboard: Manage all aspects of parts procurement from a single dashboard.
- The Action Required queue includes only orders placed with electronic vendors.
- This functionality is available to both Estimating only and Repair Workflow shops.
- For shops with Repair Workflow, user must also have the following security permission to view order updates: Create, search, view and void purchase orders.
Parts Dashboard: Vendor Messages
Vendor chat messages associated with electronic orders are now accessible in cccone.com. We've enhanced vendor chat capabilities by introducing a new dashboard for managing Vendor Messages. From this dashboard users may:
- View messages received from all vendors in one place.
- Sort and filter messages received by date, RO number, and vendor.
- Start a new chat.
To access the Vendor Messages dashboard:
- Go to the Parts Dashboard on cccone.com.
- Select Vendor Messages in the white bar on the left side of the screen.
Unread messages are displayed by default. Click the All filter chip above the message list to see all messages for the shop location.
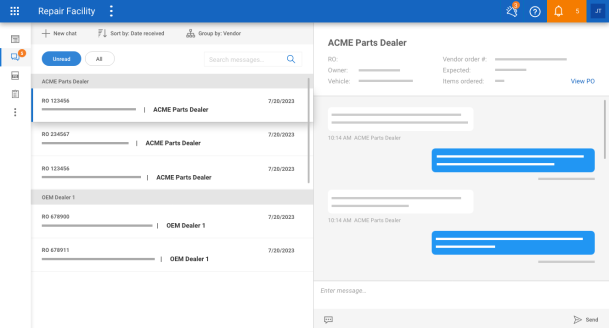
To view message detail, simply select a message from the list. On the right side of the screen you'll find summary information for the workfile and related order displayed at the top of the panel. Below the order summary you'll find the complete chat history with the vendor.
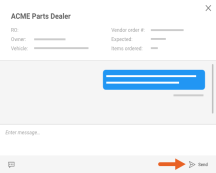
To start a new chat with the vendor:
- Select New chat in the toolbar above the message list.
- Search for and select an electronic order, then click Start Chat.
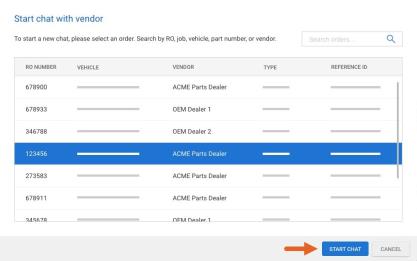
- In the chat window type your message, then click Send in the lower right corner.
Note:
- Vendor Chat is available on electronic orders only.
- This feature is available to both Repair Workflow and Estimating Only shops.
- It may take the vendor hours to reply to new chat messages or new messages sent on an existing chat.
Parts Dashboard: Backorder
Shops licensed with Repair Workflow Parts Management features can now set and clear backorder status on cccone.com. When a part is flagged for backorder, the On backorder queue in the parts dashboard is populated. This allows shops to keep track of parts they are waiting for.
To manually set backorder status:
- Go to the Parts Dashboard on cccone.com.
- Select an item in the Pending queue.
- Select View purchase order.
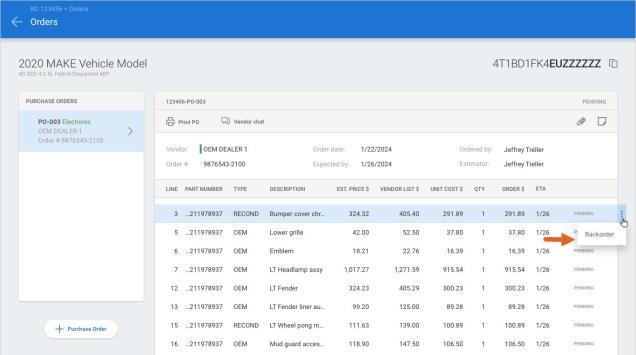
- Select a part listed on the order, then click the menu button on the right-hand side of the screen.
- Select Backorder.
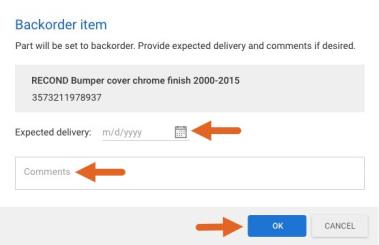
- Enter comments and expected delivery date as desired, then click OK.
Once backorder has been set, the part will be displayed in the On backorder queue. To clear backorder status:
- Select an item in the On backorder queue.
- Select Remove backorder.
- In the confirmation prompt, click Remove.
Note:
- User must have one of the following security permissions to access the workfile orders screen:
1. Create, search, view, and void purchase orders.
2. Manage all aspects of parts procurement from a single dashboard.
- This feature is only available to shops with Repair Workflow Parts Management features.
- Backorder status set or removed in cccone.com is mirrored in CCC ONE desktop, and the other way around.
Print Purchase Order
Shops can now print the purchase order report from cccone.com. This action is available from the workfile Orders screen.
To print a purchase order:
- Go to the Parts Dashboard on cccone.com.
- Select an item in one of the following queues: Pending, Action required, On backorder.
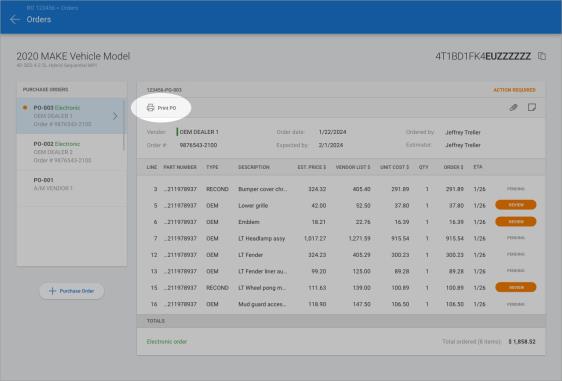
- Select View purchase order.
- In the Orders screen, select Print PO in the toolbar.
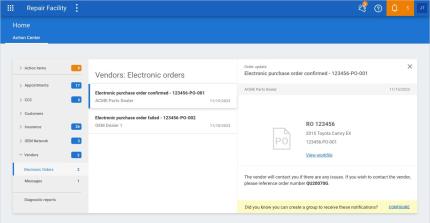
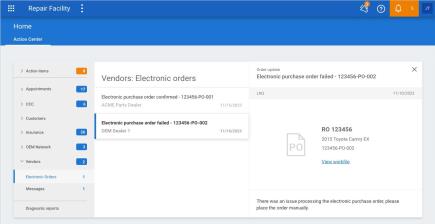
Action Center: Electronic Order Notifications
Notifications for electronic orders are now available to view in Action Center on cccone.com. This includes both "Electronic Order Confirmed" and "Electronic Order Failed" notifications. Previously these notifications were only available in CCC ONE Desktop.
To view order notifications on cccone.com:
- Log into cccone.com.
- Go to Home > Action Center.
- Select the Vendors category, then select Electronic Orders.
- Select a notification listed to view details.
Note:
- There is a link to view the workfile on both purchase order confirmed and purchase order failed notifications.
- Only users specified in a Notification Group for Vendor Messages may receive electronic order notifications.
- All users may receive electronic order notifications when no Notification Group is defined.
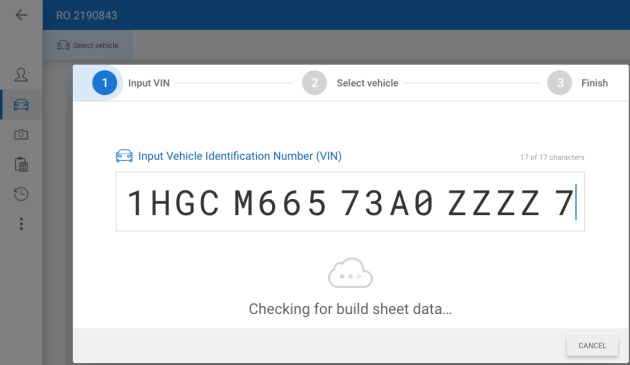
Build Sheets
Shops licensed with build sheets now have the ability to download build sheets on cccone.com. When scanning or manually entering the VIN, the build sheet will automatically download for vehicles with build sheet data. Build sheet data is then applied to the workfile. When build sheet data is applied, the following may occur:
- Model selection filters to fewer models.
- Paint and trim values populate.
- Applicable option packages selected.
- Vehicle options marked as Installed.
In the event build sheet data is not available, a Vehicle Equipment Report may still be downloaded. This too, occurs automatically. Once downloaded, with or without build sheet data, the Vehicle Equipment Report is available to view in PDF format from the workfile Options and Photos screens.
To download build sheets from cccone.com:
- Log into cccone.com.
- Select the action to create a new workfile.
- Enter customer information, then select the Vehicle button.
- In the toolbar, click Select vehicle.
- Scan or enter the VIN, then click Next.
- If more than one model is returned, select a model and click Next, otherwise click Done.
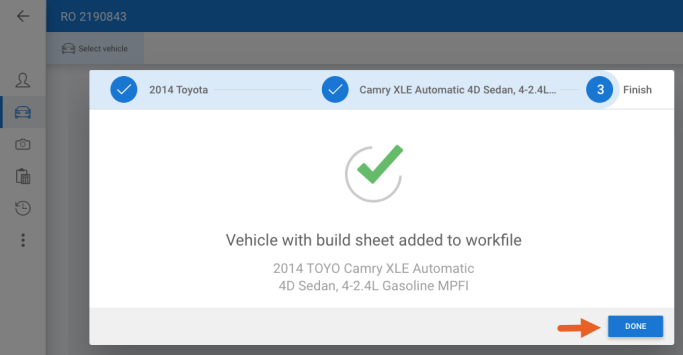
Build sheet data is downloaded automatically. Once downloaded, go to the Options screen in the workfile. There you'll see selected vehicle options as Installed. Also, you have access to the Vehicle Equipment Report.
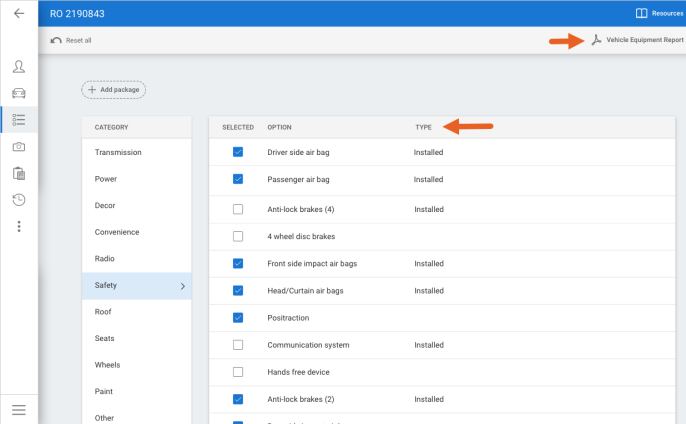
To view the Vehicle Equipment Report:
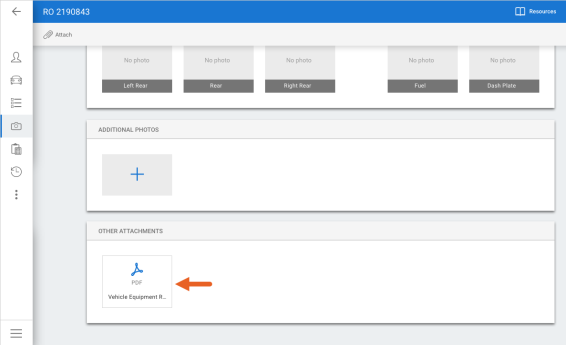
- After build sheet data is applied to the workfile, go to the workfile Vehicle Options or Photos screens.
- From Vehicle Options, click the Vehicle Equipment Report button in the upper right- hand corner of the screen.
- From Photos, scroll down to Other Attachments and click the Vehicle Equipment Report PDF.
Tip:
- Does your workfile already have a vehicle with VIN saved? You can still get build sheet data for the vehicle. In the workfile Vehicle screen, click the Factory Build Sheet button in the toolbar at the top of the screen.
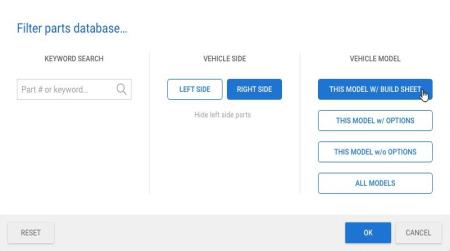
- Lastly, when build sheet data is applied to the workfile, an additional level of parts filtering becomes available. Build sheet data is used to further filter parts specific to the vehicle. To update parts filters select the blue + button on the Estimate screen. Then click the filter chip in the part database toolbar.
Note:
- Only shops licensed with the following feature may access build sheets on cccone.com: BLDSH - Build sheets.
- User must have the following security permissions to download build sheets: Create and edit workfiles.
- Build sheet data may be retrieved on cccone.com no matter which CCC ONE application was used to create the workfile.
- Not all manufacturers provide factory build sheet data. The Vehicle Equipment Report will still be automatically retrieved where build sheet data is not supported.
Jumpstart: Support for Build Sheets
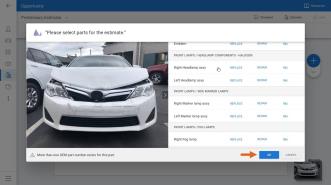
The jumpstart estimate feature on cccone.com has been updated to filter parts based build sheet data. Shops enabled with Build Sheets have the ability to download and apply build sheet data to the workfile when VIN is decoded via cccone.com or the mobile app. When this occurs, cccone.com uses build sheet data to improve the part selection experience in the jumpstart estimate wizard.
To access this feature:
- Scan or input the VIN on a workfile in cccone.com or the mobile app.
- If available, build sheet data is automatically retrieved and applied to the workfile.
- Save the workfile.
- In cccone.com open the workfile to the Estimate screen, then select Jumpstart.
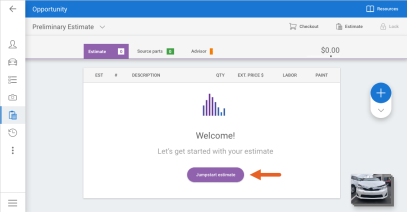
- Select parts to Repair, Replace or R&I.
- Click OK.
Note:
- Shop must have the following licensed feature to retrieve build sheet data: BLDSH - Build Sheets
- User must have the following security permission to jumpstart an estimate: Create and edit workfiles
Diagnostics: Settings support for Calibrations
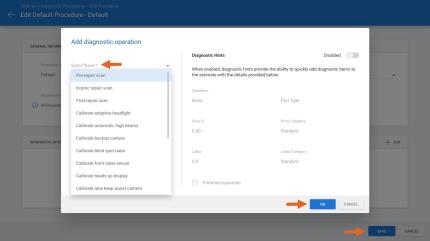
Shops enabled with CCC Diagnostics now have the ability to update diagnostic procedure settings with additional calibration operations. When editing diagnostic operations on Diagnostic Procedures and OEM Scan Preferences, the following Scan Phase options are now available:
- Calibrate adaptive headlight
- Calibrate automatic high beams
- Calibrate heads-up display
- Calibrate LiDAR sensor
- Calibrate night vision
- Calibrate rear radar sensor
- Calibration drive
- OEM access fee
- Other diagnostic service
To update Diagnostic Procedures:
- Go to Settings on cccone.com.
- Select Diagnostic Procedures.
- Select a procedure from the list to edit or, create a new one.
- Select an item from the Diagnostic Operations section to edit or, click Add to create a new one.
- Select Scan Phase, Scan Type, fill out required fields and click OK.
- Click Save.
Note:
- Diagnostic Procedures are available to shops with the following licensed feature: CCC Diagnostics.
- User must have the following security permission to edit Diagnostic Procedures: Diagnostics - Manage diagnostic procedures and regions.
CCC ONE Desktop Release 44
Receipts: Sync Payment Type with Clearent Transaction
Shops now have the ability to sync the payment type entered on the CCC ONE receipt with the payment type used on Clearent devices. This feature is only available to shops that have connected their Clearent devices with CCC ONE.
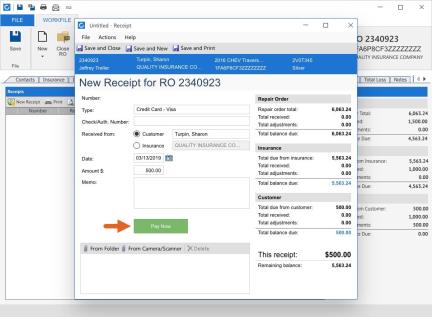
When the shop creates a new receipt in CCC ONE, the payment type must be selected. A green "Pay Now" button appears if the payment type can be processed through a Clearent device. If the payment type processed by Clearent differs from the payment type selected on the receipt, the receipt will automatically upate with the payment type returned by Clearent.
To process payments with a Clearent device:
- Connect Clearent devices on cccone.com under Settings > Payment Devices.
- Once connected, create a new receipt in CCC ONE Desktop.
- Enter required information in the new receipt, then click Pay Now.
Note:
- Back-end activation of the following client feature deployment is required to enable this feature: Clearent - Enable Payment Type Auto-Match.
- The receipt payment type will only be updated if the value selected does not match the value returned from Clearent.
- The receipt payment type will only be updated if the value returned from Clearent matches an existing payment type configured in CCC ONE.
- To configure payment types in CCC ONE, edit Receipt Types in the repairer profile.
- To connect Clearent devices to CCC ONE, go to cccone.com and edit Payment Devices settings.
- Valid payment types are: Visa, Master Card, American Express, and Discover.
Estimating Only: Parts Dashboard Access
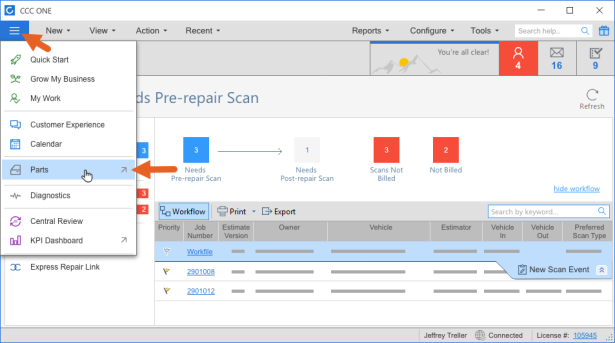
To provide more visibility to electronic orders, the Parts Dashboard is now available for Estimating only shops. This functionality was recently introduced on cccone.com. Now, users can access this dashboard from the CCC ONE Desktop dashboard menu.
For Estimating only shops, the Parts Dashboard contains the following queues:
- Pending - Includes electronic orders pending confirmation from the vendor
- Action Required - Includes electronic orders where the vendor has sent updates that require shop review
- Failed orders - Includes electronic orders that failed to process with the vendor
- Part changes - Includes parts with changes to part number, description, and/or price that may be applied to the estimate.
To access the Parts Dashboard:
- Login to CCC ONE Desktop.
- Click the menu icon in the upper left corner of the screen.
- Select Parts.
- A new browser tab will launch displaying the Parts Dashboard on cccone.com.
Note:
- The following security permission is required to manage parts through Parts Dashboard: Manage all aspects of parts procurement from a single dashboard
- The Parts Dashboard only includes electronic orders for Estimating only shops.
Mid-repair Survey Response
Shops enabled with UpdatePlus now have the ability to send a mid-repair survey to customers. The mid-repair survey allows shops to track customer satisfaction while the repair is in progress. Once configured, survey responses from the customer will appear in CCC ONE Desktop. Responses can be found in the workfile Notes tab and in the Customer Communication screen.
To view mid-repair survey responses:
- Open a workfile where the mid-repair survey was sent.
- Go to the Notes tab and select the Customer Communication category.
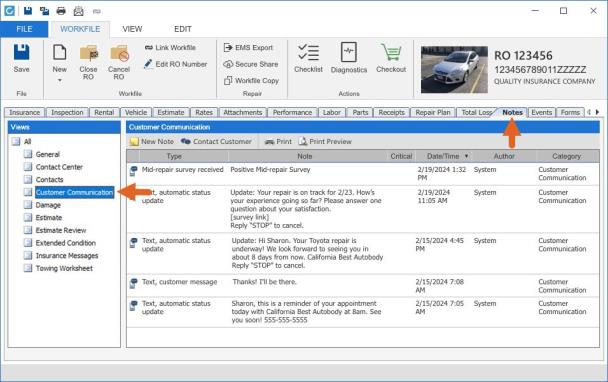
This will filter workfile notes to show only Customer Communication items. Look for Mid-repair survey received items to view the customer response.
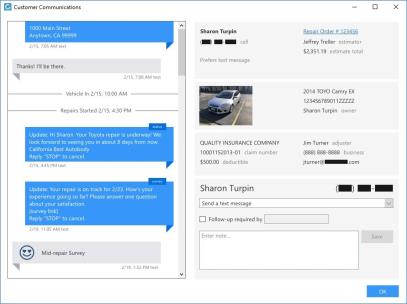
From this screen you also have access to the Customer Communication screen. Simply click the Contact Customer button in the toolbar above the notes list. Scroll through message history on the left-hand side of the screen to view all customer messages sent and received.
Note:
- To configure the use of mid-year repair surveys, go to UpdatePlus settings on cccone.com.
- Once configured, customer responses to the mid-year repair survey are automatically recorded to the workfile.
- Negative responses may include additional notes from the customer.
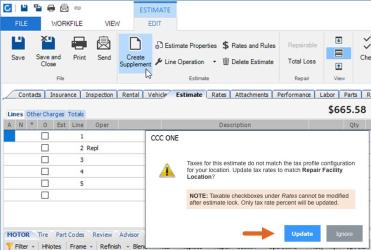
Create Supplement: Prompt for Tax Profile Difference
Shops using centralized taxes can now be alerted to tax profile discrepancies on supplement assignments and imported workfile copies. When the estimator selects the action to create a new supplement, CCC ONE compares the tax profile on the estimate with the shop location's default tax profile.
When comparing tax profiles, CCC ONE looks for differences in the following settings:
- Tax rate percentages
- Applied tax types (i.e., checkboxes related to Sales, County, etc. within all Rates tabs on the estimate)
- Tiered tax configuration (e.g., tax tiers, Bottom $, and Surcharge $)
When a difference is found, a prompt is displayed. Depending on the difference, the estimator may update the tax profile on the estimate to use the shop's default tax profile. Applied tax types cannot be changed once the initial estimate is locked. However, tax rate percentages may be updated.
To access this feature:
- Open a supplement assignment or imported workfile copy.
- Select Create Supplement.
- In the confirmation prompt, select Yes.
- If tax profile differences are detected, a prompt is displayed.
- If updating the tax profile is possible, select Update or Ignore as desired.
- If updating the tax profile is not allowed, select OK to close the prompt.

Note:
- The following client feature deployment is required to enable this feature: Enable tax difference prompt
- Shop must be enabled with centralized rates and taxes to enable this feature.
- Shop location must have a tax profile configured in cccone.com Settings > Tax Profiles.
- The prompt is only displayed when tax profile differences are detected.
- Applied tax types (i.e., taxability checkboxes for Sales, Total Loss, Municipal, County, Other 1, and Other 2) cannot be changed on a supplement.
- Tax structure (tiered tax vs. standard tax) cannot be changed on a supplement.
- No prompt will be displayed on tax-exempt workfiles - in other words, a file where no tax types are applied to the estimate.
CCC Mobile RF
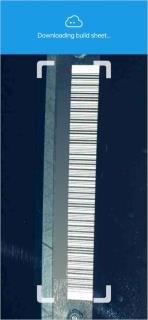
RF Mobile: Build Sheets
Shops licensed with build sheets now have the ability to download build sheets from the RF Mobile app. When scanning VIN via the mobile app, the build sheet will automatically download for vehicles with build sheet data. Build sheet data is then applied to the workfile. When build sheet data is applied, the following may occur:
- Model selection filters to fewer models.
- Paint and trim values populate.
- Applicable option packages selected.
- Vehicle options marked as Installed.
In the event build sheet data is not available, a Vehicle Equipment Report may still be downloaded. This too, occurs automatically. Once downloaded, with or without build sheet data, the Vehicle Equipment Report is available to view in PDF format from the workfile Options tab.
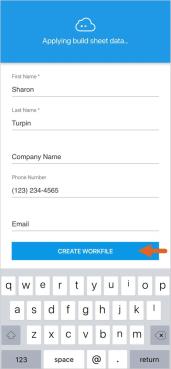
To download build sheets from the mobile app:
|
|
|
|
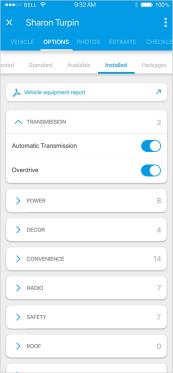
| Build sheet data will be downloaded automatically. Once downloaded, tap the Options tab in the workfile. There you'll find a button to view the Vehicle Equipment Report and a new filter view called Installed. Tap on Installed to view vehicle options marked as Installed per the build sheet. |
|
Note:
- Only shops licensed with the following feature may access build sheets in the mobile app: BLDSH - Build sheets.
- User must have the following security permissions to download build sheets in the mobile app:
- Allow access to CCC ONE Mobile
- Create and Edit Workfiles
- When downloading build sheets via the mobile app, the Vehicle Equipment Report is saved as an attachment to the workfile. As a result, the report is accessible via RF Desktop and cccone.com in the workfile Attachments tab.
Quickly find your CCC Team members. Go to http://www.cccis.com/collision-repairers/team/ and follow the screen instructions.
