What's New in CCC® Estimating for March 2024
Click here to view the What’s New release notes for CCC® Estimating.
Note: The availability of the features listed below may vary based on the products licensed to your company.
CCCONE.COM - Web Estimating
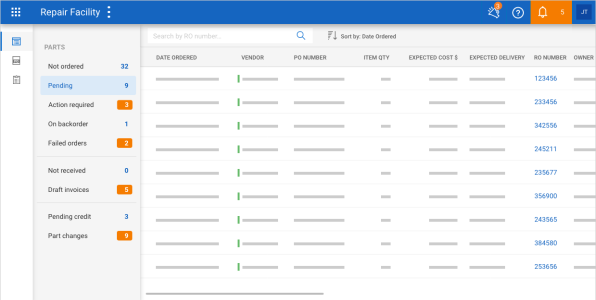
Parts Dashboard - Initial Release
The Parts Dashboard is now available in cccone.com as a read only view. It can be accessed from the primary web hamburger menu. Users may view the following queues for Parts Dashboard:
- Not Ordered
- On Backorder
- Failed Orders
- Not Received
- Draft Invoices
- Pending Credit
- Part Changes
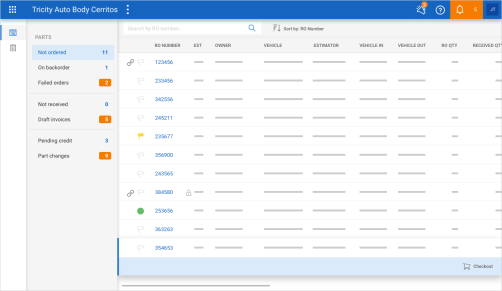
From the Not Ordered and Failed Orders view, users may access Checkout to complete their part orders.
Note:
- The Parts Dashboard is only available to shops with Repair Workflow Parts Management feature.
- The following security permission is required to manage parts through Parts Dashboard: Parts - Manage all aspects of parts procurement from a single dashboard.
- Users are not required to have additional permissions to complete checkout actions.
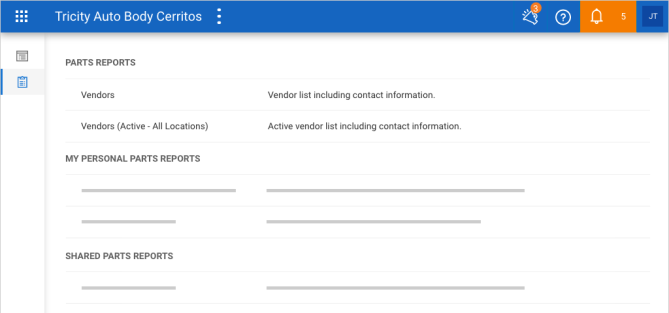
Parts Dashboard: Parts Reports
Access point to Parts Management reports from the Parts Dashboard is now available. Users with permission to view Parts Management reports will see a reports button in the white bar on the left side of the screen. Click this button to view Parts Management reports, including saved personal and shared versions of the reports.
Note:
- The Parts Dashboard is only available to shops licensed with Repair Workflow Parts Management features.
- The following security permission is required to access the Parts Dashboard: Parts - Manage all aspects of parts procurement from a single dashboard.
- The following security permission is required to access Parts Management reports: View parts management reports.
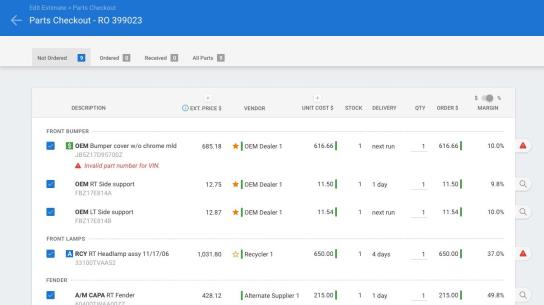
Checkout: Support for Primary Dealer
Checkout gets real-time quotes for parts from electronic vendors. Automated vendor selection in Checkout has been updated to support primary dealers. If the primary dealer returns quotes, all OEM parts are selected to order from the vendor. This is true regardless of part sourcing decisions made while writing the estimate.
Shops with Parts Management features may also create non-electronic orders for primary dealers. If the primary dealer returns no quotes, a non-electronic order is created for OEM parts. Again, this is true regardless of part sourcing decisions made writing the estimate.
Note:
- Automated selection logic for primary dealer in Checkout applies to OEM parts only.
- Checkout selects the primary dealer only when primary dealer make matches vehicle make on the workfile.
- Automated selection logic for primary dealer applies regardless of part sourcing decisions made when writing the estimate.
- Only Repair Workflow shops can create non-electronic orders created through Checkout.
Vendors: Configure Primary Dealer
Shops now have the ability to specify a vendor as a "primary dealer." Primary dealers may be automatically selected when ordering parts via Checkout. To identify primary dealers on screen, look for a filled orange star next to the vendor name.
To specify a vendor as a primary dealer:
- Go to Settings on cccone.com, then select Vendors.
- Select a vendor to edit, or add a new one.
- Scroll down to the Preferred Vendor section, then click Configure.
- If not already a preferred vendor, set the Preferred Vendor switch to Enabled.
- Set the Primary Dealer switch to Enabled.
- Select part account and vehicle make settings as desired, then click Save.
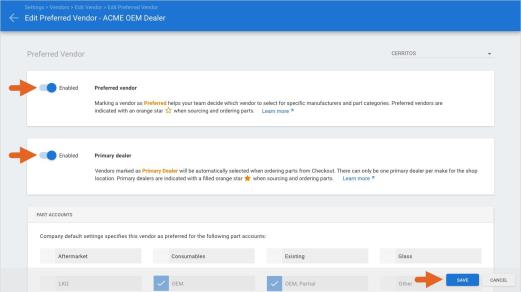
When Primary Dealer is enabled, the vendor:
- Shows up in part sourcing and Checkout screens with a filled orange star.
- Is automatically selected in Checkout if it returns quotes for OEM parts.
- Is automatically selected in Checkout to create a non-electronic order for OEM parts.
Are you a multi-shop operator? If so, you have a new setting under company default settings for preferred vendors. You'll now find a switch to enable the vendor as a primary dealer for any new location that activates the vendor.
Note:
- User must have the following security permission to configure primary dealer settings: Edit preferred vendors.
- There can be only one primary dealer per vehicle make for a given shop location.
- Checkout selects the primary dealer only when primary dealer make matches vehicle make on the workfile.
- Primary dealer configuration is available for both Repair Workflow and Estimating Only shops.
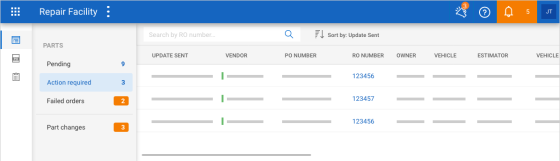
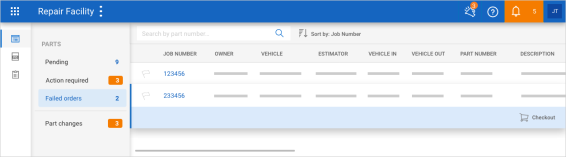
Parts Dashboard - Additional Queues
The following queues were added to the parts dashboard to help manage electronic orders:
- Pending - Includes electronic orders pending confirmation from the vendor.
- Action Required - Includes electronic orders where the vendor has sent updates that require shop review.
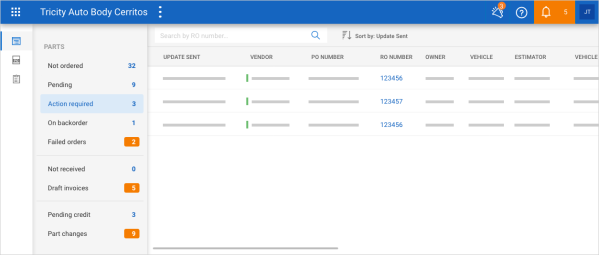
Parts Dashboard - Additional Queues (continued)
To access the parts dashboard on cccone.com:
- Log onto cccone.com, then click the white menu icon in the upper left-hand corner of the screen.
- Select Parts, then Parts Dashboard.
- To view pending orders, click Pending in the left panel.
- To view orders that need attention, click Action Required in left panel.
Note:
- User must have the following security permission to access the Parts Dashboard: Manage all aspects of parts procurement from a single dashboard.
- Pending and Action Required queues include only orders placed with electronic vendors.
- Queues are available to both Estimating only and Repair Workflow shops.
Parts Dashboard - Estimating Only
To provide more visibility to electronic orders, the Parts Dashboard is now available in cccone.com for Estimating only shops. Just like Repair Workflow shops, the Parts Dashboard can be accessed from the primary application menu. For Estimating only shops, the Parts Dashboard contains the following queues:
- Pending - Includes electronic orders pending confirmation from the vendor.
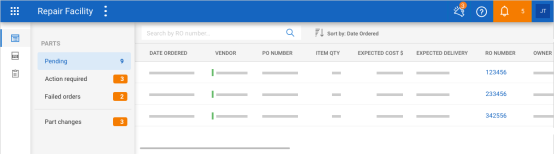
- Action Required - Includes electronic orders where the vendor has sent updates that require shop review.
- Failed orders - Includes electronic orders that failed to process with the vendor.
Parts Dashboard - Estimating Only (continued)
- Part changes - Includes parts with changes to part number, description, and/or price that may be applied to the estimate.
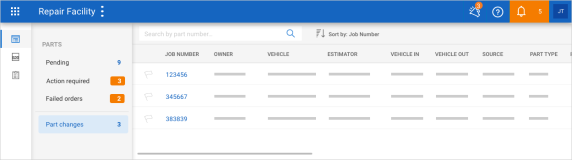
For items listed in the Failed order queue, the shop will be able to launch Checkout to create a new order for the failed item.
- The following security permission is required to manage parts through Parts Dashboard: Manage all aspects of parts procurement from a single dashboard.
- The Parts Dashboard only includes electronic orders for Estimating only shops.
- Estimating only shops may only order parts electronically through Checkout.
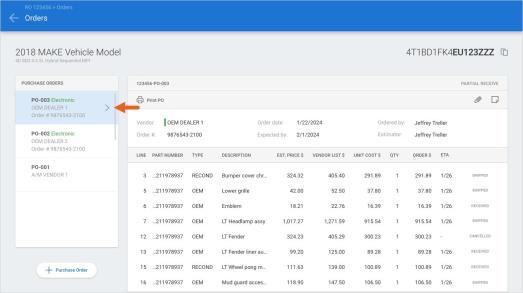
View Purchase Order Detail
Shops can now view purchase order details on cccone.com. From the Parts Dashboard and Purchase Order search screens, users have the ability to select an order and view order details. When the user selects the View purchase order action, the workfile Orders screen is displayed. From this screen, the following information is available:
- A list of all purchase orders on the workfile.
- Details for each purchase order listed.
- Order status of each purchase order listed.
- The ability to launch Checkout to create a new order for the workfile.
To view purchase order detail:
- Go to the Parts Dashboard on cccone.com.
- Select an item in one of the following queues: Pending, Action Required, On backorder.
- Select the View purchase order action.
- In the Orders screen, click on a purchase order listed on the left-hand side of the screen.
Note:
- User must have one of the following security permissions to access the workfile orders screen:
1. Create, search, view, and void purchase orders.
2. Manage all aspects of parts procurement from a single dashboard.
- Shops with Repair Workflow Parts Management features may view purchase order detail for both electronic and manual purchase orders.
- Estimating only shops may only view purchase order detail for electronic orders (these shops cannot create manual purchase orders).
- Purchase Order search and the "On backorder" queue is only available to shops with Repair Workflow Parts Management features.
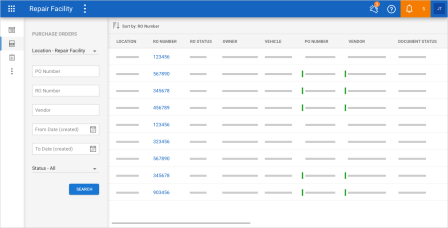
Purchase Order Search
The ability to search for purchase orders is now available on cccone.com. Shops can search for both electronic and manual purchase orders. Purchase orders can be found using the following search criteria:
- Shop location (All or the current logged in location).
- Purchase order number.
- Repair order number.
- Vendor name.
- Date created.
- Purchase order status (All, Completed, Pending, Failed, Void).
From purchase order search, the shop will be able to open the related workfile by clicking the RO Number displayed in the results list. In the near future, shops will also be able to view purchase order detail and initiate a chat with electronic vendors.
To search for purchase orders on cccone.com:
- Log onto cccone.com and click the white menu icon in the upper left-hand corner of the screen.
- Select Parts, then Purchase Orders.
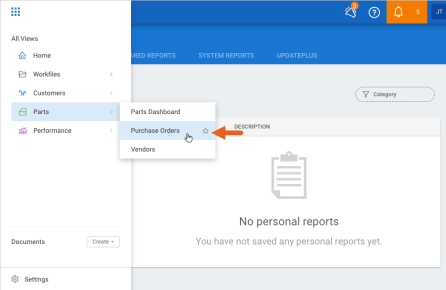
Purchase Order Search (continued)
- Search results are displayed per default criteria.
- Change criteria as desired, then click Search.
Note:
- Purchase order search is only available to shops licensed with Repair Workflow Parts Management features.
- User must have one of the following security permission to access purchase order search:
1. Create, search, view, and void purchase orders.
2. Manage all aspects of parts procurement from a single dashboard.
- Like all other views in the main app menu, the Purchase Orders menu item may be tagged as a "favorite" view.
- Purchase order status Pending and Failed apply to electronic orders only.
CCC ONE Desktop Release 43
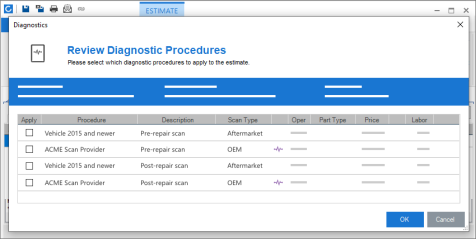
Diagnostics: Updated Diagnostic Procedures screen
Shops licensed with CCC Diagnostics will see improvements to the diagnostic procedures screen accessed from the workfile.
- The screen is now larger and resizable.
- Select columns within the screen can be resized.
- Scan provider name will be visible on diagnostic recommendations.
To resize the Review Diagnostic Procedures screen:
- Open a workfile with a standard vehicle, then click Diagnostics.
- Drag the corners of the Review Diagnostic Procedures screen to adjust size.
- Drag the the edge of the Procedures column or Description column to adjust column width.
Size adjustments made to the procedures screen are remembered. The next time the Diagnostics button is clicked, screen size and column widths are remembered from the last time the procedures screen was displayed.
To find scan provider for a diagnostic recommendation:
- Look for the rows with the purple pulse icon displayed next to Scan Type.
- View the scan provider name in the Procedure column.
Note:
- Diagnostic features are only available to shops licensed with CCC Diagnostics.
- Diagnostic recommendations are contingent on scan provider participation - some scan providers may not support recommendations.
Receipts Report: Added Payment ID Column
We've added a new column, Payment ID, to the existing Receipts report. This Payment ID is the CCC ONE receipt number generated when a new receipt is saved to the workfile. This receipt can be viewed from a workfile, under the receipts tab.
To access the existing Receipts system report:
- Open RF Desktop.
- Select Reports, then Find Reports.
- Then under System Reports, select Receipts.
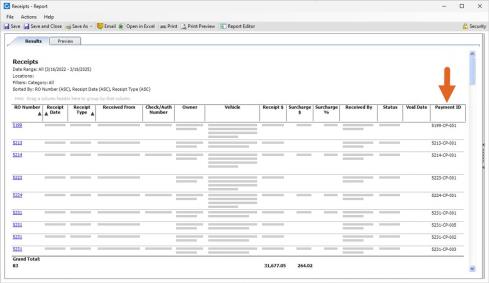
Note: User must have the following security permission to access this report: View accounting reports
Diagnostic Reports: Updated PDF Attachment Name
When a diagnostic scan is completed, the diagnostic report is automatically saved to the workfile as a PDF attachment. The name of this PDF attachment has been updated to make it easier to identify diagnostic reports from other attachments on the workfile. Attachments will now be named as follows:
- Pre-repair scan: Diagnostic Report Pre-repair
- In-process repair scan: Diagnostic Report In-proc repair
- Post repair scan: Diagnostic Report Post-repair
- Calibration: Diagnostic Report Calibration
- Program modules: Diagnostic Report Programming
All diagnostic report attachments also include the date and time the report was generated in the attachment name.
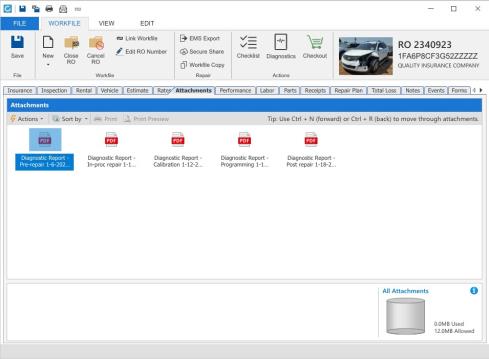
To access diagnostic reports on the workfile:
- Open a workfile with diagnostic activity.
- Go to the Attachments tab.
- Double-click on a Diagnostic Report PDF attachment to view.
Shop / HR Payroll: Employee profile Required Fields
Shops licensed with CCC Payroll will require additional information be populated in the Employee profile. This includes:
- Address (Line 1, City, State, and Zip)
- Primary E-mail
- Date of Birth
- Hire Date
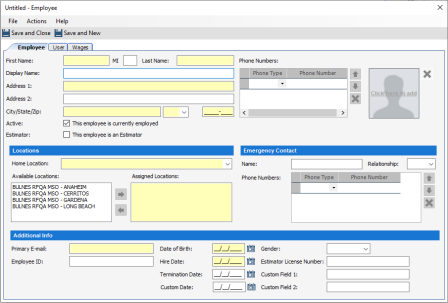
Shop / HR Payroll: Employee profile Required Fields (continued)
When editing or creating new employee records via the CCC ONE desktop application, the fields mentioned above will trigger required field validation if left blank on save.
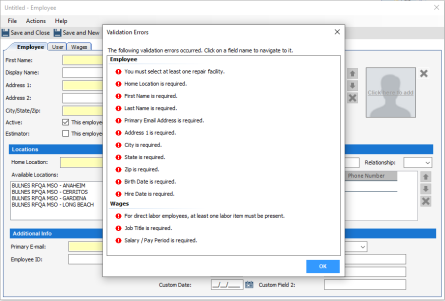
Note:
- Fields mentioned above are additional required fields when the shop license includes the following feature: HRPAY - CCC Payroll.
- There is no change to existing system required fields.
- User must have the following security permission to edit employee profiles: Create, search, view, edit, and deactivate employees.
CCC Mobile RF
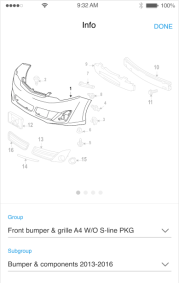
Add Graphics to Jumpstart (Android)
We have added the ability for users to view part graphics when answering part questions after selecting repair and replacement parts.
To view part graphics:
|
|
|
The part graphic screen is displayed for the part group corresponding to the question on the underlying screen. Graphics for the first sub-group are displayed by default. If there are more graphics to view you'll see up to four bullets below the graphic. Simply swipe the graphic image to the left to view the next graphic. Use standard pinch motion to zoom the graphic in or out. You can use the droplist controls for Group and Sub-group to jump to a specific graphic. When finished viewing the graphic, tap Done in the upper right-hand corner. |
|
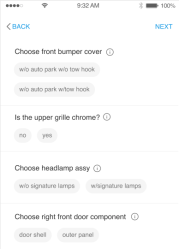
Note: User may tap the info icon displayed next to any part question displayed on the screen, regardless of whether the question has been answered
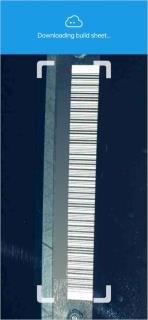
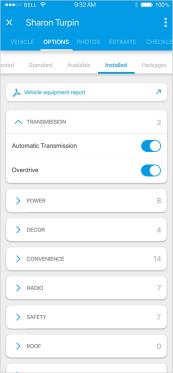
RF Mobile: Build Sheets
Shops licensed with build sheets now have the ability to download build sheets from the RF Mobile app. When scanning VIN via the mobile app, the build sheet will automatically download for vehicles with build sheet data. Build sheet data is then applied to the workfile. When build sheet data is applied, the following may occur:
- Model selection filters to fewer models.
- Paint and trim values populate.
- Applicable option packages selected.
- Vehicle options marked as Installed.
In the event build sheet data is not available, a Vehicle Equipment Report may still be downloaded. This too, occurs automatically. Once downloaded, with or without build sheet data, the Vehicle Equipment Report is available to view in PDF format from the workfile Options tab.
To download build sheets from the mobile app:
|
|
RF Mobile: Build Sheets (continued)
|
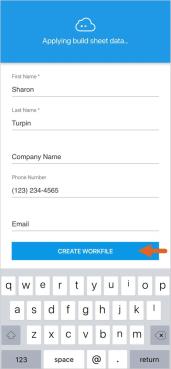
|
RF Mobile: Build Sheets (continued)
| Build sheet data will be downloaded automatically. Once downloaded, tap the Options tab in the workfile. There you'll find a button to view the Vehicle Equipment Report and a new filter view called Installed. Tap on Installed to view vehicle options marked as Installed per the build sheet. |
|
Note:
- Only shops licensed with the following feature may access build sheets in the mobile app: BLDSH - Build sheets.
- User must have the following security permissions to download build sheets in the mobile app:
- Allow access to CCC ONE Mobile
- Create and Edit Workfiles
- When downloading build sheets via the mobile app, the Vehicle Equipment Report is saved as an attachment to the workfile. As a result, the report is accessible via RF Desktop and cccone.com in the workfile Attachments tab.
Quickly find your CCC Team members. Go to http://www.cccis.com/collision-repairers/team/ and follow the screen instructions.
