What's New in CCC® Estimating for February 2024
Click here to view the What’s New release notes for CCC® Estimating.
Note: The availability of the features listed below may vary based on the products licensed to your company.
CCCONE.COM - Web Estimating
Web Checkout Refactor
Web checkout has been redesigned. First, you'll notice that navigation in the checkout screen has been updated. Tab controls are now used to switch between part status views:
- Not Ordered
- Ordered
- Received
- All Parts
- Order History
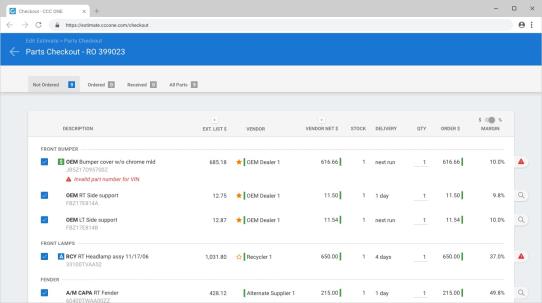
Also, the Order Parts button has been moved to the Purchase Order Summary at the bottom of the screen.
Second, you'll find that checkout now provides more parts data on screen. You can now easily see both estimate detail and vendor detail for a given part. This includes:
- Estimate Description and Part Number
- Estimate Quantity
- Estimate Adjustment %
- Estimate Price $
- Estimate Extended Price $
- Vendor Description and Part Number
- Vendor List $
- Vendor Discount %
- Vendor Unit Cost $
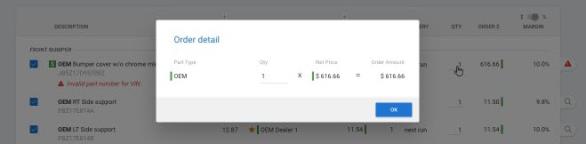
Additionally, new ordering capabilities have been incorporated into the checkout screen. This includes:
- Specifying the order quantity.
- The ability to include vehicle damage photos on electronic orders.
- Including part group, subgroup, and point of impact on electronic orders.
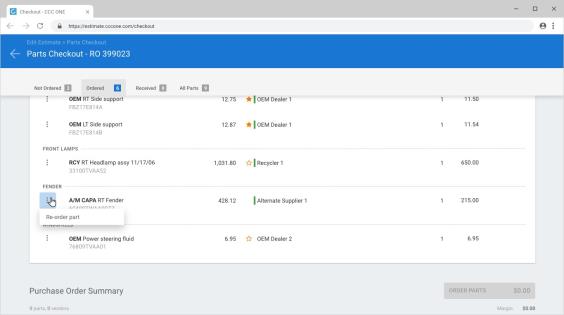
- The ability to re-order parts.
- The ability to create non-electronic orders for replacement parts.
- The ability to create non-electronic orders for miscellaneous items configured for order (e.g., shop materials, hazardous waste, etc.).
Lastly, shops with Repair Workflow Parts Management features now have the ability to create non-electronic purchase orders from the checkout screen. This includes creating orders for non-electronic vendors and ordering manual parts and miscellaneous items configured to invoice (e.g., paint materials, shop materials, etc.).
Web checkout may be accessed from the workfile in either the desktop application or cccone.com. To access checkout:
- Open a workfile with replacement parts.
- Select the Checkout action.
- In the Checkout screen check or uncheck the parts you wish to order.
- Use the search tags on the right-hand side of the screen to view available alternatives.
- Update the order quantity by clicking the Order Qty field.
- To send vehicle damage photos with the order, check the box in the Purchase Order Summary at the bottom of the screen.
- When all purchasing decisions are complete, click the blue Order Parts button at the bottom of the screen to place your orders.
Once you click Order Parts, a separate purchase order for each vendor will be created. Electronic orders are automatically sent to your electronic vendors. Non-electronic orders will generate a purchase order print document.
To re-order parts that have already been ordered:
- Open a workfile that has ordered parts.
- Select the Checkout action.
- Click on one of the following views: Ordered, Received, or All Parts.
- Select the menu button (triple-dot) displayed to the left of the ordered part, then select Re-order.
- When ready, click the blue Order Parts button at the bottom of the screen.
Note:
- The following security permission is required to order parts through checkout: Create, search, view, edit, and workfiles.
- Repair Workflow shops also require the following security permission to order parts: Create, search, view and void purchase orders.
- The ability to create non-electronic purchase orders via checkout is only available to shops with Repair Workflow Parts Management features.
- Only miscellaneous items configured to Display on Invoice in Sales - Miscellaneous Accounts settings will be available to order via checkout.
- The Received view is only available to shops with Repair Workflow Parts Management features.
- The Order History view is only available to shops without Repair Workflow Parts Management features (i.e., estimating only shops).
- Updates described above will be accessible by the desktop application on the date of release (no new client version necessary).
Electronic Orders: Order Update Notifications
When an order update is received from an electronic vendor, the existing purchase order is automatically updated with change from the vendor. Additionally, an order update notification is generated for the shop. These notifications will appear in Action Center under Vendors > Electronic Orders. Shops may use Notification Groups to configure specific users to view these notifications.
To view order update notifications in Action Center:
- Log onto cccone.com.
- Select the main menu button in the upper left-hand corner of the screen.
- Select Home.
- Select Vendors, then select Electronic Orders.
To configure notification groups:
- Go to Settings on cccone.com.
- Select Notification Groups.
- Click Add.
- Specify a Group Name, then select users to receive the notifications.
- Select one or more Event Types, then click Save.

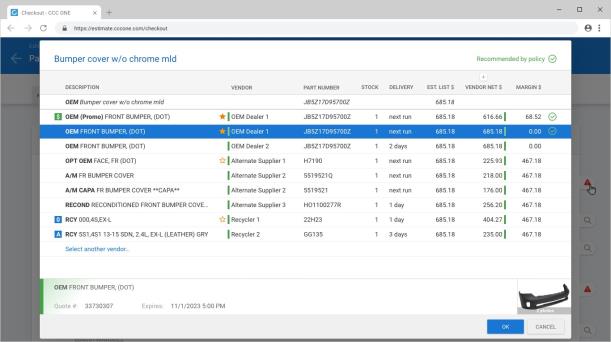
Checkout: Update to Alternatives Screen
When using Checkout to order parts, the alternatives screen provides additional part options from other vendors. This screen has been updated to improve parts comparison.
- All price columns are visible when the screen is displayed - no need to unhide columns or scroll horizontally to view
- EXT. PRICE $ was added to easily compare with VENDOR LIST $ and UNIT COST $
To view alternative part options within Checkout:
- Open a workfile with replacement parts to order.
- Select Checkout.
- Select the grey search tag on the right-hand side of the screen for the part you want to review.
Note:
- The following security permission is required to order parts through checkout: Create, search, view, edit, and workfiles.
- Repair Workflow shops also require the following security permission to order parts: Create, search, view, and void purchase orders.
Checkout: Use Job Number for PO Number
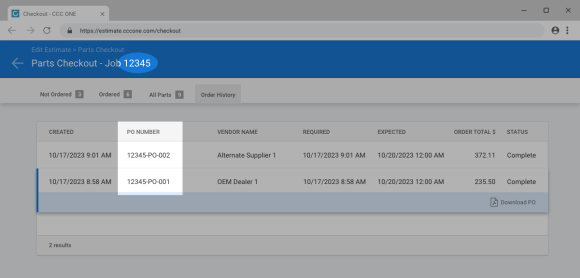
The job number is now used to generate the CCC ONE purchase order number when using Checkout for estimating only shops (i.e., shops without Repair Workflow Parts Management features). Users will see this change in both the Checkout user interface and on the purchase order document.
To view order history:
- Open a workfile with replacement parts that have been ordered.
- Select Checkout.
- In the Checkout screen, select the Order History tab.
From the Order History view you can download the purchase order document. Simply select a purchase order listed, then click Download PO.
Note: The following security permission is required to order parts through checkout: Create, search, view, edit, and workfiles
Reports Dashboard: Access to DMS Reports
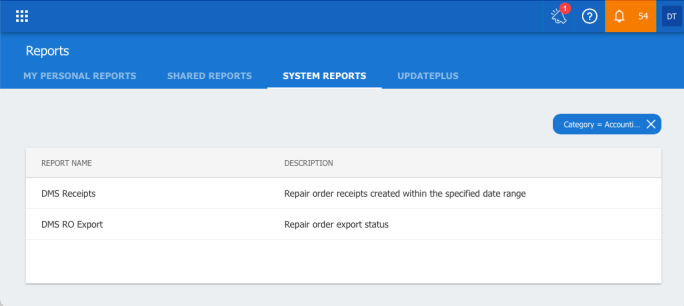
Shops enabled with Dealer Management Integration now have access to Dealer Management reports via the Reports dashboard on cccone.com. Users with permission to view accounting reports will be able to run the following reports:
- DMS Receipts - This report provides a list of all repair order receipts created within the date range specified and includes DMS export status of the receipt.
DMS RO Export - This report provides a list of all repair orders created within the date range specified and the DMS export status
To access Dealer Management reports from the Reports dashboard:
- Log into cccone.com.
- Select the blue menu button in the upper left-hand corner of the screen, then select Reports.
- Click the Category filter in the upper right-hand side of the screen, then select Accounting.
Note:
- Dealer Management reports are only available with the licensed product Dealer Management Integration.
- Users with the following security permission may access Dealer Management reports: Dealer Management - Manage DMS integration from a single dashboard or Reports - View accounting reports.
- Users with only Reports - View accounting reports permission will have access to the Dealer Management reports, but they will not have access to the Dealer Management dashboard.
Dealer Management Reports
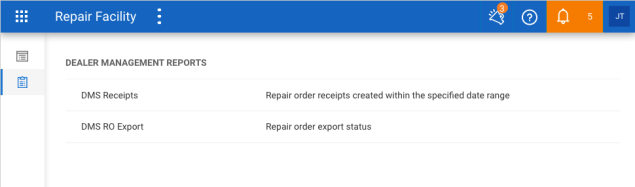
Shops enabled with Dealer Management Integration now have access to Dealer Management reports on cccone.com. These reports provide shops with the ability to reconcile repair order and receipt information exported to their dealer management system. These new reports may be access via the Dealer Management or Reports dashboards.
There are two new reports available:
- DMS Receipts - Report provides a list of all repair order receipts created within the date range specified and includes DMS export status of the receipt.
- DMS RO Export - Report provides a list of all repair orders created within the date range specified and the DMS export status.
To access Dealer Management reports from the Reports dashboard:
- Log into cccone.com.
- Select the blue menu button in the upper left-hand corner of the screen, then select Reports.
- Click the Category filter in the upper right-hand side of the screen, then select Accounting.
To access Dealer Management reports from the Dealer Management dashboard:
- Log into cccone.com.
- Select the blue menu button in the upper left-hand corner of the screen, then select Dealer Management.
- Select the Dealer Management Reports button on the left-hand side of the screen.
Note:
- Dealer Management reports are only available with the licensed product Dealer Management Integration.
- Users with the following security permission may access Dealer Management reports: Dealer Management - Manage DMS integration from a single dashboard or Reports - View accounting reports.
- Users with only Reports - View accounting reports permission will have access to the Dealer Management reports, but they will not have access to the Dealer Management dashboard.
- Users with only Dealer Management - Manage DMS integration from a single dashboard permission automatically inherit the permission to view accounting reports.
Additional Workfile Reports
Users now have the ability to view or print the following reports on ccccone.com:
- Estimate to Repair
- Final Bill
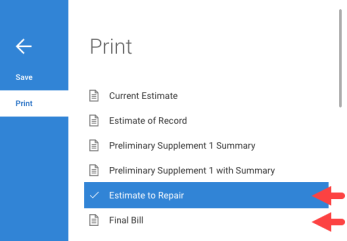
To view or print additional reports, follow these steps:
- Open a workfile on cccone.com.
- Click the menu button in the lower left corner.
- Select Print.
- Select the report you want to print and click OK.
Note: Estimate to Repair and Final Bill reports are only available to shops enabled with Repair Order Management features
CCC ONE Desktop Release 42
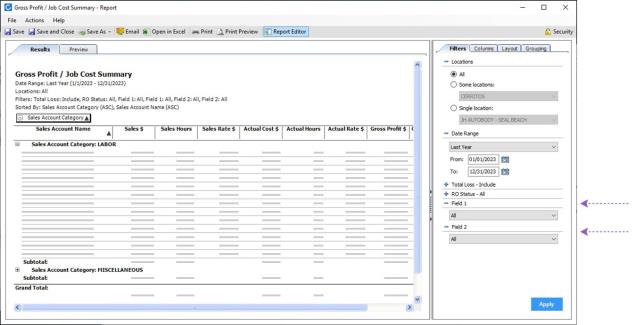
System Reports: Add filters to Gross Profit / Job Cost Summary
The Gross Profit / Job Cost Summary report now includes the following filters:
- Field 1
- Field 2
Shops licensed with Repair Order Management features that utilize these data fields on the workfile will now be able to filter report results by this data.
To access this report:
- Log into the desktop application.
- On the top right, go to Reports > Find Reports.
- Under System Reports, click on Gross Profit / Job Cost Summary.
- Specify report criteria then click Apply.
Note:
- This report is only available to shops licensed with Repair Order Management features.
- User must have the following security permission to run this report: Sales - View sales reports.
- Settings for Field 1 and Field 2 data values may be configured in the repairer profile under Repair Management > Marketing - Custom Fields.
System Reports: Add Vehicle Delivered to Diagnostic Opportunity Detail
We've updated the Diagnostic Opportunity Detail system report. The report now includes a "Vehicle Delivered" column. This column provides insight to the Vehicle Out milestone status on the workfile. When Vehicle Out is complete, "Yes" is displayed in the Vehicle Delivered column. When Vehicle Out is not complete, no value is displayed. Additionally, a subtotal of all rows where Vehicle Delivered is "Yes" is displayed at the bottom of the report.
To access this feature in system reports:
- Select the Reports menu, then select Find Report.
- Under System Reports, select Diagnostic Opportunity Detail.
- Select the desired date range and any other filters.
- Click Apply to run the report.

Note:
- Report is only available to shops licensed with CCC Diagnostics.
- The following security permission is required to run this report: Estimating Reports - View estimating reports.
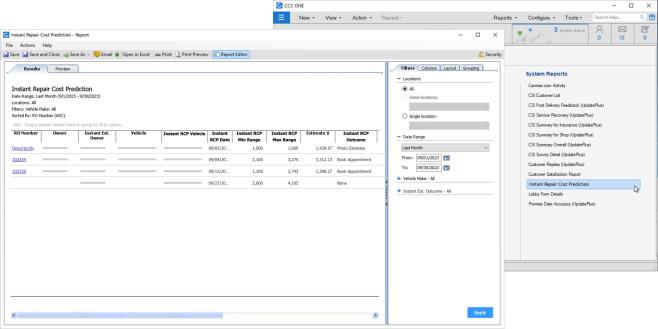
System Reports: Updated Instant Repair Cost Prediction Report
There was an update to the existing Instant Estimate Cost Range system report, in which the name of the system report has been changed. The report is now called "Instant Repair Cost Prediction."
Also, the names for corresponding "instant estimate" columns within the report were updated. All columns that had a prefix of "Instant Est." were changed to "Instant RCP." For example, "Instant Est. Owner" is now "Instant RCP Owner."
To access this report:
- Log into the desktop application.
- Select the Reports menu, then select Find Report.
- Under System Reports, select Instant Repair Cost Prediction.
Note:
- This report is only available to shops with the following licensed feature: CCENG - CCC Engage.
- Only users with the following security permission may access this report: Customer - View customer reports.
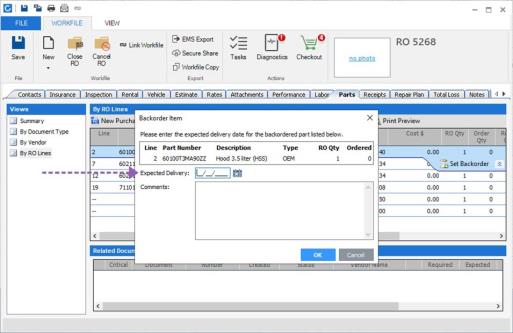
Parts Management: ETA not Required to Set Backorder
Users can now set an item as backordered without the need to enter an Expected Delivery Date. Validation requiring this has been removed.
To access this feature:
- Open a repair order workfile with parts to order.
- Select the Parts tab, then select By RO Lines.
- Select a part in the list.
- Select Set Backorder.
Note:
- Set backorder functionality is only available to shops licensed with Repair Workflow Parts Management features.
- Workfile must be a repair order to access the Parts screen.
CCC Mobile Repair Facility
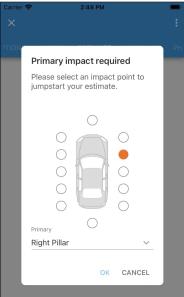
Jumpstart POI Update (Android)
A primary point of impact is required before writing an estimate using Mobile Jumpstart. If primary impact is missing when the user attempts to jumpstart an estimate, a prompt is now displayed to make the selection.
Previously the user could update the primary impact value via droplist menu in the validation prompt. Now we have added graphical POI selection control to the prompt. Users can now use the graphic or droplist menu to make their primary impact selection. Once selected, Jumpstart continues automatically.
To use Mobile Jumpstart:
- Log into the Repair Facility Mobile app.
- Open a workfile with a standard vehicle (or create a new one).
- Tap the Estimate tab.
- Tap Jumpstart.
Add Graphics to Jumpstart (iOS/Android)
We have added the ability for users to view part graphics when answering part questions after selecting repair and replacement parts.
To view part graphics:
- Open a workfile without an estimate, then select the Estimate tab and tap Jumpstart.
- In the Select Parts screen, select all your repair and replacement parts then tap Next in the upper right-hand corner.
- In the part questions screen, tap the info icon displayed to the right of the part question.
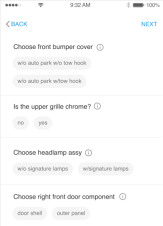
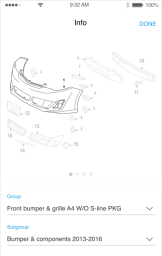
The part graphic screen is displayed for the part group corresponding to the question on the underlying screen. Graphics for the first sub-group are displayed by default. If there are more graphics to view you'll see up to four bullets below the graphic. Simply swipe the graphic image to the left to view the next graphic.
Use standard pinch motion to zoom the graphic in or out. You can use the droplist controls for Group and Sub-group to jump to a specific graphic. When finished viewing the graphic, tap Done in the upper right-hand corner.
Note: User may tap the info icon displayed next to any part question displayed on the screen, regardless of whether the question has been answered
Quickly find your CCC Team members. Go to http://www.cccis.com/collision-repairers/team/ and follow the screen instructions.
