What's New in CCC® Estimating for December 2023
Click here to view the What’s New release notes for CCC® Estimating.
Note: The availability of the features listed below may vary based on the products licensed to your company.
CCCONE.COM - Web Estimating
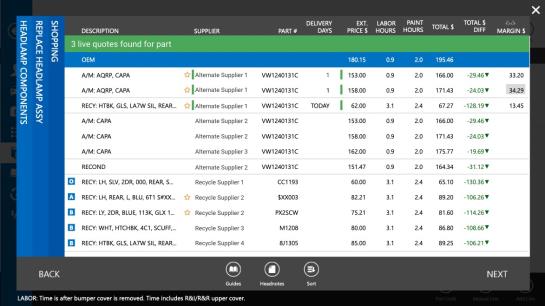
Multiple Parts Available Button
When editing the estimate on cccone.com, you may now see a blue "..." button to the right of the part description. This is an indication that there are multiple part options available for the specified part. Simply click the button to view available options. Then, if desired, select a part to update your estimate. You no longer need to delete and re-add the part to get the correct item on the estimate.
When viewing available options, parts are separated by group and subgroup. Database values for labor, paint, and part price are also available. Hover over a part row to view additional detail including the full part description and part number.
To access this feature:
- Open a workfile to Edit.
- In the Estimate screen, click on the blue ... button where available.
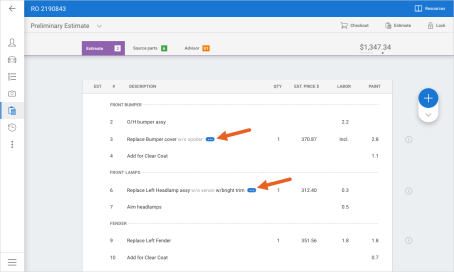
- In the Multiple parts available screen, select a part row and click OK.
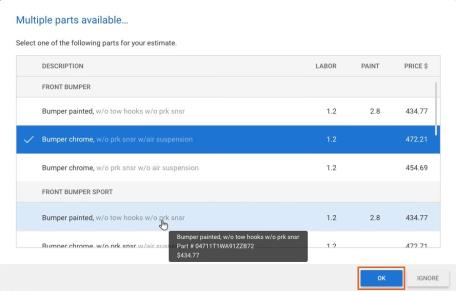
The existing estimate line is now updated with the new part selection.
Note:
- The ... button is only available on lines with the following operation: Replace, Repair, R&I, Blend
- The ... button will only be displayed when there is more than one part option available in the database
- The ... button is not available on sourced parts or on locked estimates/supplements
- If line notes exist and the operation is Replace or Repair, line notes are retained when the part line is updated
- For lines with operation Repair, R&I, or Blend, existing labor hours are retained when the part line is updated
- To edit the estimate the following security permission is required: Create and edit estimate
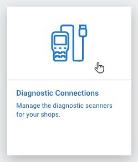
Diagnostic Connections - Elitek®
A new scan provider has been added to Diagnostic Connection settings. Shops can now configure Elitek as a diagnostic scan provider. Once configured, scans performed by the configured device will be automatically linked to the associated workfile within CCC ONE.
To configure diagnostic connections:
- Go to Settings on cccone.com.
- Select Diagnostic Connections.
- Click Add in the Diagnostic Scan Connections screen.
- Select the Connection Type (i.e., your scan provider).
- Enter the device ID if required, then click OK.
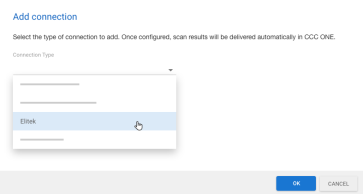
- Check the box to accept the Terms of Use, then click Accept.
In some cases additional steps may be required to complete activation of your device. When this occurs you will be presented with additional instruction specific to your scan provider. Once all steps have been completed, the device connection status displays as "Enabled."
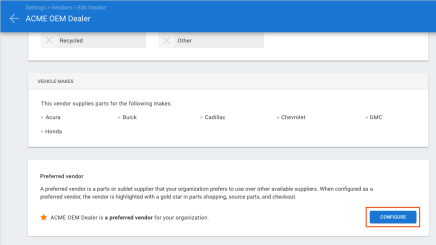
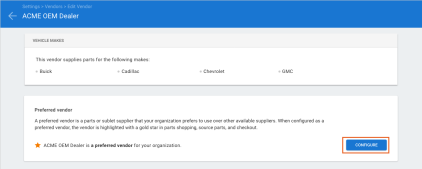
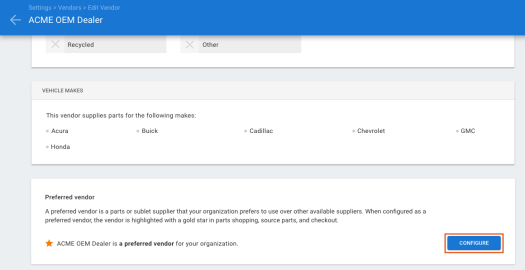
Preferred Vendors Configuration
Configuration for preferred vendors has been updated to better support preferred vendor settings across repair facility locations within an organization. We've also provided additional end-user facing content to clarify what it means to mark a vendor as preferred. With these updates shops will see that:
- Vendor supported vehicle makes are now always displayed on the Vendor profile.
- Preferred vendor settings are now defined in a separate screen.
- MSOs can now customize preferred vendors settings by location.
To mark a vendor as preferred:
- Go to Settings on cccone.com, then select Vendors.
- Add a new vendor or search for and select a vendor to edit.
- In the Vendor tab, scroll down to the Preferred vendor section and click Configure.
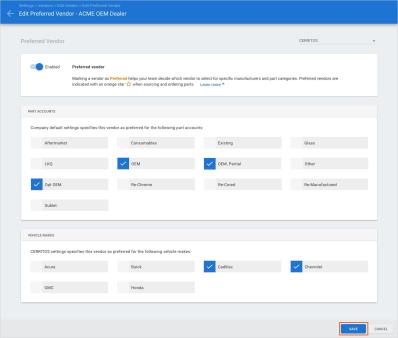
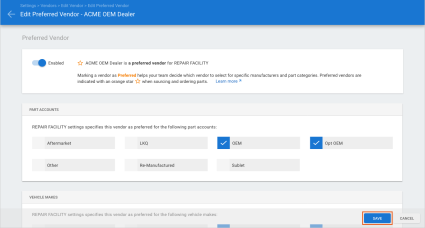
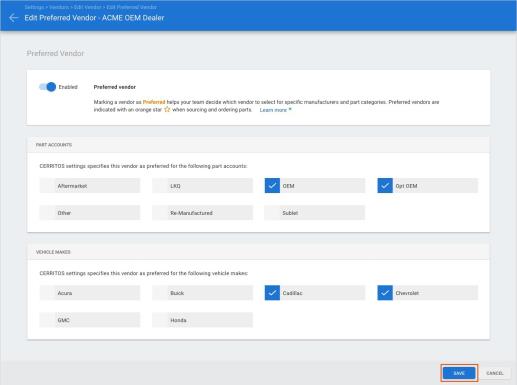
- Company default settings are displayed.
- Select the Part Accounts and Vehicle Makes for which the vendor is preferred.
- Choose whether or not you want new locations added to the vendor to be marked as preferred by default.
- Click Save in the bottom right-hand corner of the screen.
There are two ways you can update location level settings for a preferred vendor:
- From the Edit Preferred Vendor screen, use the location dropdown in the upper right-hand corner to select your location.
- From the Locations tab in the vendor profile, click on the link displayed in the Preferred column.
Once you are viewing location level settings you can:
- Change the preferred vendor setting to non-preferred.
- Customize part accounts and vehicle makes for which the vendor is preferred.
Note:
- You must have the following security permission to edit vendors:Create, search, view, edit, and deactivate vendors.
- You must have the following security permission to edit preferred vendor settings: Edit preferred vendors.
- There is no change to the shop's ability to mark a vendor as preferred from the vendor profile Locations tab - this functionality remains.
- Single-store organizations will not see the "Company default" screen when editing preferred vendor settings - only location level settings apply.
Copy Estimating Blend Rules
When configuring Estimating Blend Rules on cccone.com, Multi-shop Organizations (MSOs) now have the ability to copy blend rules from one location to another. For details on configuring blend rules, please refer to the following guide:
Note:
- Copying blend rules to other locations is only available to MSOs.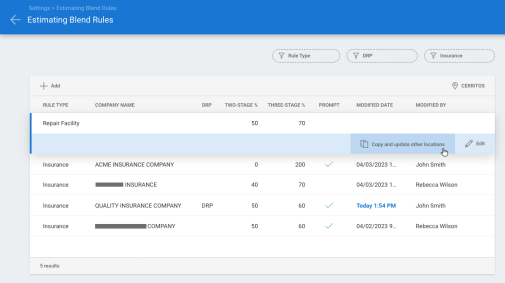
- User must have the following security permission to edit Estimating Blend Rules settings: Edit and repair facility profiles.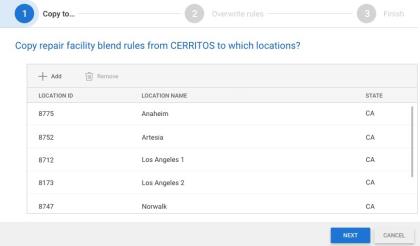
Blend: Support for Configurable Blend Rules
When writing an estimate on cccone.com, the Blend operation will now use Estimating Blend Rules configured under Settings. The update impacts both two-stage and three-stage blend.
Please refer to the following guide for details on how this impacts CCC® Estimating for Repair Facility users:
Note:
- This update is specific to shops that edit workfiles on cccone.com.
- User must have the following security permission to edit workfiles: Create and edit workfiles
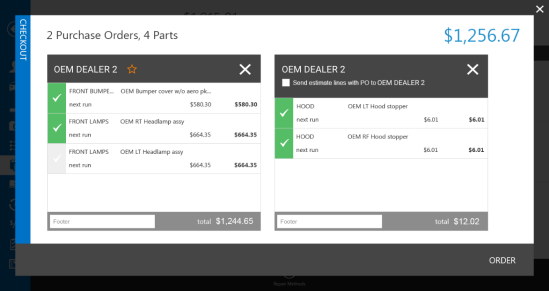
Checkout: Show Latest Quote Data
Each time Checkout runs, Checkout now refreshes quote data from electronic vendors and displays the latest quote returned. This is true even on parts that were previously shopped or sourced while writing the estimate regardless of quote expiration.
To access this feature:
- Open a workfile with estimate lines.
- Select Checkout.
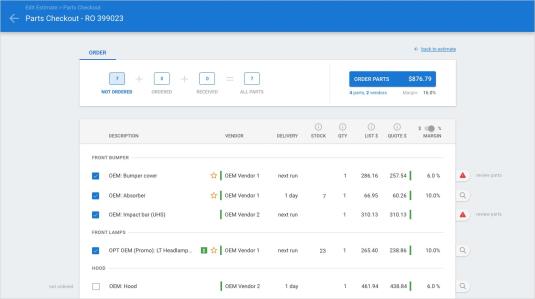
Note:
- Checkout is only available to users that can edit the estimate and order parts.
- Only users with the following security permission may edit the estimate: Create and edit workfiles.
- For shops with Repair Workflow Parts Management features, only users with the following security permission may create purchase orders: Create, search, view, and void purchase orders.
Preferred Vendors: Updated Iconography
For shops with Repair Workflow Parts Management features, iconography for preferred vendors has been updated. The preferred vendor icon now displays as a wireframe (outline) star. The star icon is used to indicate a vendor is preferred in Source Parts and Checkout screens.
To view this update in Source Parts:
- Open a workfile to Edit.
- Go to the Estimate screen and add at least one replacement part.
- Select the Source Parts tab at the top of the screen.
- Click the green tag on the right-hand side of the estimate sheet.
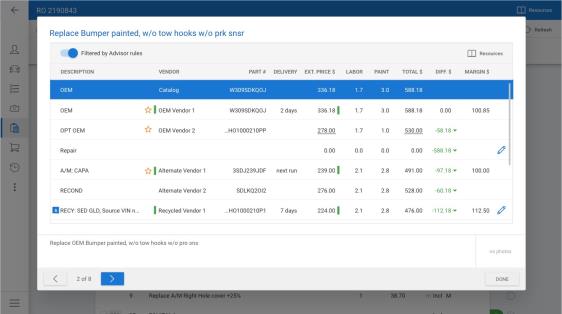
To view this update in Checkout:
- Open a workfile to Edit.
- Go to the Estimate screen and add at least one replacement part.
- Click the Checkout button in the toolbar at the top of the screen.

Note:
- Only users with the following security permission may edit the estimate: Create and edit workfiles
- Only users with the following security permission may create purchase orders: Create,search, view, and void purchase orders
- Preferred vendor functionality is only available to shops with Repair Workflow at this time
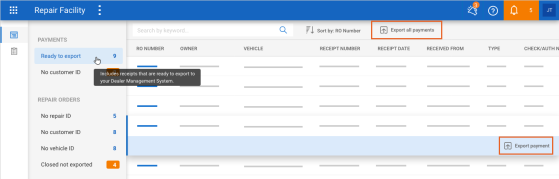
Dealer Management Dashboard
Shops enabled with Dealer Management Integration now have access to the Dealer Management dashboard on cccone.com. This dashboard provides users with the ability to manage repair order and payment export exceptions with their configured Dealer Management System (DMS). The dashboard may be accessed via the desktop application and on cccone.com.
Within the dashboard users have visibility to the following:
- Payments - Ready to export
- Payments - No customer ID
- Repair Orders - No repair ID
- Repair Orders - No customer ID
- Repair Orders - No vehicle ID
- Repair Orders - Closed not exported
The Payments - Ready to export queue provides a list of all receipts that have not yet been exported to the shop's DMS. From this queue the shop user may export receipts one at a time or batch export all receipts that are ready to export.
The Payments - No customer ID queue provides a list of all repair orders with receipts that have not yet been exported to the shop's DMS and there is no DMS customer ID on the workfile. From this queue the shop user may get the DMS customer ID and add it to the workfile. Once added to the workfile, receipts that have not been exported become ready to export.
Workfiles listed in the Repair Orders queues provide visibility to DMS related exceptions.From these queues the shop user may view workfile detail on cccone.com. At this time, to resolve exceptions the user will have to view DMS Activity on the workfile within the desktop application.
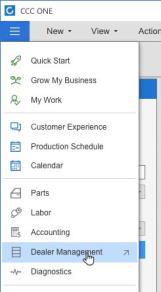
To access the Dealer Management dashboard:
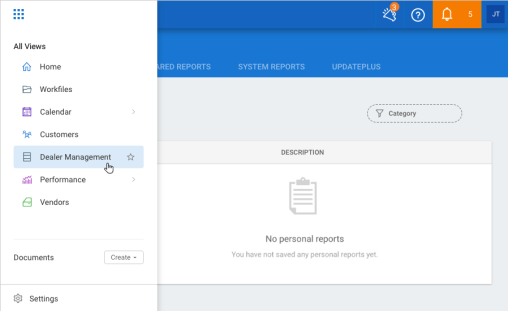
- Click on the main app menu in the upper left-hand corner of the screen in either the desktop application or on cccone.com.
- Select Dealer Management.
- To view dashboard queues, select the Dealer Management Dashboard button.
- To view reports, select the Dealer Management Reports button.
To export receipts that are ready to export:
- Go to the Dealer Management Dashboard.
- Select Payments - Ready to export.
- To export all payments that are ready to export, select the Export all payments button in the toolbar above queue results.
- To export a single payment, select a row in the results displayed then select Export payment.
Note:
- To access the Dealer Management dashboard and new dealer management reports, user must have the following security permission: Dealer Management – Manage all aspects of dealer management integration from a single dashboard.
- The ability to bulk export payment receipts is only available through the Dealer Management Dashboard at this time.
Electronic Orders: Auto-Accept Order Updates from Supplier
Electronic vendors now have the ability to initiate order updates on electronic purchase orders. Vendor updates may include:
- Part price
- Part quantity
- Expected delivery date
- Part details (such as part number or description)
- Parts availability
These vendor updates will automatically update the existing electronic order placed by the shop. When viewing the purchase order document, users will see order updates made by the vendor reflected in the purchase order document.
Note:
- A given purchase order may have multiple changes from the vendor.
- Updates described above will be accessible by the desktop application on the date of release (no new client version necessary).
Preferred Vendors for Estimating Only Shops
Preferred vendor configuration is now available to shops without Repair Workflow! This means all shops using CCC Estimating for Repair Facilities can now configure preferred vendors. Vendors that are marked as preferred will show an orange star next to the vendor name when using Shopping, Source Parts, and Checkout.
To mark a vendor as preferred:
|
|
|
|
When configuring preferred part accounts and vehicle makes, it's important to note that shops without Repair Workflow do not have the ability to configure Sales Part Accounts. As a result, part accounts available to configure are fixed. Available part accounts include:
- Aftermarket
- LKQ
- OEM
- Opt OEM
- Other
- Re-Manufactured
- Sublet
Photo Estimate Requests: Updated Support for Consumer Photos
For shops with Carwise Photo Estimate enabled, consumers are asked to capture vehicle damage photos when requesting on online estimate via Carwise.com. Previously, consumer supplied photos were pre-labeled with a position label on the CCC ONE workfile. To improve usability when shops capture their own damage photos via the mobile app or cccone.com, consumer photos are now added to the workfile as "Additional Photos" rather than the standard pre-labeled vehicle positions. Consumer supplied photos will continue to be labeled with the vehicle position. However, they will also include the prefix "Consumer."
To access this feature:
- Log into cccone.com.
- Select the main menu button in the upper left-hand corner, then select Workfiles.
- Locate a workfile with "Photo estimate" in the Updates column.
- Open the workfile and go to the Photos screen.
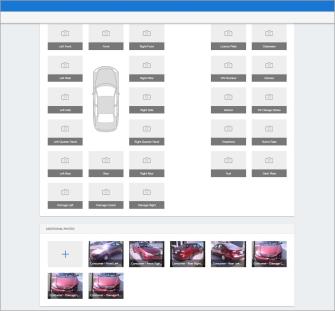
You'll find the photos the consumer took in the Additional Photos section. Now, the shop can easily take their own photos by selecting the desired vehicle position (e.g., Left Front, Front, etc.).
Note:
- To receive online photo estimate requests, the shop must have Carwise enabled and turned on online photo estimate features in their Carwise profile.
- To access online photo estimate features the shop must have the following licensed product: CCC Engage.
- The photo label on consumer supplied photos is the same in all application platforms - desktop, mobile, and cccone.com. However, photo position thumbnails and "Additional Photos" category are only supported in the mobile app and on cccone.com.
Consumer Payments via Clearent PayLink
Repair workflow shops that have configured payment devices with Clearent have a new, contactless payment offering for customers via UpdatePlus Web Estimate features. When Web Estimate features are enabled, repair status updates to the customer include a link to view repair details on the web. If the customer has a balance due when notified the vehicle is ready for pickup, the customer can securely pay their balance via Clearent Paylink.
To complete a contactless payment:
- Customers receives a text or email notification the vehicle is ready for pickup.
- The customer clicks the web link included in the message.
- The estimate web view is displayed with Vehicle Ready for Pickup.
- The customer selects the Pay Now button.
- The customer is redirected to Clearent Paylink where they can complete payment.

Once the payment is completed, the customer is directed back to the estimate web view. Remaining balance due should be updated to reflect the completed payment.
Note:
- This feature is only available to shops with the following licensed products: Repair Order Management and UpdatePlus.
- The shop location must have Web View enabled in Settings > UpdatePlus.
- The shop location must have a Clearent payment device configured in Settings > Payment Devices.
- The shop location must have contactless payments (Paylink) enabled on their Clearent account (managed outside of CCC ONE).
- The Clearent Paylink site accessed via the estimate web view is branded with the shop's information and logo stored in Settings > Network Profile.
- Customers may complete payment via Clearent Paylink with debit or credit card.
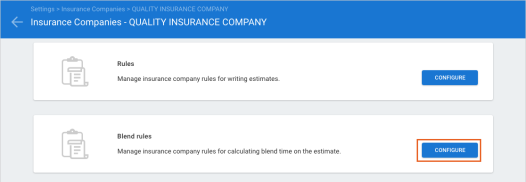
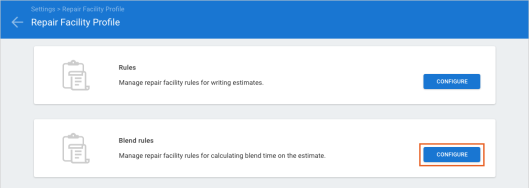
Settings: Added Launch Points for Blend Rules
New launch points for accessing Blend Rules have been added to Settings. In addition to the main Estimating Blend Rules access point, shops can now get to blend rules settings from Repair Facility and Insurance Company profiles.
To access blend rules from the repair facility profile:
- Go to Settings on cccone.com, then select Repair Facility Profile.
- Scroll down to Blend Rules, then click the Configure button.
You are redirected to the Settings > Estimating Blend Rules page and the fly-out for editing repair facility rules is automatically displayed.
To access blend rules from the insurance company profile:
- Go to Settings on cccone.com, then select Insurance Companies.
- Select an insurance company in the list, then select Open.
- Scroll down to Blend Rules, then click the Configure button.
You are redirected to the Settings > Estimating Blend Rules page. The list of blend rules is automatically filtered to the selected insurance company and the fly-out for editing insurance specific blend rules is automatically displayed.
For detailed instructions for managing Estimating Blend Rules, please refer to the following guide: CCC Estimating Automotive
CCC ONE Desktop Release 41
Preferred Vendors for Estimating Only Shops
Preferred vendor configuration is now available to shops without Repair Workflow! This means all shops using CCC Estimating for Repair Facilities can now configure preferred vendors. Vendors that are marked as preferred will show an orange star next to the vendor name when using Shopping, Source Parts, and Checkout.
To mark a vendor as preferred:
- Go to Settings on cccone.com, then select Vendors.
- Add a new vendor or search for and select a vendor to edit.
- In the Vendor tab, scroll down to the Preferred Vendor Section and click Configure.
- Specify company default and/or location level settings.
- Click Save in the bottom right-hand corner of the screen.
When configuring preferred part accounts and vehicle makes, it's important to note that shops without Repair Workflow do not have the ability to configure Sales Part Accounts. As a result, part accounts available to configure are fixed. Available part accounts include:
- Aftermarket
- LKQ
- OEM
- Opt OEM
- Other
- Re-Manufactured
- Sublet
Note:
- You must have the following security permission to edit vendors: Create, search, view, edit, and deactivate vendors.
- You must have the following security permission to edit preferred vendor settings: Edit preferred vendors.
DMS Dashboard Launchpoint
Shops licensed with Dealer Management Integration will now have access to the Dealer Management dashboard on cccone.com. This dashboard provides users with the ability to manage repair order and payment export exceptions with their configured Dealer Management System (DMS).
To access the dashboard from the desktop application:
- Select the main app menu in the upper right-hand corner of the screen.
- Select Dealer Management.
Note:
- Shop must have the following licensed feature to access the Dealer Management dashboard: Dealer Management Integration.
- User must have the following security permission to access the Dealer Management dashboard: Dealer Management – Manage all aspects of dealer management integration from a single dashboard.
Workfile Exceptions: Duplicate Part Code Exists
Shop users can now configure an exception highlight the presence of duplicate part codes used on the estimate. Previously, the same part code could be added to the estimate multiple times without the estimator’s attention being drawn to the discrepancy. Like other workfile exceptions, this new exception is managed through the Performance tab on the workfile. Further, the severity (critical or very critical) of the exception is configurable with all other exceptions through Workfile Exceptions settings in the repairer profile.
To configure workfile exceptions:
- Select the Configure menu to access Profile settings.
- Select the repairer profile and click Edit.
- Select Workfile – Exceptions.
- Click Edit.
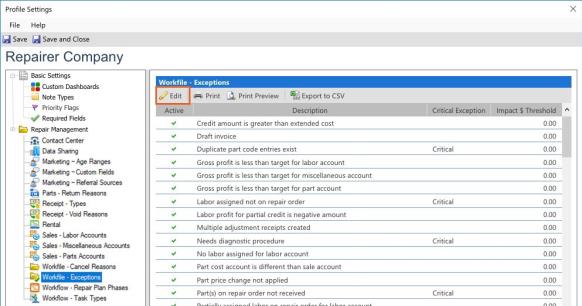
- Check the box on the Duplicate part code entries exist exception, then click Save.
- Click Save on the repairer profile.
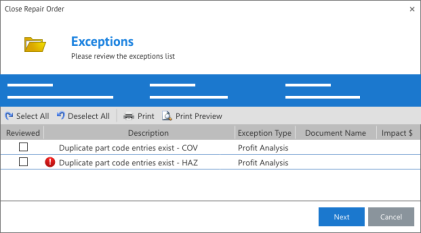
Once activated, a workfile exception will be generated whenever a duplicate part code is detected on the estimate. Users can manage resolution of the exception in the workfile Performance tab and in the Exceptions screen of the Close Repair Order wizard.
Note:
- Workfile exceptions functionality is only available to shops with the following licensed product: Repair Order Management.
- Users must have the following security permission to edit workfile exception settings: Edit repairer profile.
- The duplicate part code exception can be configured as a "Critical" or "Very Critical" exception.
- When flagged as a "Critical" or "Very Critical" exception, the Close Repair Order flow will require the user to view and resolve workfile exceptions.
- To resolve "Critical" and "Very Critical" exceptions the following security permissions are required: Override CRITICAL performance exceptions and Override VERY CRITICAL performance exceptions.
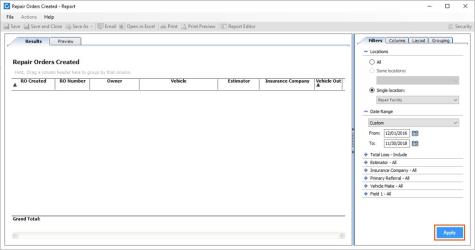
System Reports: Extend support for Historical Data to 7 Years
CCC ONE users can now run reports with a start date of up to 7 years in the past. This means that all reports available under System Reports can now have a start of up to 7 years prior to today's date.
To access this feature in system reports:
- Select the Reports menu, then select Find Report.
- Select a report listed under System Reports.
- Modify the Date Range.
- Click Apply to run the report.
Note:
- To run reports within CCC ONE, users must have the appropriate security permission to view the report category.
- When specifying the date range, the overall range ("From" date to "To" date) cannot exceed 2 years.
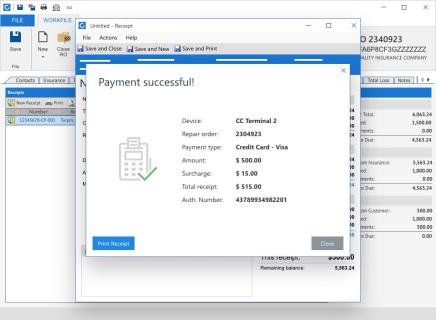
Clearent: Support for Surcharge on Credit Card Transactions
Shop users may now see surcharges returned from Clearent on payments processed with the POS provider. Users with surcharge functionality enabled with Clearent may now recieve a surcharge amount when a new receipt is successfully created through the Clearent integration. The surcharge amount is applied to the receipt in question and included on the following print reports: Estimate to Repair, Final Bill, and Receipt. Further, these reports include a disclaimer advising user of the surcharge applied.
To process a payment through the Clearent integration:
- Go to Settings on cccone.com and select Payment Devices to register your Clearent device with CCC ONE.
- Once configured, open a workfile with a balance due.
- Select New Receipt.
- Click the green Pay Now button.
When payment completes successfully a "success" screen is displayed with payment details. If a surcharge was returned from Clearent, the surcharge amount and total receipt amount including surcharge is displayed on screen. When printing the receipt, these amounts are also included in the receipt subtotals and balance due history.
Note:
- To create receipts in CCC ONE, the shop must have the following licensed product: Repair Order Management.
- Users must have the following security permission to create a receipt: Create, search, and view receipts.
- Credit card surcharge features are configured via external settings with Clearent. If configured, CCC ONE will automatically apply surcharges returned by Clearent when the payment is processed.
- If no surcharge is returned by Clearent, then no surcharge amount or surcharge disclaimer is added to the receipt.
- Back-end activation is required - the following client feature deployment must be enabled: Enable Clearent Surcharge.
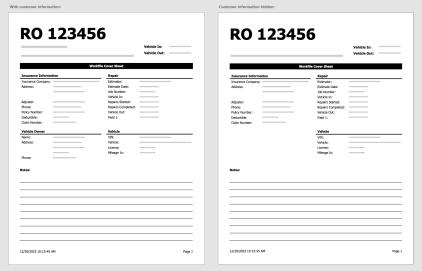
Workfile Cover Sheet: Portrait Layout
All users can now easily print the workfile cover sheet in portrait orientation. Depending on Workfile - Printing settings in your repair facility profile, vehicle owner information can be hidden or shown in the report.
To access this feature:
- Go to any Workfile, then select Print.
- Check the box for the following report: Workfile Cover Sheet - Portrait.
- Set print quantity and printer as desired, then click OK.
To update Workfile - Printing settings:
- In the Configure menu, select Profiles.
- Select the repair facility profile, then click Edit.
- Select Workfiles - Printing under Repair Management settings.
- Edit settings as desired, then click Save.
Note:
- Users must have the following security permission to print workfile reports: Search and view (read-only) workfiles or Create and edit workfiles.
- Users must have the following security permission to edit settings in the repair facility profile: Edit repair facility profile.
Estimate to Repair / Final Bill: Miscellaneous Charges
All users will now see any Miscellaneous Operations items broken out in the totals section of the Estimate to Repair and Final Bill print reports. Previously, these charges were included within Parts totals. This change improves clarity and visibility around estimate totals.
To see the benefit of this feature:
- Go to any Workfile.
- Select and add various operations to the estimate including replacing parts and any Miscellaneous Operation.
- Select Print.
- Locate Final Bill or Estimate to Repair.
- Find that all Miscellaneous Operations exist in their own category.
Final Bill:
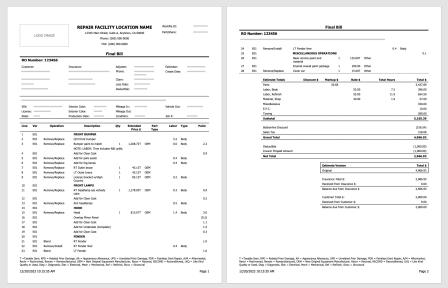
Estimate to Repair

Receipts Report: Support for Clearent Surcharge
The Receipts system report has been updated to include additional columns for surcharge details from Clearent. Additional columns are:
- Surcharge $
- Surcharge %
To access this report:
- In the desktop application, select the Reports menu.
- Select Find Report, then Accounting.
- Under System Reports, select Receipts.
Note:
- The Receipts report is only available to shops licensed with Repair Order Management features.
- User must have the following security permission to access the Receipts report: Accounting - View accounting reports.
- Surcharge data will populate on the report only when processing CCC ONE receipts through Clearent and a surcharge is returned by Clearent.}
- Support for the new report columns does not require a new desktop client version. However, Clearent surcharge capability becomes available in R41.
Electronic Orders: Auto-accept Order Updates from Supplier
Electronic vendors now have the ability to initiate order updates on electronic purchase orders. Vendor updates may include:
- Part price
- Part quantity
- Expected delivery date
- Part details (such as part number or description)
- Parts availability
These vendor updates will automatically update the existing electronic order placed by the shop. When viewing the purchase order document, users will see order updates made by the vendor reflected in the purchase order document.
Note:
- A given purchase order may have multiple changes from the vendor.
- Updates described above will be accessible by the desktop application on the date of release (no new client version necessary).
Blend: Support for Configurable Blend Rules
When writing an estimate on cccone.com, the Blend operation will now use Estimating Blend Rules configured under Settings. The update impacts both two-stage and three-stage blend.
Please refer to the following guide for details on how this impacts CCC® Estimating for Repair Facility users:
CCC Estimating Automotive - Color Blend
Note:
- This update is specific to shops that edit Workfiles on cccone.com.
- The user must have the following security permission to edit Workfiles: Create and edit Workfiles.
CCC Touch
Blend: Support for Configurable Blend Rules
When writing an estimate on Touch, the Blend operation will use Estimating Blend Rules configured under Settings. The update impacts both two-stage and three-stage blend.
Please refer to the following guide for details on how this impacts CCC® Estimating for Repair Facility users:
Note:
- This update is specific to shops that edit workfiles on Touch.
- User must have the following security permission to edit workfiles: Create and edit workfiles
Preferred Vendors: Updated iconography
For shops with Repair Workflow Parts Management features, iconography for preferred vendors has been updated. The preferred vendor icon now displays as a wireframe (outline) star. The star icon is used to indicate a vendor is preferred in Part Shopping and Checkout screens.
To view this update in Part Shopping:
- Open a workfile to Edit.
- Go to the Estimate screen and add at least one replacement part.
To view this update in Checkout:
- Open a workfile to Edit.
- Go to the Estimate screen and add at least one replacement part.
- At the top of the screen, pull down the workfile toolbar and tap the Checkout button
Note:
- Only users with the following security permission may edit the estimate: Create and edit workfiles.
- Only users with the following security permission may create purchase orders: Create, search, view, and void purchase orders.
- Preferred vendor functionality is only available to shops with Repair Workflow at this time.
CCC Mobile RF
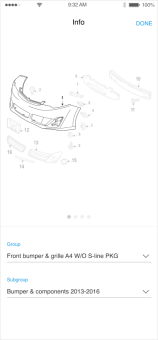
Add Graphics to Jumpstart (Android/iOS)
We have added the ability for users to view part graphics when answering part questions after selecting repair and replacement parts.
- Open a workfile without an estimate, then select the Estimate tab and tap Jumpstart.
- In the Select Parts screen, select all your repair and replacement parts then tap Next in the upper right-hand corner.
- In the part questions screen, tap the info icon displayed to the right of the part question.
The part graphic screen is displayed for the part group corresponding to the question on the underlying screen. Graphics for the first sub-group are displayed by default. If there are more graphics to view you'll see up to four bullets below the graphic. Simply swipe the graphic image to the left to view the next graphic.
Use standard pinch motion to zoom the graphic in or out. You can use the droplist controls for Group and Sub-group to jump to a specific graphic. When finished viewing the graphic, tap Done in the upper right-hand corner.
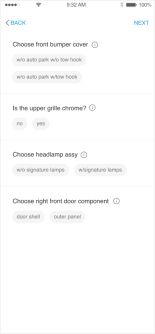
Note:
- User may tap the info icon displayed next to any part question displayed on the screen, regardless of whether the question has been answered
Jumpstart POI Update
|
A primary point of impact is required before writing an estimate using Mobile Jumpstart. If primary impact is missing when the user attempts to jumpstart an estimate, a prompt is now displayed to make the selection. Previously the user could update the primary impact value via droplist menu in the validation prompt. Now we have added graphical POI selection control to the prompt. Users can now use the graphic or droplist menu to make their primary impact selection. Once selected, Jumpstart continues automatically. To use Mobile Jumpstart:
|
|
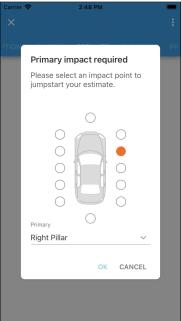
Photo Estimate Requests: Updated Support for Consumer Photos
For shops with Carwise Photo Estimate enabled, consumers are asked to capture vehicle damage photos when requesting on online estimate via Carwise.com. Previously, consumer supplied photos were pre-labeled with a position label on the CCC ONE workfile. To improve usability when shops capture their own damage photos via the mobile app or cccone.com, consumer photos are now added to the workfile as "Additional Photos" rather than the standard pre-labeled vehicle positions. Consumer supplied photos will continue to be labeled with the vehicle position. However, they will also include the prefix "Consumer."
To access this feature:
|
|
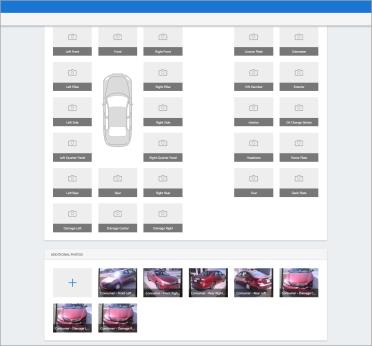
You'll find the photos the consumer took in the Additional Photos section. Now, the shop can easily take their own photos by selecting the desired vehicle position (e.g., Left Front, Front, etc.).
Note:
- To receive online photo estimate requests, the shop must have Carwise enabled and turned on online photo estimate features in their Carwise profile.
- To access online photo estimate features the shop must have the following licensed product: CCC Engage.
- The photo label on consumer supplied photos is the same in all application platforms - desktop, mobile, and cccone.com. However, photo position thumbnails and "Additional Photos" category are only supported in the mobile app and on cccone.com.
Quickly find your CCC Team members. Go to http://www.cccis.com/collision-repairers/team/ and follow the screen instructions.
