What's New in CCC® Estimating for October 2023
Click here to view the What’s New release notes for CCC® Estimating.
Note: The availability of the features listed below may vary based on the products licensed to your company.
CCCONE.COM - Web Estimating
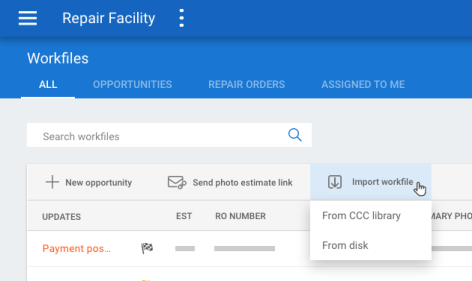
Import from CCC Library
Users can now import workfiles from the CCC Library. This allows users to request workfile copies from the insurance company that can be imported into CCC ONE and edited by the repair facility.
To request workfile copy from the CCC Library:
- Go to the Workfiles screen on cccone.com.
- Select Import workfile, then From CCC library.
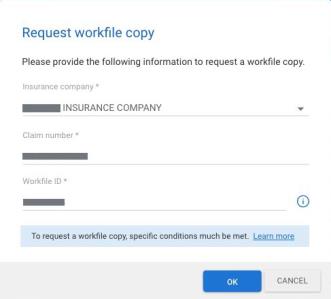
- In the Request workfile copy screen, select Insurance company.
- Enter the workfile Claim number.
- Enter the Workfile ID, then click OK.
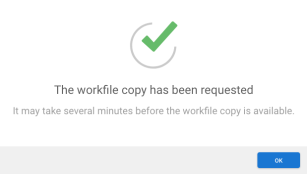
Your request for the workfile is submitted and processed. When successfully processed, the workfile automatically appears in the Workfiles screen with a status of "Copied workfile" in the Updates column.
Note:
- User must have the following security permission to import workfiles from CCC Library: Enable import/export EMS and workfile copy on cccone.com
- Similar to CCC ONE Desktop, request for workfile copy from the CCC Library may take 15 minutes to an hour before the workfile is imported and available for edit
- Once a workfile successfully imports, it is available for edit on all CCC ONE applications for repair facilities
Support for Generic Vehicle
Now you can write estimates for generic vehicles on cccone.com. Estimates may be written using the generic parts database for car, truck, or van. If MOTOR data is available, you can also write generic estimates using parts data for a specific year and make (e.g., 2024 Ford).
To write a generic vehicle estimate:
- Create a New Workfile.
- Go to the Vehicle screen and click Select vehicle.
- Optionally enter a value in the VIN field and click Next.
- Change the Vehicle option from Standard to Generic.
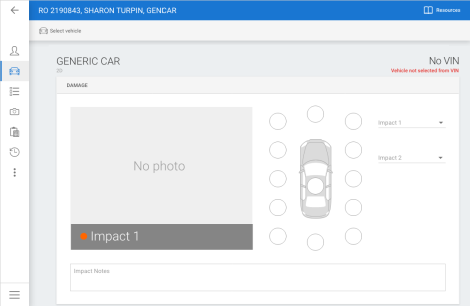
- Select Type Car, Truck, Van or Unknown.
- Optionally enter Year and Make.
- Select Chapter.
- Optionally enter Body Style and Engine, then click Next.
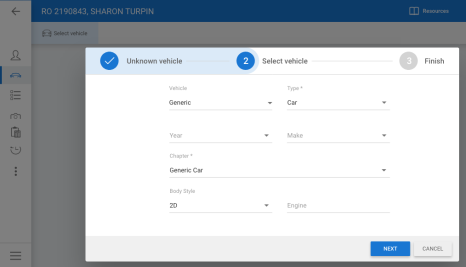
- Click Done.
Now you're ready to write an estimate. Go to the Estimate screen where you can add and edit parts from the database as usual.
Note: User must have the following security permission to edit the workfile and write a generic vehicle estimate: Create and edit workfiles
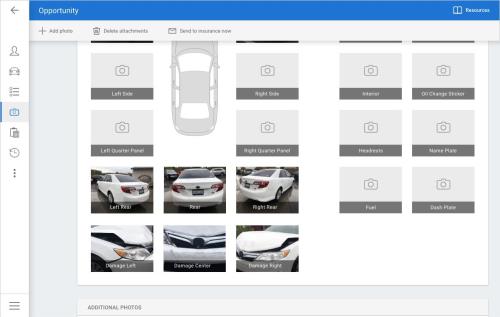
Workfile Photos: New Position Thumbnails
You can now add pre-labeled images for Damage Left, Damage Center, and Damage Right photos to the workfile in cccone.com. The new placeholders appear immediately below the twelve (12) impact placeholders on the Photos screen.
To add a pre-labeled photo:
- Open a workfile and go to the Photos screen.
- Select one of the pre-labeled thumbnails without a photo.
- Browse for and select the photo file you want to add.
- Save your changes to the workfile.
Note: Only users with the following security permission may add photos to the workfile: Create and edit workfile
Estimating Hotkeys
cccone.com now supports the estimating shortcut and hotkey functions to execute common actions while editing the estimate and viewing photos.
While in the estimate screen, the following keys execute the action described:
- Delete: Deletes the selected estimate line.
When the MOTOR database is in view, the following keys execute the action described:
- G: Opens the MOTOR Guide to Estimating.
After selecting a part row in the MOTOR database, the following keys execute the action described:
- Enter/Return: Same as "Replace" - Adds the selected part to the estimate with "Replace" operation.
- A: Same as "Add with changes" - Adds the selected part to the estimate and displays Line Properties for edit.
- B: Adds the selected part to the estimate with no operation.
- D: Adds the selected part to the estimate with "Blend" operation.
- E: Adds the selected part to the estimate with "Replace" operation and "Recore" prefix, then displays Line Properties for edit.
- F: Adds the selected part to the estimate with "Replace" operation and labor type "Frame". Paint labor is not affected.
- G: Opens the MOTOR Guide to Estimating.
- I: Adds the selected part to the estimate with "Replace" operation and sets labor to "Incl". Paint labor is not affected.
- J: Same as "Refinish" - Adds the selected part to the estimate with "Refinish" operation and displays Line Properties for edit.
- M: Adds the selected part to the estimate with "Replace" operation and labor type "Mechanical". Paint labor is not affected..
- R: Same as "Repair" - Adds the selected part to the estimate with "Repair" operation.
- S: Same as "Section" - Adds the selected part to the estimate with "Section" operation.
- T: Same as "R&I" - Adds the selected part to the estimate with "R&I" operation.
- U: Adds the selected part to the estimate with "Replace" operation and labor type "Structural". Paint labor is not affected.
- Shift + 5 (i.e., %) - Adds the selected part to the estimate with "Replace" operation, then opens Line Properties to the Adjustment tab for edit.
Estimating Hotkeys (continue)
When viewing photos in the large image viewer:
- Alt + N: Displays the next photo.
- Alt + R: Displays the previous photo.
Note:
- Hotkey functionality related to editing estimate details is only available to users with the following security permission: Create and edit workfiles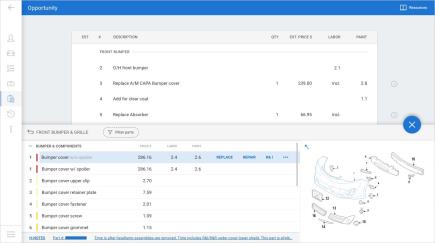
- The large image viewer may be accessed by clicking any photo thumbnail in the workfile Photos screen, or by clicking the photo thumbnail displayed in the lower right-hand corner of the Estimate screen.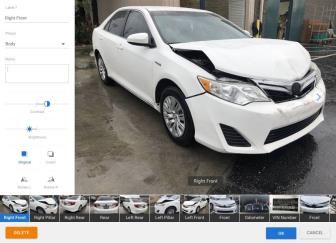
Checkout: Require "Convert to Job"
For shops without Repair Workflow (i.e., Estimating only shops), workfiles must now be converted to a job before using Checkout. If the user selects the Checkout action and the workfile has not been converted, a prompt is displayed asking the user to convert to job first.
To access this feature:
- Open a workfile that has not been converted to job yet.
- Select Checkout.
- When prompted to convert to job, select Convert.
![]()
Once converted to job, Checkout is launched and the user may place electronic orders for parts as desired.
Note: Users must have the following security permission to convert workfiles to jobs: Workfiles - Create and edit workfiles
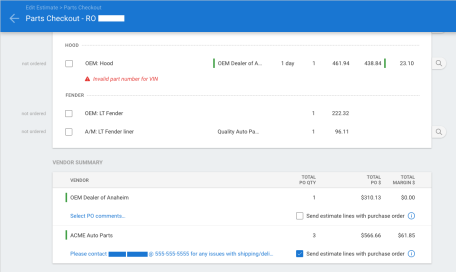
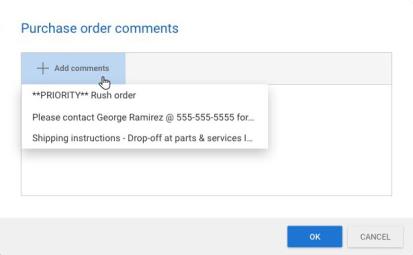
Checkout: Rename "PO Footer" to "PO Comments"
Users will now see “PO Comments” as the term associated with notes added to the purchase order. Previously the terminology was “PO Footer.” This terminology update applies to the Vendor detail screen and purchase orders created through Checkout.
To access vendor settings:
- Go to Settings and select Vendors.
- Search for and select a vendor to edit.
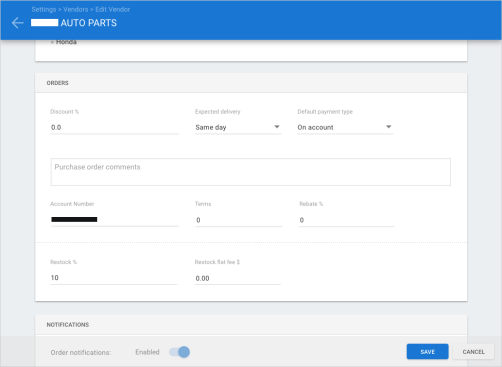
- Edit vendor settings, including default PO Comments, as desired.
To add comments to a purchase order in Checkout:
|
|
|
|
Note:
- User must have the following security permission to edit vendor settings: Vendors - Create, search, view, edit, and deactivate vendors
- User must have the following security permissions to order parts through checkout:
- Workfiles - Create and edit workfiles
- Purchase orders - Create, search, view, and void purchase orders
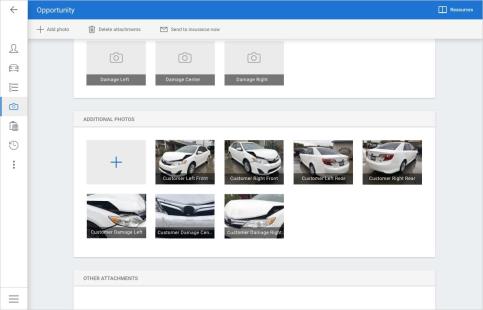
Carwise Appointments
When a customer schedules an appointment through Carwise, they may have taken photos of the damage to their vehicle when filling out the request for an appointment. These photos are now included on the workfile when the appointment request is received.
To access this feature:
- In the Workfiles screen, search for and select a workfile where Carwise appointment appears in the Updates column.
- Open the workfile to edit/view.
- Go to the Photos screen.
Photos taken by the customer appear under Additional Photos. You can expect to see the four corners of the vehicle plus three damage close-ups. Photos captured by the customer are labeled as follows:
|
|
Note:
- Photos captured by the customer are not automatically selected to share with the customer
- Only Carwise appointments booked through the Online Estimate action will include photos from the customer
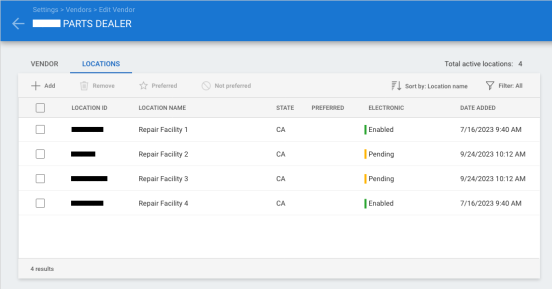
Electronic vendors update
Electronic ordering will now be enabled for all electronic vendors. Shops will no longer need to manually enable electronic ordering within the vendor profile.
To add an electronic vendor:
- Go to Settings on cccone.com.
- Select Vendors.
- Select Add, then select Part vendor.
- Search for and select an electronic vendor to add, then click OK.
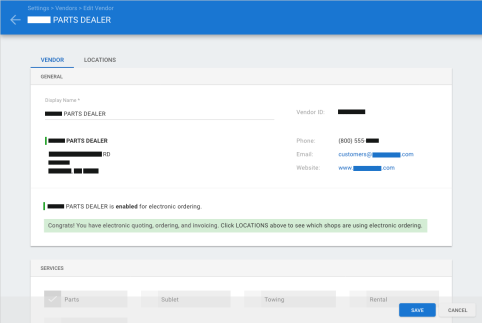
When an electronic vendor is activated for a new shop location, configuration by the vendor may be required. In this instance the shop's electronic ordering status is "Pending". Once configured by the vendor, the shop's status will automatically update to "Enabled".
For MSOs, some shop locations may be fully enabled for electronic ordering while others may be "pending." Electronic ordering status for each location is available on the Locations tab of the vendor profile.
To view electronic ordering status:
- From the Vendors screen, select an electronic vendor then click Edit.
- Click on the Locations tab.
- View ordering status in the Electronic column.
Note: The following security permission is required to edit vendors: Create, search, view, edit, and deactivate vendors
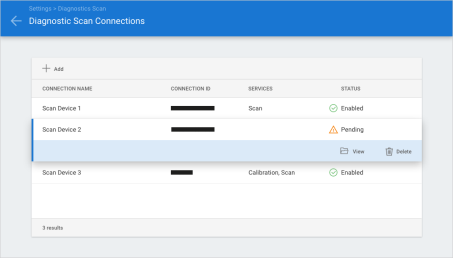
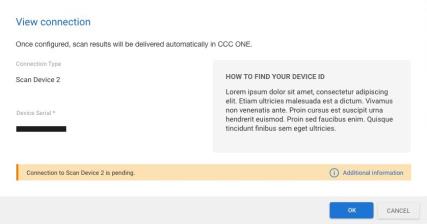
Diagnostic Connections "Pending" status
When adding a new diagnostic scanner to Diagnostic Connection settings, there may be a delay in activation by the device provider. When this occurs, the scan device will now show "Pending" status. The shop will also be provided with a description of what needs to occur for the device to become fully enabled. Once device status reaches "Enabled", results of diagnostic scans performed on the device will be available in CCC ONE.
|
To configure diagnostic scan devices:
|
|
|
|
If additional action is required, you'll be presented with the Connection pending... screen. Once all requirements have been met, device status will be updated to Enabled.
Note: The following security permission is required to edit Diagnostic Connections: Edit repairer profile or Edit repair facility profile
Online Appointments from Google
Shops with CCC Engage now have the ability to accept online appointments through Google. Settings to manage this feature reside in the shop's Carwise profile.
To update online scheduling settings:
- Go to Settings on cccone.com.
- Select Carwise Profile.
- Set Online estimate appointments with Carwise to Enabled, then click Configure.
- Set Online appointments from Google to Enabled, then click Save.
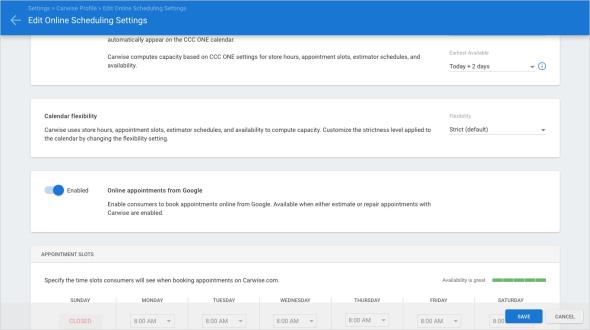
Once enabled, you'll be able to receive online estimate (or repair) appointments for your shop from Google.
Note:
- Shops that already have online appointments from Carwise enabled will automatically have online appointments from Google enabled
- If the shops chooses to disable online appointments from Carwise, online appointments from Google will also be disabled
- Users must have the following security permission to edit the Carwise profile: Edit repair facility profile
Updated Navigation Menu
cccone.com has redesigned the menu bar to enhance user experience and increase productivity — including favoriting often used features and providing access to additional actions, such as "Create” workfiles or opportunities.
The new menu has been designed to group features under specific business categories. Users also now have the ability to mark menu items as favorites. This feature enables faster access to frequently used screens. Favorites are customizable at the user-level, allowing individual users to design their menu to the specific needs of their personal workflow.
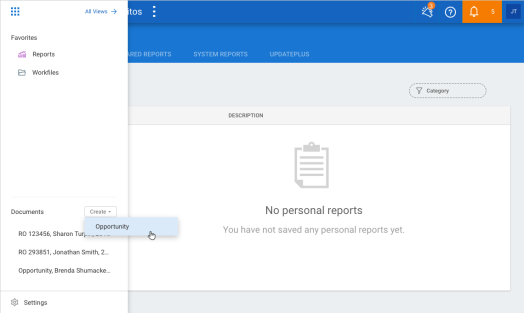
Keeping track of your recent workfile activities has also been simplified with adding a recent documents section in the menu. The last three documents access by the logged in user are listed, further adding to the personalized experience.
To access the enhanced menu:
- Log in to cccone.com.
- Click the application menu icon in the upper left-hand corner of the screen.
- Browse through and select menu items to navigate to the corresponding screen.
- To favorite an item, highlight the item and click the star on the right-hand side of the button.
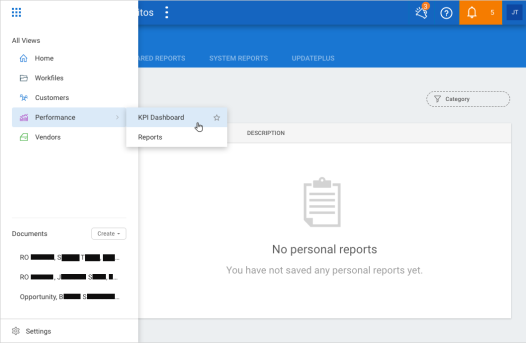
- Switch between favorites and the full menu by clicking the All views or Favorites links in the upper right-hand corner of the menu.
- Open recent workfiles by clicking the item under the Documents section.
- Create a new workfile by selecting the Create button.
Note:
- All users with access to cccone.com will experience the new menu.
- Menu defaults to Favorites when at least one item is marked as a favorite by the user.
- New categories and menu items will be introduced in upcoming releases.
- Additional actions will be introduced in the Create menu in upcoming releases.
DRP Scorecard and Indicators
Access to Estimatic Indicators and DRP Scorecard is now available on cccone.com. Just like the desktop application, selecting one of these options from the application menu will launch a new browser tab. Content for the selected dashboard is displayed in the new browser tab.
To launch Estimatic Indicators and DRP Scorecard:
- Log onto cccone.com.
- Select the menu icon in the upper left-hand corner of the screen.
- Select Performance.
- Select DRP Scorecard or Indicators.
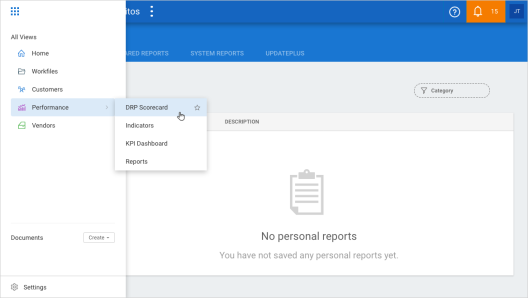
Tip: Access these views often? Select the star icon on the menu option to tag them as a favorite in the application menu.
Note:
- The following security permission is required to access DRP Scorecard and Indicators menu items: Indicators - Access DRP Scorecard and Indicators dashboards
- The CCC ONE user ID of the logged in user must be configured with appropriate portal roles to successfully launch DRP Scorecard and Indicators dashboards
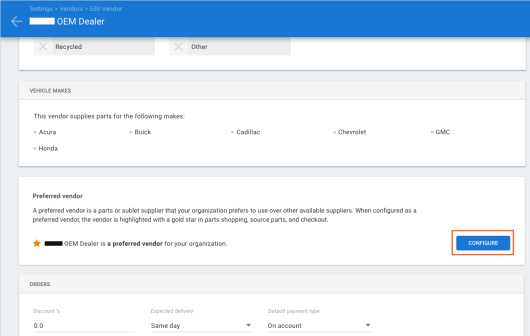
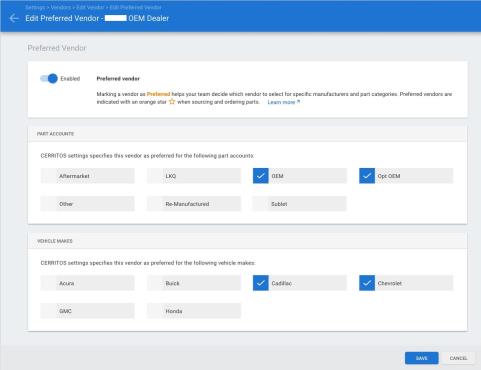
Preferred Vendors Configuration
Configuration for preferred vendors has been updated to better support preferred vendor settings across repair facility locations within an organization. We've also provided additional end-user facing content to clarify what it means to mark a vendor as preferred.
With these updates shops will see that:
- Vendor supported vehicle makes are now always displayed on the Vendor profile
- Preferred vendor settings are now defined in a separate screen
- MSOs can now customize preferred vendors settings by location
To mark a vendor as preferred:
- Go to Settings on cccone.com, then select Vendors.
- Add a new vendor or search for and select a vendor to edit.
- In the Vendor tab, scroll down to the Preferred vendor section and click Configure.
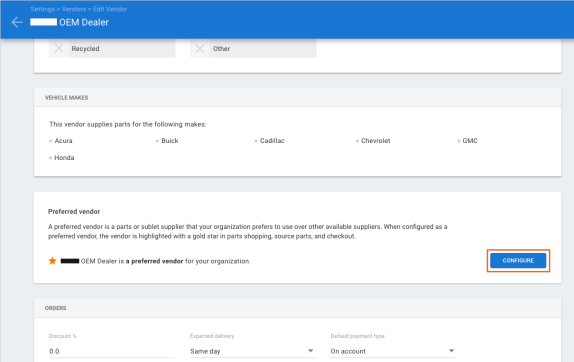
- Company default settings are displayed.
- Select the Part Accounts and Vehicle Makes for which the vendor is preferred.
- Choose whether or not you want new locations added to the vendor to be marked as preferred by default.
- Click Save in the bottom right-hand corner of the screen.
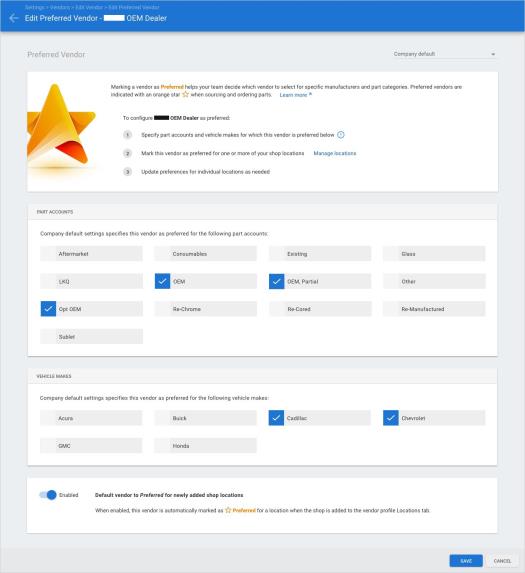
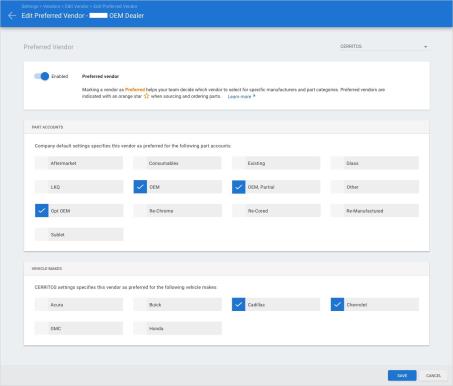
There are two ways you can update location level settings for a preferred vendor:
- From the Edit preferred vendor screen, use the location dropdown in the upper right-hand corner to select your location.
- From the Locations tab in the vendor profile, click on the link displayed in the Preferred column.
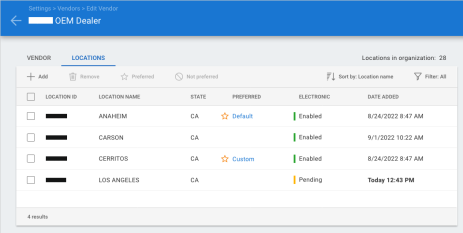
Once you are viewing location level settings you can:
- Change the preferred vendor setting to non-preferred.
- Customize part accounts and vehicle makes for which the vendor is preferred.
Note:
- You must have the following security permission to edit vendors: Create, search, view, edit, and deactivate vendors.
- You must have the following security permission to edit preferred vendor settings: Edit preferred vendors.
- There is no change to the shop's ability to mark a vendor as preferred from the vendor profile Locations tab - this functionality remains.
- Single-store organizations will not see the "Company default" screen when editing preferred vendor settings - only location level settings apply.
CCC ONE Desktop Release 40
Preferred Vendors for Estimating Only Shops
Preferred vendor configuration is now available to shops without Repair Workflow! This means all shops using CCC Estimating for Repair Facilities can now configure preferred vendors. Vendors that are marked as preferred will show an orange star next to the vendor name when using Shopping, Source Parts, and Checkout.
To mark a vendor as preferred:
- Go to Settings on cccone.com, then select Vendors.
- Add a new vendor or search for and select a vendor to edit.
- In the Vendor tab, scroll down to the Preferred vendor section and click Configure.
- Specify company default and/or location level settings.
- Click Save in the bottom right-hand corner of the screen.
When configuring preferred part accounts and vehicle makes, it's important to note that shops without Repair Workflow do not have the ability to configure Sales Part Accounts. As a result, part accounts available to configure are fixed. Available part accounts include:
- Aftermarket
- LKQ
- OEM
- Opt OEM
- Other
- Re-Manufactured
- Sublet
Note:
- You must have the following security permission to edit vendors: Create, search, view, edit, and deactivate vendors
- You must have the following security permission to edit preferred vendor settings: Edit preferred vendors
Blend: Support for Configurable Blend Rules
On April 28, 2023, MOTOR Information Systems announced a change to Color Blend (Adjacent Panels) procedures listed within the Guide to Estimating:
MOTOR Information Systems (MOTOR), a Hearst company, announced today it will make a change to the Estimated Worktime Development Methodology for color blend of adjacent panels within the MOTOR Guide to Estimating (GTE). The change is designed to account for variations in modern vehicle paint refinishing and will be made in October 2023 as part of the company’s standard GTE update schedule.
Per MOTOR’s revision, the refinish time associated with color blend of adjacent panels will defer to the judgement of an estimator or appraiser. This change impacts both two-stage and three-stage blend procedures.
Please refer to the following guides for details on how this impacts CCC® Estimating:
System Reports: Instant Estimate Cost Range
A new system report has been added to the Customer reports category for shops with CCC Engage. The report is called Instant Estimate Cost Range. The report provides details on workfiles generated through the Online Photo Estimate flow. Report data includes customer and vehicle information received from the customer when completing the online estimate request compared with actual values saved to the workfile in CCC ONE. Detail also includes the predicted instant estimate cost range provided to the customer and the action taken by the customer (i.e., get detailed estimate or book appointment).
To access this report:
- Log into the CCC ONE desktop application.
- Select the Reports menu, then select Find Report.
- Select Customer in the report category menu.
- Under System Reports, select Instant Estimate Cost Range.
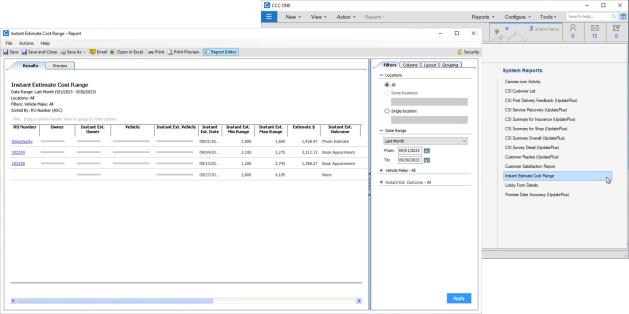
Note:
- This report is only available to shops with the following licensed feature: CCENG - CCC Engage.
- Only users with the following security permission may access this report: Customer - View customer reports.
- Report is available to run in desktop client versions prior to R40, however filtering capability is limited.
- Client versions R40 and above include the following filter: Instant Est. Outcome.
CCC Touch
Blend: Support for configurable blend rules
On April 28, 2023, MOTOR Information Systems announced a change to Color Blend (Adjacent Panels) procedures listed within the Guide to Estimating:
MOTOR Information Systems (MOTOR), a Hearst company, announced today it will make a change to the Estimated Worktime Development Methodology for color blend of adjacent panels within the MOTOR Guide to Estimating (GTE). The change is designed to account for variations in modern vehicle paint refinishing and will be made in October 2023 as part of the company’s standard GTE update schedule.
Per MOTOR’s revision, the refinish time associated with color blend of adjacent panels will defer to the judgement of an estimator or appraiser. This change impacts both two-stage and three-stage blend procedures.
Please refer to the following guides for details on how this impacts CCC® Estimating:
CCC Mobile RF
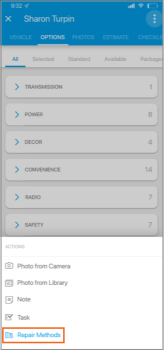
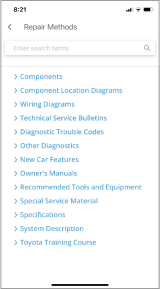
Repair Methods on RF Mobile (iOS)
Repair Methods are now available within the workfile on the RF Mobile app for iOS. For workfiles with a standard vehicle, the user can now view repair procedures.
|
To access this feature:
|
|
|
The Repair Methods screen is displayed with repair procedures for the vehicle year, make, and model listed on the workfile. within the Repair Methods screen the user can:
|
|
Note:
- Repair Methods is available to all standard and technician users with access to CCC ONE Mobile.
- Some procedures may not be available to view in the mobile app. When this occurs, a prompt is displayed with instruction to check Repair Methods in the desktop application.
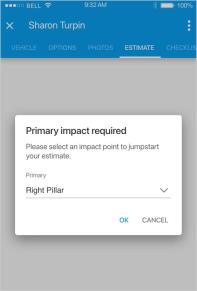
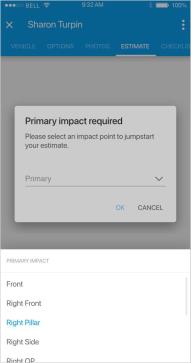
Mobile Jumpstart: Prompt for Primary Impact (iOS)
| A primary point of impact is required before writing an estimate using Mobile Jumpstart. If primary impact is missing when the user attempts to jumpstart an estimate, a prompt is now displayed to make the selection. Previously a simple validation error was displayed. The user had to go to the Vehicle screen, select primary impact, then try Jumpstart again. Now, the user can make their selection in the validation prompt. Once selected, Jumpstart continues automatically. |
|
|
To use Mobile Jumpstart:
- Log into the RF Mobile app.
- Open a workfile with a standard vehicle (or create a new one).
- Tap the Estimate tab.
- Tap Jumpstart.
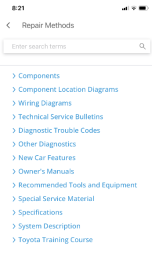
Repair Methods on RF Mobile (Android)
Repair Methods are now available within the workfile on the RF Mobile app for Android. For workfiles with a standard vehicle, the user can now view repair procedures.
|
To access this feature:
|

|
|
The Repair Methods screen is displayed with repair procedures for the vehicle year, make, and model listed on the workfile. within the Repair Methods screen the user can:
|
|
Note:
- Repair Methods is available to all standard and technician users with access to CCC ONE Mobile
- Some procedures may not be available to view in the mobile app. When this occurs, a prompt is displayed with instruction to check Repair Methods in the desktop application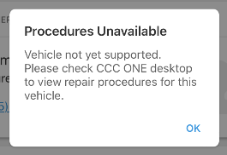
Mobile Jumpstart: Prompt for Primary Impact (Android)
|
A primary point of impact is required before writing an estimate using Mobile Jumpstart. If primary impact is missing when the user attempts to jumpstart an estimate, a prompt is now displayed to make the selection. Previously a simple validation error was displayed. The user had to go to the Vehicle screen, select primary impact, then try Jumpstart again. Now, the user can make their selection in the validation prompt. Once selected, Jumpstart continues automatically. |
|
|
To use Mobile Jumpstart:
- Log into the RF Mobile app.
- Open a workfile with a standard vehicle (or create a new one).
- Tap the Estimate tab.
- Tap Jumpstart.
Quickly find your CCC Team members. Go to http://www.cccis.com/collision-repairers/team/ and follow the screen instructions.
