What's New in CCC® Estimating for September 2023
Click here to view the What’s New release notes for CCC® Estimating.
Note: The availability of the features listed below may vary based on the products licensed to your company.
CCCONE.COM - Web Estimating
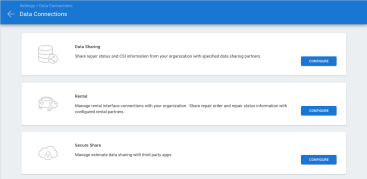
Settings - Data Connections
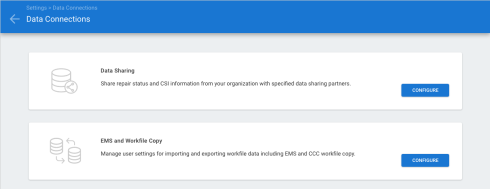
The new Data Connections tile on cccone.com gives users an additional convenient way to access certain settings from a single location.
|
|

Note:
- Existing access points on the main Settings screen for Secure Share, Rental, and Data Sharing are still available and remain unchanged.
- All users have access to the Data Connections landing page. However, user must have appropriate permission to edit settings launched from the page.
Part Price Changes
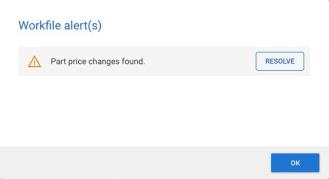
Part price changes can now be applied to the estimate in cccone.com for shops without repair order management features. Part price changes are detected when part price EMS or part provider XML files are imported to the CCC ONE desktop app. When opening a workfile with part price changes, an alert is displayed informing you that there are part price changes to review.
Part changes may include the following:
- Updated part type
- Updated part price
- Updated part number
- New and/or deleted parts due to recycled assembly sourced alternative
You can apply some or all of the part price changes to the estimate.
To view and apply part price changes:
- From the workfile search screen, open a workfile with Part Changes displayed in the Updates column.
- When the workfile opens, click the Resolve button on the part change alert.
- Check the box to either Apply or Discard the part change listed.
- To update the estimate, click the OK button.
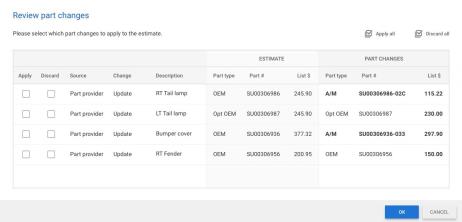
Selected part changes are applied to the estimate. Any part changes left unselected (i.e., neither applied or discarded) will remain available to apply later.
Note:
- Only users with "Create and edit workfile" permission may update the estimate with part price changes.
- This feature is not yet available for shops with Repair Order Management.
Updated Help Landing Page
Help and support links on cccone.com now launch the new CCC Estimating Training landing page.
- From the login screen, click the Support link in the lower left-hand side of the screen.
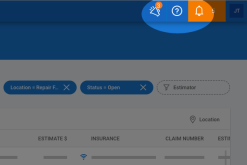
- From the main toolbar on cccone.com, click the Help (?) button in the upper right-hand corner.

Note:
- This feature is available to anyone with access to cccone.com.
- To view the CCC Estimating Training page click the following link: https://help.cccis.com/learning/rf/web/index.html
View Claim Status
Users now have the ability to launch ClaimTracker to view claim status on assignment workfiles from cccone.com. The "Claim Status" action is available on assignment workfiles only. When clicking the button, a new webpage is launched to ClaimTracker for the selected workfile.
To view claim status:
- Log onto cccone.com.
- Click the menu button in the upper left corner, then select Workfiles.
- Search for and select an assignment workfile in the results displayed.
- Click Claim Status.

Import Workfile Copy from Disk
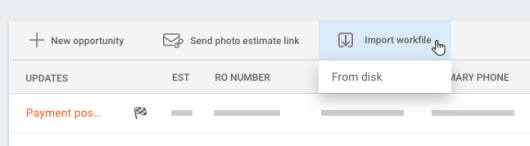
Users can now import workfile copy files from disk on cccone.com. Users with appropriate permission will now see an "Import workfile" button on the Workfiles screen.
To import workfily copy on cccone.com:
- Go to the Workfiles screen.
- Select Import workfile, then From disk.
- Enter the file path where your .AWE file is located.
- Select Import.

The workfile is imported and a new "Copied workfile" record appears in Workfile search results. Open and edit the workfile as desired.
Note:
- Only users with the following security permission can import workfile copy: Enable import/export EMS and workfile copy on cccone.com.
- The CCC ONE Data Transfer application is not required to import workfile copy from disk.
- Import from library is not yet available on cccone.com - stay tuned for this feature in an upcoming release.
Import & Export Workfile Data
Users now have the ability to import and export estimate EMS and workfile copy files from cccone.com. Users can:
- Import EMS assignments
- Import EMS part price changes
- Import part provider XML
- Export CCC workfile copies
- Import CCC workfile copies
Import & Export Workfile Data: Configuration
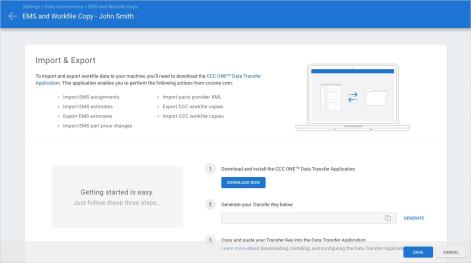
To import and export workfile data to your machine, you’ll need to download the CCC ONE Data Transfer Application. Then you'll need to configure your import and export directories in Data Connections settings.
To access import and export settings:
- Go to Settings on cccone.com.
- Select Data Connections.
- Click Configure on EMS and Workfile Copy.
Note:
- To access import and export settings on cccone.com you must have the following permission: Enable import/export EMS and workfile copy on cccone.com.
- Unlike the desktop application, import and export settings are specific to the logged in user.
- For detailed instructions on how to download & install the CCC ONE Data Transfer Application see this article: https://cccis.zendesk.com/hc/en-us/articles/17534585996180-Import-Export-Workfiles-on-cccone-com.
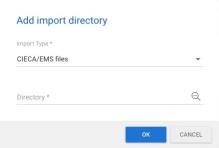
Importing EMS & Part Provider XML
To import assignment EMS, estimate EMS, and part provider XML, the CCC ONE Data Transfer application must be running on the device where import directories have been configured. The CCC ONE Data Transfer application will automatically process files found in the configured directories.
Note: The CCC ONE Data Transfer application is a Windows application. Import activity performed by the application is only supported on Windows devices.
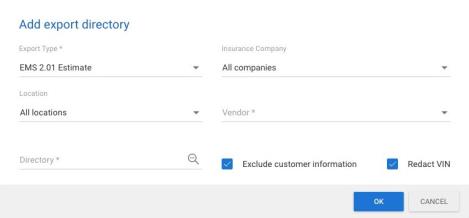
Exporting Estimate EMS
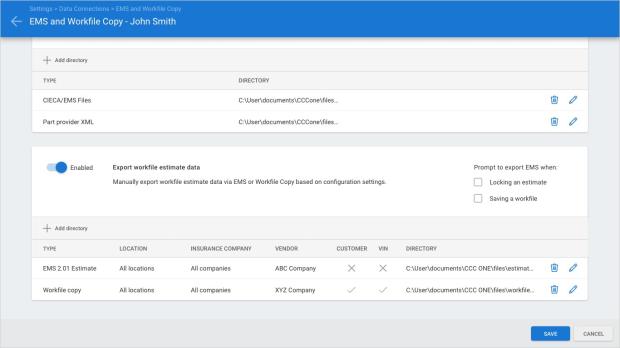
To export estimate EMS you must first configure your export directories. For each directory specified you'll need to define the following:
- Export type = EMS 2.01 Estimate
- Repair Facility location
- Insurance company
- Vendor
- Include or exclude customer information (personally identifiable information such as name, phone, address)
- Include full or redact VIN
- Directory path
When configuring your directories, you may choose to automatically prompt to export EMS when the workfile is saved and/or when an estimate is locked. You can manually export EMS from the workfile at any time.
To manually export estimate EMS:
- Open a workfile with an estimate.
- Select the menu button in the lower left-hand corner of the screen.
- Select Actions.
- Select Export EMS.
Whether prompted or manually executed, exported files will be dropped into configured directories.
Note: To export EMS the CCC ONE Data Transfer application must be running on the device where export directories are configured and the export action is taken.
Exporting CCC Workfile Copies
To export CCC workfile copies you must first configure your export directories. For each directory specified you'll need to define the following:
- Export type = Workfile Copy
- Repair facility location
- Directory path
To export CCC workfile copy:
- Open a workfile with an estimate.
- Select the menu button in the lower left-hand corner of the screen.
- Select Actions.
- Select Export workfile copy.
Exported files will be dropped into configured directories.

Note: To export CCC workfile copy the CCC ONE Data Transfer application must be running on the device where export directories are configured and the export action is taken.
CCC ONE Desktop Release 39
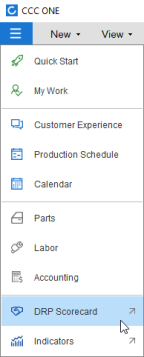
DRP Scorecard
Users now have access to the refreshed DRP Scorecard Dashboards powered by Tableau®.
Dealer Management: Dealer Activity with Payment Export
Several enhancements to have been made to Dealer Management Integration to expand functionality:
- Dealer Management System (DMS) activity is now available to view on the workfile.
- The workfile customer can be synced with the DMS Customer ID before RO close.
- The workfile vehicle can be synced with the DMS Vehicle ID before RO close.
- Payments (i.e., completed receipts) on the workfile can be exported to the DMS.
- Failed exports at RO closed can now be retried without re-opening the repair order.
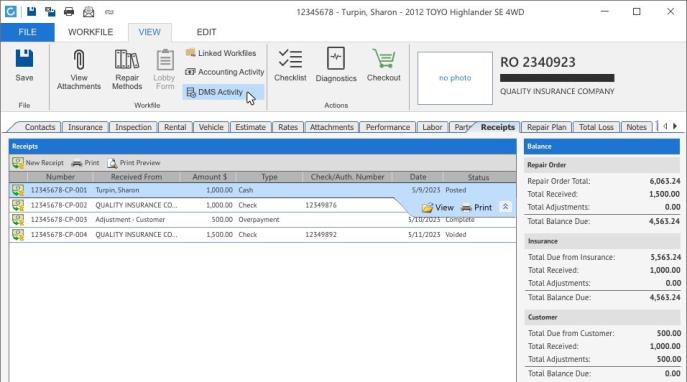
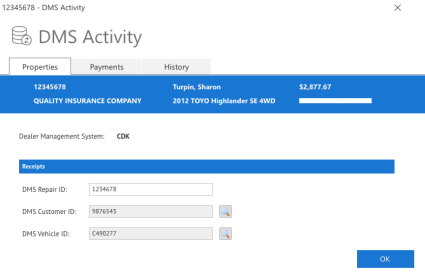
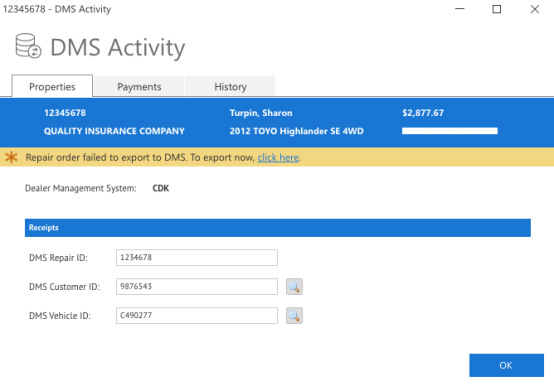
Once a workfile is converted to a repair order, access to view DMS Activity becomes available. The DMS Activity screen includes workfile DMS properties, payment tracking, and DMS transaction history.
To access DMS Activity:
- Open a repair order workfile.
- Select the View tab.
- Click DMS Activity.
From the DMS Activity screen, users can view the DMS Repair ID and add or edit the DMS Customer and DMS Vehicle IDs. This allows the user to sync the workfile customer and vehicle records with corresponding DMS records before closing the RO.
To add the DMS Customer and/or Vehicle ID:
- Click the DMS Activity button on an open repair order.
- Select the search button next to DMS Customer ID or DMS Vehicle ID.
- If the DMS returns existing matching records, select one of the results returned or choose the action to export the information from the workfile as a new record to the DMS.
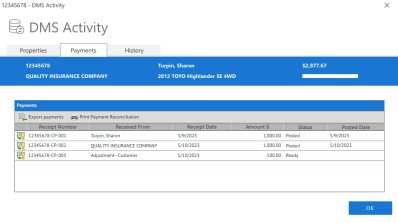
The DMS Activity screen provides visibility to all payments saved to the workfile, including date posted to the DMS. From this screen, users can export all payments that haven't been posted to the DMS yet. Any payment with "Ready" or "Failed" status will be exported to the DMS. If a payment has not been posted prior to RO close, the payment will automatically be exported as part of the RO close process.
To export payments before RO close:
- Click the DMS Activity button on an open repair order.
- Select the Payments tab.
- Select Export payments in the toolbar.
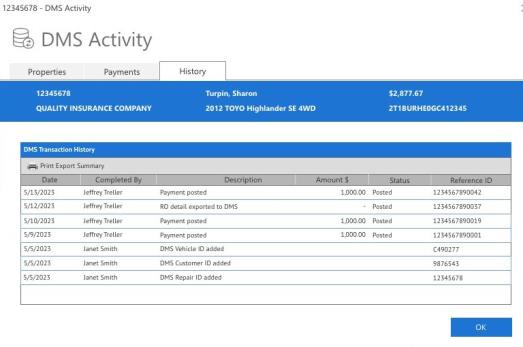
The DMS Activity screen also provides a ledger of DMS events that have occurred on the workfile. Events are displayed in chronological order, newest activity listed first. Each event listed includes the event date, an event description, and the name of the user that completed the action. For payments you'll also see the payment amount, status, and a transaction reference ID.
To view DMS event history:
- Click the DMS Activity button on an open repair order.
- Select the History tab.
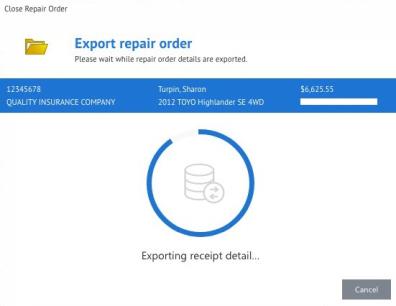
Lastly, the DMS Activity screen provides the ability to retry exporting the RO to the DMS if export failed when closing the repair order. The DMS Activity screen will display an orange warning bar with a link to retry the export.
To retry export on a closed repair order:
- Click the DMS Activity button on a closed repair order.
- Select click here in the orange warning bar.
CCC ONE will attempt to export the workfile to the DMS again. This action is only available if the prior export failed.

Note:
- DMS Activity and payment export features are only available to shops with the following license feature code: CCDMS - Dealer Management System Integration.
- Existing DMS Integration functionality for converting to repair orders and close repair orders remains unchanged. Functionality described above is new, added functionality.
- To export payments to the DMS, the shop location must add payment accounts to their configuration on cccone.com under Settings > DMS Connection.
- Payment export functionality is currently only available for CDK Global.
- DMS Activity is available on the workfile regardless of whether or not payment export functionality is enabled.
Diagnostics: Dashboard Calibration Queues
There are two new Calibration queues in the Diagnostics Dashboard. The new queues provide improved visibility to calibration exceptions on workfiles.
No Calibration Event This list includes workfiles without a calibration scan event. The estimate may or may not include a line for a calibration operation. A workfile will appear in this queue when:
- Workfile does not contain any calibration events.
- Workfile does not appear in any Pre-Repair Scan queue.
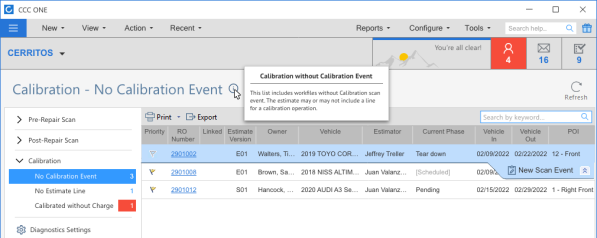
A workfile may ultimately have multiple calibration events. When even one calibration event is saved to the workfile, the workfile is removed from the No Calibration Event queue.
No Estimate Line This list includes workfiles without a calibration line on the estimate. Workfiles in this list may or may not have a calibration event. A workfile will appear in this queue when:
- Workfile does not contain any calibration operations on the estimate.
- Workfile does not appear in any Pre-Repair Scan queue.
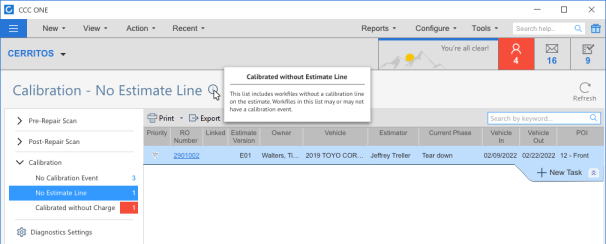
A workfile may ultimately have multiple calibration line items on the estimate. When even one calibration operation is added to the estimate, the workfile is removed from the No Estimate Line queue.
To access this feature:
- Access the Diagnostic Dashboard.
- Select Calibration on the left-hand side of the screen.
Note:
- The Diagnostics Dashboard is only available to shops with the following license feature code: DGNWF - Diagnostic Workflow.
- Users must have the following security permission to access the Diagnostic Dashboard: Diagnostics Dashboard - Manage diagnostic exceptions on workfiles.
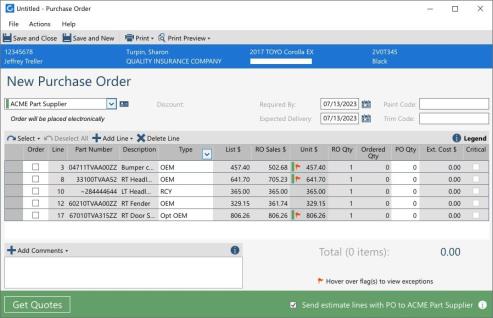
Checkout: Require "Convert to Job" for Checkout
For shops without Repair Workflow (i.e., Estimating only shops), workfiles must now be converted to a job before using Checkout. If the user selects the Checkout action and the workfile has not been converted, a prompt is displayed asking the user to convert to job first.
To access this feature:
- Open a workfile that has not been converted to job yet.
- Select Checkout.
- When prompted to convert to job, select Convert.

Once converted to job, Checkout is launched and the user may place electronic orders for parts as desired.
Note: Users must have the following security permission to convert workfiles to jobs: Workfiles - Created and edit workfiles.
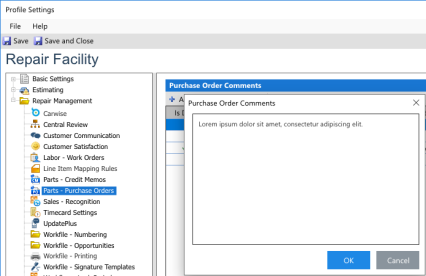
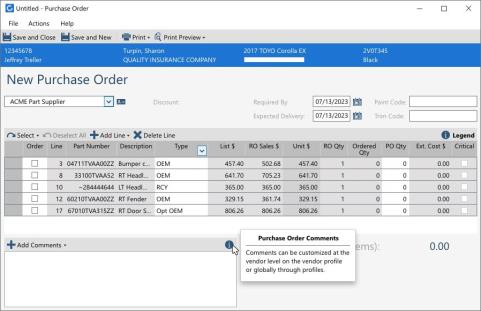
Purchase Orders: Rename "PO Footer" to "PO Comments"
Users will now see PO Comments as the term associated with notes added to the purchase order. Previously the terminology was PO Footer. This terminology update applies to the purchase order document and purchase order settings in the repair facility profile.
To access purchase order settings:
- Search for and select a repair facility profile, then select Edit.
- Click on Parts - Purchase Orders.
- Add, edit, and delete purchase order comments settings as desired.
To add comments to a manual purchase order:
- Open a repair order workfile.
- Select the New Purchase Order action.
- Add or edit comments in the text box displayed in the lower left-hand corner.
Note:
- User must have the following security permission to edit purchase order settings: Profiles - Edit repair facility profiles.
- User must have the following security permission to create purchase orders: Purchase orders - Create, search, view, and void purchase orders.
- Purchase order comments are sent to the vendor when placing electronic orders.
Quickly find your CCC Team members. Go to http://www.cccis.com/collision-repairers/team/ and follow the screen instructions.
